Духовые шкафы Whirlpool OASKC8V1SWBLG - инструкция пользователя по применению, эксплуатации и установке на русском языке. Мы надеемся, она поможет вам решить возникшие у вас вопросы при эксплуатации техники.
Если остались вопросы, задайте их в комментариях после инструкции.
"Загружаем инструкцию", означает, что нужно подождать пока файл загрузится и можно будет его читать онлайн. Некоторые инструкции очень большие и время их появления зависит от вашей скорости интернета.

EN
Quick guide
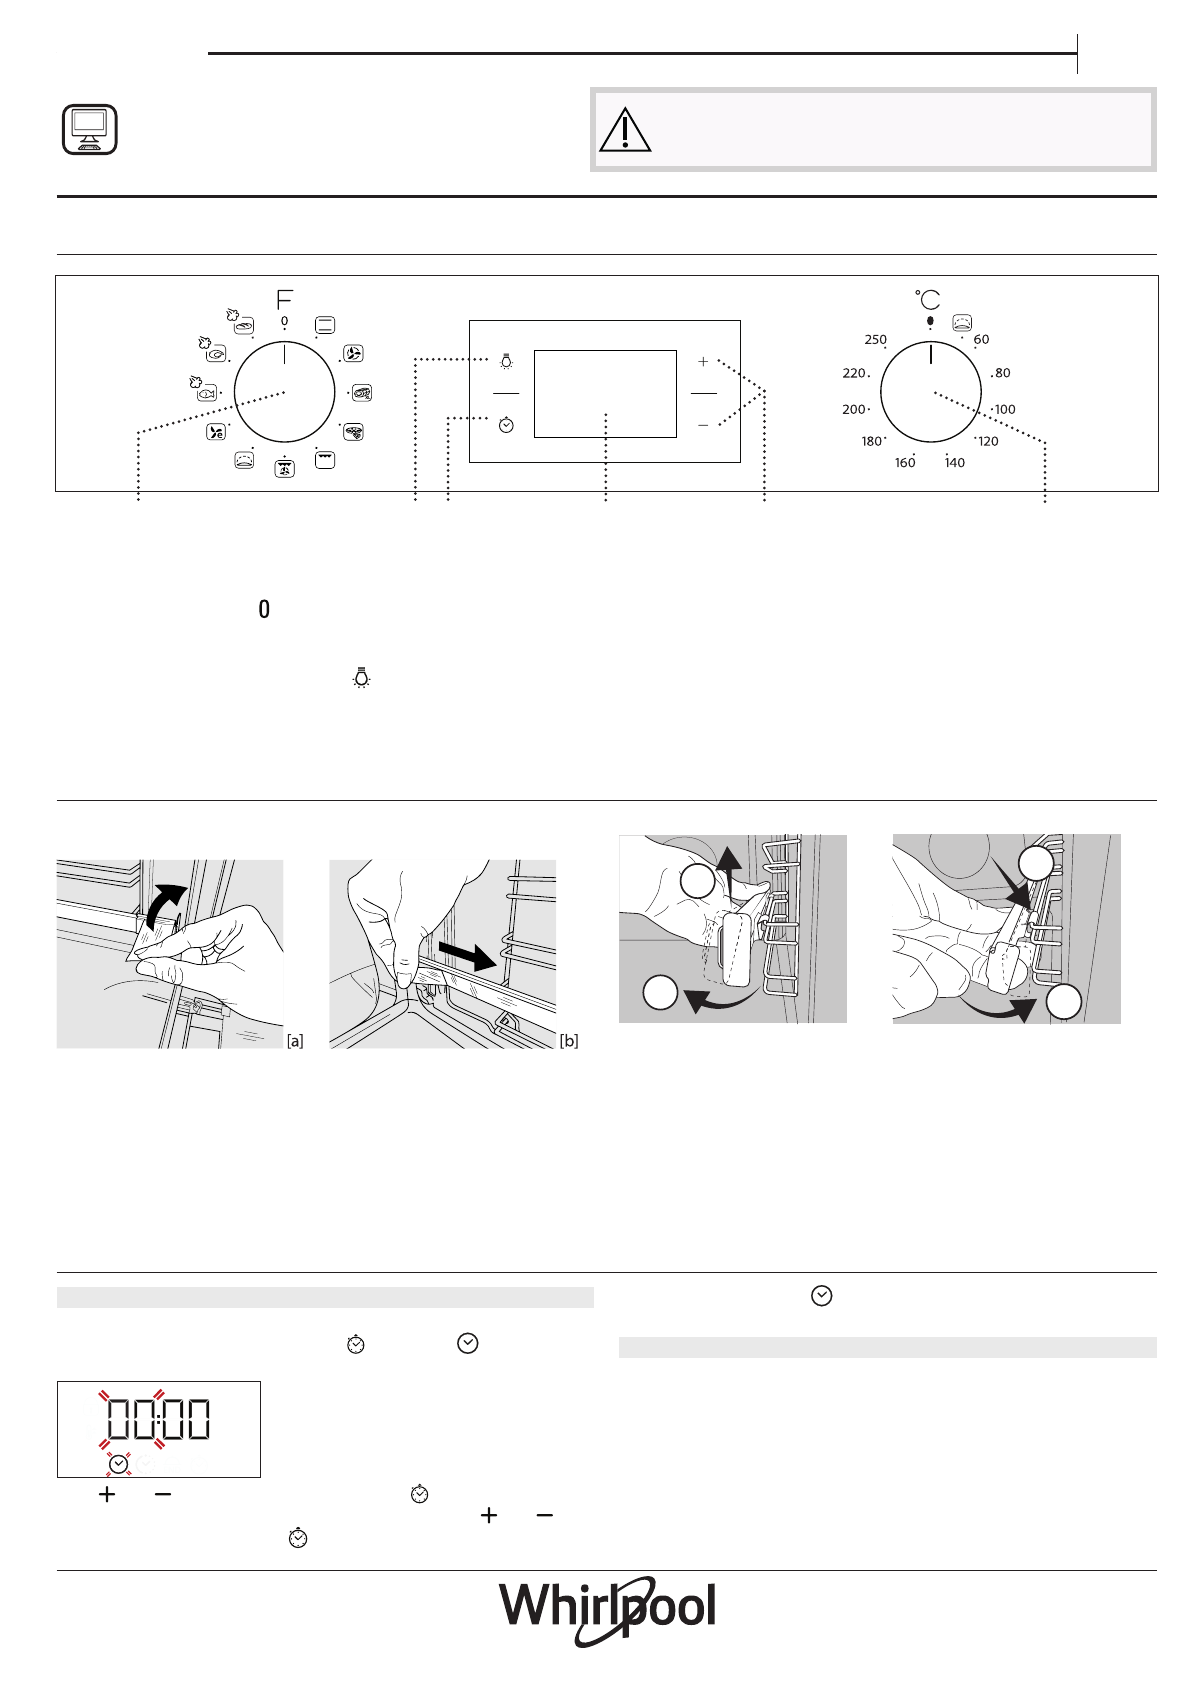
SLIDING RUNNERS AND SHELF GUIDES
Before using the oven remove the protective tape [a] and then
remove the protective foil [b] from the sliding runners.
REMOVING THE SLIDING RUNNERS [c]
Pull the lower part of the sliding runner to uncouple the lower
hooks (1) and pull the the sliding runners upwards, removing
them from the upper hooks (2).
REFITTING THE SLIDING RUNNERS [d]
Hook the upper hooks on the shelf guides (1) then press the
lower part of the sliding runners against the shelf guides, until
the lower hooks are clicking (2).
1
2
1
2
[c]
[d]
REMOVING AND REFITTING THE SHELF GUIDES
1. To remove the shelf guides, firmly grip the external part of
the guide, and pull it towards you to extract the support and
the two internal pins from the lodging.
2. To reposition the shelf guides, position them near the cavity
and initially insert the two pins into their lodgings. Next,
position the external part near its lodging, insert the support,
and firmly press towards the wall of the cavity to make sure
the shelf guide is properly secured.
FIRST TIME USE
1. SET TING THE TIME
You will need to set the time when you switch on the
appliance for the first time: Press
until the
icon and the
two digits for the hour start flashing on the display.
Use
or
to set the hour and press
to confirm. The
two digits for the minutes will start flashing. Use
or
to
set the minutes and press
to confirm.
Please note: When the
icon is flashing, for example following
lengthy power outages, you will need to reset the time.
2. HEAT THE OVEN
A new oven may release odours that have been left behind
during manufacturing: this is completely normal.
Before starting to cook food, we therefore recommend
heating the oven with it empty in order to remove any
possible odours. Remove any protective cardboard or
transparent film from the oven and remove any accessories
from inside it.
Heat the oven to 250 °C for about one hour. The oven must be
empty during this time.
CONTROL PANEL DESCRIPTION
1
3
2
4
5
6
1. SELECTION KNOB
For switching the oven on by selecting
a function. Turn to the
position to
switch the oven off.
2. LIGHT
With the oven switched on, press
to turn the oven compartment lamp on
or off.
3. SETTING THE TIME
For accessing the cooking time settings,
delayed start and timer.
For displaying the time when the oven
is off.
4. DISPLAY
5. ADJUSTMENT BUTTONS
For changing the cooking time settings.
6. THERMOSTAT KNOB
Turn to select the temperature you
require when activating manual
functions.
Please note: The knobs are retractable. Press
the knobs in the middle and they pop up.
THANK YOU FOR BUYING A WHIRLPOOL
PRODUCT
In order to receive a more complete
assistance, please register your product on
www . whirlpool . eu/register
Before using the appliance carefully read the Safety
Instruction.
Характеристики
Остались вопросы?Не нашли свой ответ в руководстве или возникли другие проблемы? Задайте свой вопрос в форме ниже с подробным описанием вашей ситуации, чтобы другие люди и специалисты смогли дать на него ответ. Если вы знаете как решить проблему другого человека, пожалуйста, подскажите ему :)


