
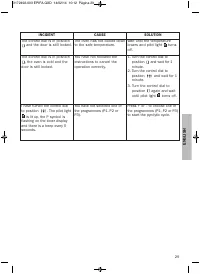
Духовые шкафы Teka HPL 840 - инструкция пользователя по применению, эксплуатации и установке на русском языке. Мы надеемся, она поможет вам решить возникшие у вас вопросы при эксплуатации техники.
Если остались вопросы, задайте их в комментариях после инструкции.
"Загружаем инструкцию", означает, что нужно подождать пока файл загрузится и можно будет его читать онлайн. Некоторые инструкции очень большие и время их появления зависит от вашей скорости интернета.


24
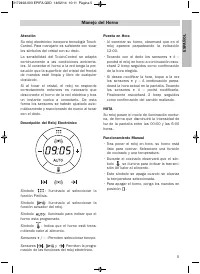
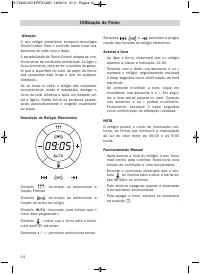
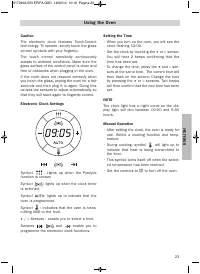
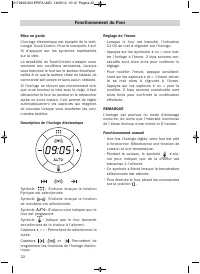
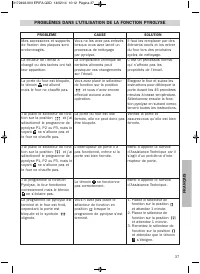
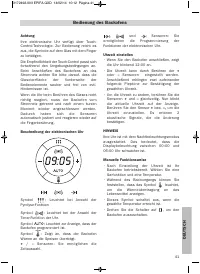
Electronic Clock Settings
Timer Alarm:
The alarm will go off at the pro-
grammed time, even if the oven has finished
cooking.
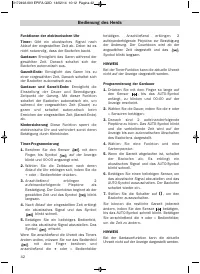
Cooking Time:
This function allows you to pro-
gramme the cooking time, after which the
oven will turn off automatically.
Cooking Stop Time:
This setting allows you to
programme the time for cooking to stop, after
which the oven will turn off automatically.
Cooking Time and Cooking Stop Time:
This
setting allows you to programme the cooking
time and cooking stop time. The oven switches
on automatically at the set time and operates
for the selected cooking time (Cooking Time).
It then switches off automatically at the indi-
cated time (Cooking Stop Time).
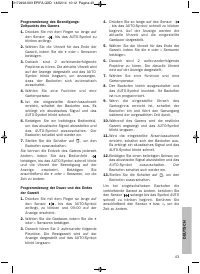
Child Safety Function.
This function locks the
electronic clock, preventing small children
from playing with it.
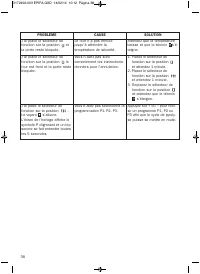
Programming the Timer Alarm
1.
Touch sensor
with your finger tip until
symbol
star ts flashing on the display.
The clock will also flash 00:00.
2.
Select the time after which you want the
alarm to sound by pressing the
+
or
–
sen-
sor.
3.
You will hear 2 beeps to confirm that the
time has been set. The clock will star t
counting down from the selected time and
symbol
will flash slowly.
4.
When the time is up, the alarm will go off
and symbol
will flash quickly.
5.
Touch any sensor to stop the alarm.
Symbol
will switch off.
If you want to change the timer alarm, simply
touch sensor
with your finger tip and
then press the
+
or
–
sensor. You will hear 2
beeps to confirm that the time has been chan-
ged. The clock will star t counting down from
the new time and symbol
will flash
slowly.
NOTE
You cannot see the current time on the display
when the timer alarm is set.
Programming Cooking Time
1.
Touch sensor
with your finger tip until
the AUTO symbol star ts to flash and 00:00
appears on the display.
2.
Select the cooking time by pressing the
+
or
–
sensor.
3.
You will hear 2 beeps, the AUTO symbol will
flash slowly and the display will show the
time left before the oven switches off auto-
matically.
4.
Select a cooking function and temperature.
5.
Once the cooking time is up, the oven will
turn off, an alarm will sound and the AUTO
symbol will flash quickly.
6.
Touch any sensor to stop the alarm and to
turn off the AUTO symbol. The oven will
switch on again.
7.
Set the controls to
to turn off the oven.
You can change the remaining cooking time at
any time by touching sensor
with your fin-
ger tip until the AUTO symbol star ts to flash
quickly. Now touch the
+
or
–
sensor to change
the time.
NOTE
You cannot see the current time on the display
when the cooking time is set.
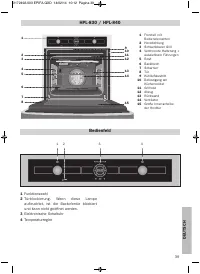
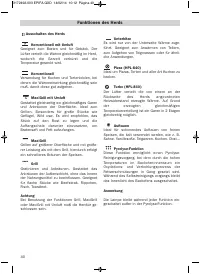
Use of the Oven
3172492-003 EPIFA.QXD 14/02/14 10:12 Página 24
Характеристики

Остались вопросы?Не нашли свой ответ в руководстве или возникли другие проблемы? Задайте свой вопрос в форме ниже с подробным описанием вашей ситуации, чтобы другие люди и специалисты смогли дать на него ответ. Если вы знаете как решить проблему другого человека, пожалуйста, подскажите ему :)


