
Духовые шкафы Monsher MOER 6091 C - инструкция пользователя по применению, эксплуатации и установке на русском языке. Мы надеемся, она поможет вам решить возникшие у вас вопросы при эксплуатации техники.
Если остались вопросы, задайте их в комментариях после инструкции.
"Загружаем инструкцию", означает, что нужно подождать пока файл загрузится и можно будет его читать онлайн. Некоторые инструкции очень большие и время их появления зависит от вашей скорости интернета.

6
English
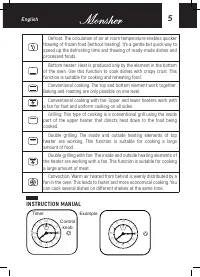
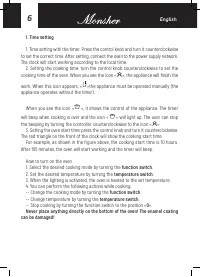
1. Time setting
1. Time setting with the timer. Press the control knob and turn it counterclockwise
to set the correct time. After setting, connect the oven to the power supply network.
The clock will start working according to the local time.
2. Setting the cooking time: turn the control knob counterclockwise to set the
cooking time of the oven. When you see the icon « », the appliance will finish the
work. When this icon appears: « »the appliance must be operated manually (the
appliance operates without the timer).
When you see the icon «
165
», it shows the control of the appliance. The timer
will beep when cooking is over and the icon «
0
» will light up. The user can stop
the beeping by turning the controller counterclockwise to the icon « »
3. Setting the oven start time: press the control knob and turn it counterclockwise.
The red triangle on the front of the clock will show the cooking start time.
For example, as shown in the figure above, the cooking start time is 10 hours.
After 165 minutes, the oven will start working and the timer will beep.
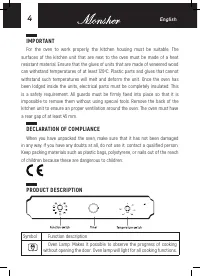
How to turn on the oven
1. Select the desired cooking mode by turning the
function switch
.
2. Set the desired temperature by turning the
temperature switch
.
3. When the lighting is activated, the oven is heated to the set temperature.
4. You can perform the following actions while cooking:
-- Change the cooking mode by turning the
function switch
.
-- Change temperature by turning the
temperature switch
.
-- Stop cooking by turning the function switch to the position «
0
».
Never place anything directly on the bottom of the oven! The enamel coating
can be damaged!
Содержание
- 13 СОВЕТЫ ПО БЕЗОПАСНОМУ ИСПОЛЬЗОВАНИЮ; вилку кабеля питания из розетки.; УСТАНОВКА ДУХОВКИ В КУХОННОЙ МЕБЕЛИ
- 14 ВАЖНО
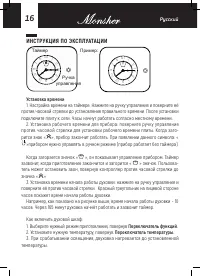
- 16 ИНСТРУКЦИЯ ПО ЭКСПЛУАТАЦИИ; Установка времени; Когда загорается значок «; Переключатель функций.; Установите нужную температуру, повернув; Переключатель температуры.
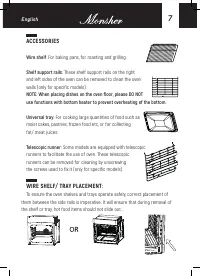
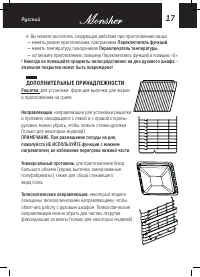
- 17 ДОПОЛНИТЕЛЬНЫЕ ПРИНАДЛЕЖНОСТИ:
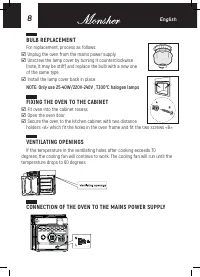
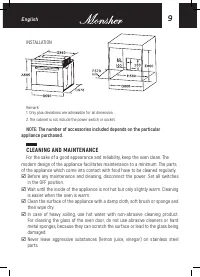
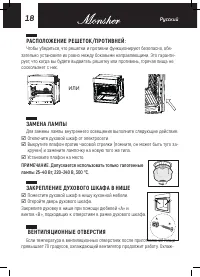
- 18 ЗАМЕНА ЛАМПЫ; Отключите духовой шкаф от электросети.; ПРИМЕЧАНИЕ. Допускается использовать только галогенные; ЗАКРЕПЛЕНИЕ ДУХОВОГО ШКАФА В НИШЕ; Поместите духовой шкаф в нишу кухонной мебели.; ВЕНТИЛЯЦИОННЫЕ ОТВЕРСТИЯ
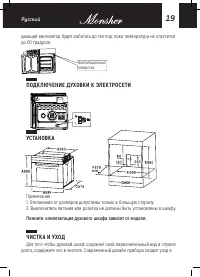
- 19 ПОДКЛЮЧЕНИЕ ДУХОВКИ К ЭЛЕКТРОСЕТИ; Помните: комплектация духового шкафа зависит от модели.; ЧИСТКА И УХОД


