Духовые шкафы Korting OKB 591 CSGW - инструкция пользователя по применению, эксплуатации и установке на русском языке. Мы надеемся, она поможет вам решить возникшие у вас вопросы при эксплуатации техники.
Если остались вопросы, задайте их в комментариях после инструкции.
"Загружаем инструкцию", означает, что нужно подождать пока файл загрузится и можно будет его читать онлайн. Некоторые инструкции очень большие и время их появления зависит от вашей скорости интернета.


7
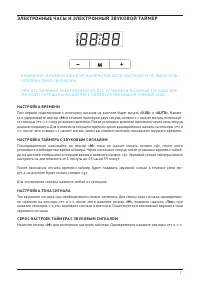
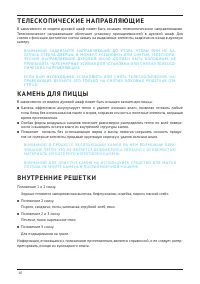
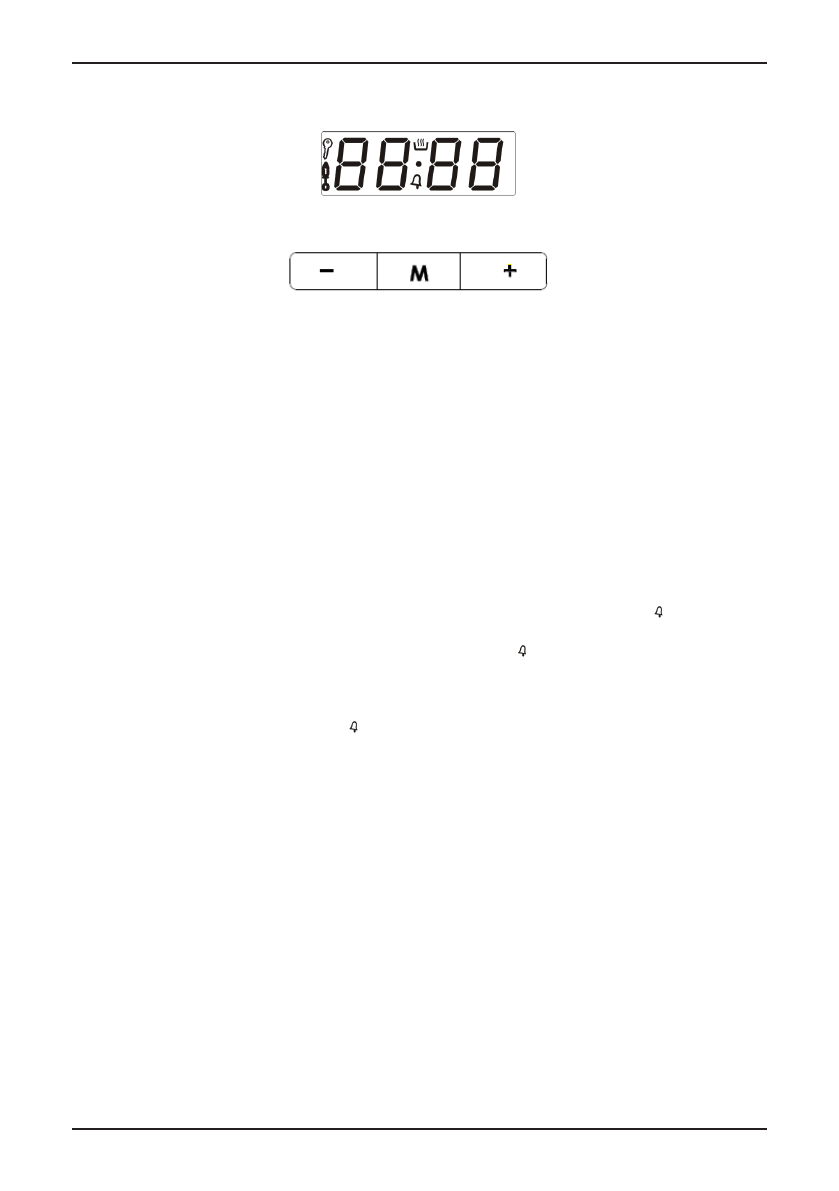
ЭЛЕКТРОННЫЕ Ч АС Ы И ЭЛ Е КТ Р О Н Н Ы Й З В У КО В О Й ТА Й М Е Р
11
1
2
3
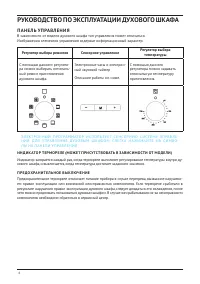
MODEL :
OKB 591 CSGN/ OKB 591 CSGW/ OKB 591 CSGB/ OKB 591 CSGM
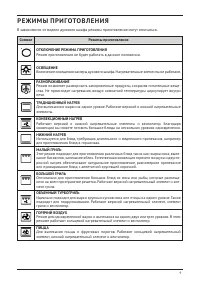
1 : FUNCTION SELECTION BUTTON :
Sets the oven working positions
2 : DIGITAL TIMER :
Read the instructions below
3 : TEMPERATURE ADJUSTMENT BUTTON :
Used for setting the oven temperature between
50-250 °C when working. Only put to max. position for Grill function.
OFF FUNCTION:
The product won't work in this position.
LAMP FUNCTION:
In this position, the oven light will be on and the lamp will remain
on for other functions.
BOTTOM AND TOP HEATER FUNCTION: Mostly used for cooking in one tray. Roasts
both sides of the food equally, making it crispy.
FAN + TOP AND BOTTOM HEATER FUNCTION:
Circulates hot air inside the oven for
more homogeneous cooking. Used for meals you want to be soft on the inside and
crunchy on the outside.
BOTTOM HEATER FUNCTION:
Only the bottom heater is functional. Used for meals
that have to be cooked from the bottom, heating meals or for meals that have to be
cooked for a long period with low temperature such as stew.
GRILL FUNCTION :
Uses the grill heater
GRILL +TOP HEATER FUNCTION
FAN+ TOP HEATER+ GRILL FUNCTION
FAN+TURBO HEATER:
Fan and surrounding heater will be activated. This program
also enables cooking more than one food without their smell or taste mixing up.
FAN+TURBO HEATER+BOTTOM FUNCTION
В Н И М А Н И Е! ДУХО В О Й Ш К АФ Н Е В К Л Ю Ч И ТС Я, Е С Л И Н АСТ Р О Й К И Н Е Б Ы Л И УСТА
-
Н О В Л Е Н Ы Л И Б О С Б Р О Ш Е Н Ы
П Р И ОТ К Л Ю Ч Е Н И И Э Л Е К Т Р ОЭ Н Е Р Г И И, В С Е УСТА Н О В К И, В К Л Ю Ч А Я Т Е К У Щ Е Е В Р Е
-
М Я, Б УДУ Т С Б Р О Ш Е Н Ы. Н А Д И С П Л Е Е П О Я В И ТС Я М И ГА Ю Щ И Й С И М В О Л
«
0.00
»
.
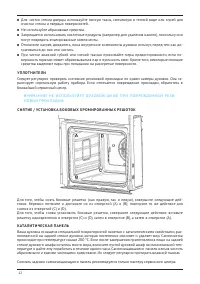
Н АСТ Р О Й КА В Р Е М Е Н И
При первом подключение к источнику питания на дисплее будет мигать «
0.00
» и «
AUTO
». Нажми
-
те и удерживайте сенсор «
M
» в течение примерно двух секунд, символ «.» начнет мигать, используй
-
те сенсоры «
+
» и «
-
» для установки времени. После установки времени примерно через семь секунд
данные сохранятся. Для изменения текущего времни нужно одновременно нажать на сенсоры «
+
» и
«
-
» после чего символ «.» начнет мигать, затем вы можете изменить показатели текущего времени.
Н АСТ Р О Й КА ТА Й М Е РА С З В У КО В Ы М С И Г Н АЛ О М
Последовательно нажимайте на сенсор «
M
» пока не начнет мигать символ «
12
DIGITAL TIMER USER MANUAL
SETTING THE TIME OF DAY (24 H CLOCK)
After plugging in or reconnecting to a power source after current decay, “
0.00
”, and “
AUTO
”
flashes.
Press button
1
approximately 2 sec., dot icon starts flashing. Set the current time using
buttons
2
and
3
. About 7 seconds after the set time has been finished, new data is memorized.
The time correction can be done later;
Press button
2
and
3
approximately 2 sec., dot icon starts flashing. Then you can set the
current time.
Notice!
If the correct time is not set then proper operation of the oven is not possible.
MANUAL OPERATION
If the programmer is not in semi-automatic or full-automatic mode you can use oven functions
manually.
SETTING THE MINUTE MINDER
You can activate the minute minder at any time, regardless the activity state of other
programmer functions. The measured time ranges from 1 minute to 23 hours 59 minutes.
Press button
1
until the minute minder icon starts to flash, and the display shows “
0.00
”.
Enter the required time using buttons
3
and
2
. Minute minder icon remains on the display.
After the set time has elapsed, an audible signal will be heard for approximately 7 minutes and
the minute minder icon starts to flash again.
Press buttons
1
,
2
or
3
to turn the signal off; the minute minder icon disappears, and the
display indicates the current time.
CHANGE THE TIMER BEEPS
The tone of the timer beeps may be changed as follows:
Press buttons
2
and
3
simultaneously,
Press button
1
to see actual tone “
ton.1
” to see on the display.
Press button
2
to select the tone you wish from 1 to 3.
CANCEL SETTINGS
Cancel automatic function settings:
Press buttons
2
and
3
simultaneously.
Cancel minute minder settings:
Press button
1
to select minute minder settings,
Press buttons
2
and
3
.
», после этого
установите необходимое время таймера. Через несколько секунд после установки времени тайме
-
ра, на дисплее отобразиться текущее время и появится символ «
12
DIGITAL TIMER USER MANUAL
SETTING THE TIME OF DAY (24 H CLOCK)
After plugging in or reconnecting to a power source after current decay, “
0.00
”, and “
AUTO
”
flashes.
Press button
1
approximately 2 sec., dot icon starts flashing. Set the current time using
buttons
2
and
3
. About 7 seconds after the set time has been finished, new data is memorized.
The time correction can be done later;
Press button
2
and
3
approximately 2 sec., dot icon starts flashing. Then you can set the
current time.
Notice!
If the correct time is not set then proper operation of the oven is not possible.
MANUAL OPERATION
If the programmer is not in semi-automatic or full-automatic mode you can use oven functions
manually.
SETTING THE MINUTE MINDER
You can activate the minute minder at any time, regardless the activity state of other
programmer functions. The measured time ranges from 1 minute to 23 hours 59 minutes.
Press button
1
until the minute minder icon starts to flash, and the display shows “
0.00
”.
Enter the required time using buttons
3
and
2
. Minute minder icon remains on the display.
After the set time has elapsed, an audible signal will be heard for approximately 7 minutes and
the minute minder icon starts to flash again.
Press buttons
1
,
2
or
3
to turn the signal off; the minute minder icon disappears, and the
display indicates the current time.
CHANGE THE TIMER BEEPS
The tone of the timer beeps may be changed as follows:
Press buttons
2
and
3
simultaneously,
Press button
1
to see actual tone “
ton.1
” to see on the display.
Press button
2
to select the tone you wish from 1 to 3.
CANCEL SETTINGS
Cancel automatic function settings:
Press buttons
2
and
3
simultaneously.
Cancel minute minder settings:
Press button
1
to select minute minder settings,
Press buttons
2
and
3
.
». Звуковой сигнал таймера можно
настроить на длительность от 1 минуты до 23 часов 59 минут.
После окончания отсчета времени таймер будет подавать звуковой сигнал в течение семи ми
-
нут, а на дисплее будет мигать символ «
12
DIGITAL TIMER USER MANUAL
SETTING THE TIME OF DAY (24 H CLOCK)
After plugging in or reconnecting to a power source after current decay, “
0.00
”, and “
AUTO
”
flashes.
Press button
1
approximately 2 sec., dot icon starts flashing. Set the current time using
buttons
2
and
3
. About 7 seconds after the set time has been finished, new data is memorized.
The time correction can be done later;
Press button
2
and
3
approximately 2 sec., dot icon starts flashing. Then you can set the
current time.
Notice!
If the correct time is not set then proper operation of the oven is not possible.
MANUAL OPERATION
If the programmer is not in semi-automatic or full-automatic mode you can use oven functions
manually.
SETTING THE MINUTE MINDER
You can activate the minute minder at any time, regardless the activity state of other
programmer functions. The measured time ranges from 1 minute to 23 hours 59 minutes.
Press button
1
until the minute minder icon starts to flash, and the display shows “
0.00
”.
Enter the required time using buttons
3
and
2
. Minute minder icon remains on the display.
After the set time has elapsed, an audible signal will be heard for approximately 7 minutes and
the minute minder icon starts to flash again.
Press buttons
1
,
2
or
3
to turn the signal off; the minute minder icon disappears, and the
display indicates the current time.
CHANGE THE TIMER BEEPS
The tone of the timer beeps may be changed as follows:
Press buttons
2
and
3
simultaneously,
Press button
1
to see actual tone “
ton.1
” to see on the display.
Press button
2
to select the tone you wish from 1 to 3.
CANCEL SETTINGS
Cancel automatic function settings:
Press buttons
2
and
3
simultaneously.
Cancel minute minder settings:
Press button
1
to select minute minder settings,
Press buttons
2
and
3
.
».
Для отключения сигнала нажмите любой из сенсоров.
Н АСТ Р О Й КА ТО Н А С И Г Н АЛ А
Тон звукового сигнала при необходимости можно изменить. Для смены тона сигнала, одновремен
-
но нажмите на сенсоры «
+
» и «
-
», после этого нажмите сенсор «
M
», появится надпись «
Ton
», при
нажатии сенсоров «
-
», тон звукового сигнала изменится. Существует три возможных варианта тона
звукового сигнала.
С Б Р О С Н АСТ Р О Е К ТА Й М Е РА С З В У КО В Ы М С И Г Н АЛ О М
Нажмите сенсор «
M
» для изменения настроек таймера. Одновременно нажмите сенсоры «
+
» и «
-
».
12
DIGITAL TIMER USER MANUAL
SETTING THE TIME OF DAY (24 H CLOCK)
After plugging in or reconnecting to a power source after current decay, “
0.00
”, and “
AUTO
”
flashes.
Press button
1
approximately 2 sec., dot icon starts flashing. Set the current time using
buttons
2
and
3
. About 7 seconds after the set time has been finished, new data is memorized.
The time correction can be done later;
Press button
2
and
3
approximately 2 sec., dot icon starts flashing. Then you can set the
current time.
Notice!
If the correct time is not set then proper operation of the oven is not possible.
MANUAL OPERATION
If the programmer is not in semi-automatic or full-automatic mode you can use oven functions
manually.
SETTING THE MINUTE MINDER
You can activate the minute minder at any time, regardless the activity state of other
programmer functions. The measured time ranges from 1 minute to 23 hours 59 minutes.
Press button
1
until the minute minder icon starts to flash, and the display shows “
0.00
”.
Enter the required time using buttons
3
and
2
. Minute minder icon remains on the display.
After the set time has elapsed, an audible signal will be heard for approximately 7 minutes and
the minute minder icon starts to flash again.
Press buttons
1
,
2
or
3
to turn the signal off; the minute minder icon disappears, and the
display indicates the current time.
CHANGE THE TIMER BEEPS
The tone of the timer beeps may be changed as follows:
Press buttons
2
and
3
simultaneously,
Press button
1
to see actual tone “
ton.1
” to see on the display.
Press button
2
to select the tone you wish from 1 to 3.
CANCEL SETTINGS
Cancel automatic function settings:
Press buttons
2
and
3
simultaneously.
Cancel minute minder settings:
Press button
1
to select minute minder settings,
Press buttons
2
and
3
.
Характеристики

Остались вопросы?Не нашли свой ответ в руководстве или возникли другие проблемы? Задайте свой вопрос в форме ниже с подробным описанием вашей ситуации, чтобы другие люди и специалисты смогли дать на него ответ. Если вы знаете как решить проблему другого человека, пожалуйста, подскажите ему :)


