Daikin BRC1E53C - Инструкция по эксплуатации
Кондиционер Daikin BRC1E53C - инструкция пользователя по применению, эксплуатации и установке на русском языке. Мы надеемся, она поможет вам решить возникшие у вас вопросы при эксплуатации техники.
Если остались дополнительные вопросы — свяжитесь с нами через контактную форму.

Installation and operation manual
BRC1E53
1
3P419248-1-KA – 2015.09
The English text is the original instruction. Other languages are
translations of the original instructions.
Refer
http://www.daikineurope.com/support-and-manuals/
product-information/
for more detailed user reference guides.
Installation: see
.
1.
General safety precautions
Please read these
"1. General safety precautions"
carefully before
installing air conditioning equipment and be sure to install it
correctly.
Failure to follow these instructions properly may result in property
damage or personal injury, which may be serious depending on the
circumstances.
2.
Features and functions
The BRC1E53 is a state of the art remote controller that offers full
control over your installation.
1 BASIC REMOTE CONTROLLER
The basic remote controller functions are:
ON/OFF,
operation mode change-over,
temperature adjustment,
air volume adjustment,
airflow direction adjustment.
2 CLOCK FUNCTION
The clock functions are:
12/24 hours real time clock,
automatic daylight saving time.
3 SCHEDULE FUNCTION
The schedule timer functions are:
a maximum of 5 actions can be programmed for each day of
the week,
3 independent schedules can be programmed,
schedule can be enabled/disabled at any time,
linked to a cool temperature and/or heat temperature or an
OFF operation (with or without a setback temperature),
"last command" overrules previous command until next
scheduled command.
4 SETBACK
The setback function maintains the room temperature in a specific
range when the occupants are out for a longer period and the
airconditioning is switched OFF.
5 PROHIBIT BUTTON/FUNCTION
Buttons, functions and/or modes can be locked to limit the user
action.
6 DETAILED DISPLAY POSSIBILITY
Additionally possible to display the outdoor temperature or room
temperature.
7 Duty rotation
Auto backup unit and auto rotation to maximize your
airconditioners' life.
8 Demand control
Make up an energy reduction schedule.
9 Quiet mode
Schedule a quiet mode for your outdoor unit(s).
10 INTERLOCK WITH 2 EXTERNAL SIGNALS
(Only available when the BRP7A51 Digital Input Adapter is
connected)
Connect up to two switch contacts (contact B1 and B2).
Typical application: hotel interlock with field supplied window
contact B1 and key card B2.
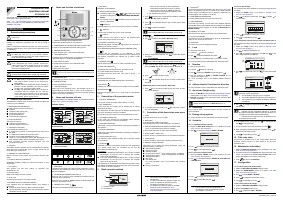
3.
Name and function of switches
1 OPERATION MODE SELECTOR BUTTON
To select the operation mode of your preference.
2 FAN SPEED/AIRFLOW DIRECTION SETTING BUTTON
To enter the fan speed/airflow direction setting screen.
3 MENU/ENTER BUTTON
To enter the main menu or the selected setting item.
4 UP/DOWN BUTTON
To raise/lower the set temperature, to highlight the next item on the
upper/lower side or to change the selected item.
5 RIGHT/LEFT BUTTON
To highlight the next item on the right/left-hand side.
6 ON/OFF BUTTON
To start or stop the system.
7 OPERATION LAMP
Lights up during operation or blinks if a malfunction occurs.
8 CANCEL BUTTON
To return to the previous screen.
9 LCD (with backlight)
When pushing any operation button, the backlight will be lit for
approximately 30 seconds. When 1 indoor unit is controlled by 2
remote controllers, the backlight of the remote controller operated
earlier than the other one will be lit.
4.
Name and function of icons
To change between the standard display and the detailed display
refer to
"17.4 To select the display mode"
Standard display
Detailed display
1 OPERATION MODE
2 FAN SPEED
Indicates the fan speed that is set for the air conditioner. If the air
conditioner does not have fan speed control function, the fan speed
will not be displayed.
3 SET/SETBACK TEMPERATURE DISPLAY
When the unit is turned on,
Set to
indicates the temperatures that
are set for the air conditioner.
When the unit is turned off,
Setback
indicates the temperatures that
are set for the setback function.
4 DEFROST/HOT START
Indicates that the defrost/hot start mode is active.
5 MESSAGE
Messages can be displayed.
6 VENTILATION/CLEANING
Ventilation mode icons
indicate the current
ventilation mode (HRV only) (
AUTOMATIC
,
ENERGY RECLAIM VENT.
,
BYPASS
).
Air Cleaning unit icon
indicates that the air cleaning unit
(option) is operational.
7
DISPLAY
Indicates that the key lock is set or the menu button is prohibited.
8
DISPLAY
Indicates that schedule timer or OFF timer is enabled.
DISPLAY
Indicates that the clock needs to be set. The schedule timer
function will not work until the clock is set.
9 EXTERNAL CONTROL ICON
Indicates that another controller with higher priority is controlling or
disabling your remote controller.
10 CHANGEOVER UNDER CENTRALISED CONTROL ICON
Indicates that the changeover of the installation is under
centralised control assigned to another indoor unit or optional cool/
heat selector connected to the outdoor unit (= master remote
controller).
11 SETBACK ICON
Flashes when the unit is turned on under the setback control.
12 AIRFLOW DIRECTION
Is displayed when the airflow direction and swing are set.
13 CLOCK (12/24 Hours real time clock)
Is displayed when the clock is set. If the clock is not set, - : - is
displayed.
14 DETAILED SELECTION
Is displayed when the detailed display items are selected.
15 ROTATION
Indicates one unit is set as back-up and rotation mode is enabled.
16 QUIET MODE
Indicates the HVAC system runs in quiet mode or under demand
control.
5.
Description of the operation modes
1 FAN ONLY OPERATION
In this mode, air only circulates without heating or cooling.
2 DRY OPERATION
In this mode, the air humidity will be lowered with a minimal
temperature decrease.
The temperature and fan speed are controlled automatically and
cannot be controlled by the remote controller.
Dry operation will not function if the room temperature is too low.
3 AUTOMATIC OPERATION
In this mode, the controller will automatically switch between
heating and cooling as required by the setpoint.
4 COOLING OPERATION
In this mode, cooling will be activated as required by the setpoint or
limit operation.
5 HEATING OPERATION
In this mode, heating will be activated as required by the setpoint or
setback operation.
6 VENTILATION (HRV only)
The ventilation mode operates the HRV; refer to the HRV manual
for more details.
7 SETBACK
SETBACK is a feature that enables to keep the room temperature
in a specific range when the occupants are out and the
airconditioning is switched OFF.
For example:
If the room temperature drops below 10°C, heating is started
automatically. As soon as 12°C is reached, the controller
returns to its original status.
If the room temperature goes above 35°C, cooling is started
automatically. As soon as 33°C is reached, the controller
returns to its original status.
The differential can be adjusted in the Setback configuration menu.
The setback temperature can be set during the unit is turned off on
basic screen or set in the schedule.
6.
Basic operation method
a
Operation mode
b
Temperature:
•
When the unit is turned on,
Set to
indicates the
temperatures that are set for the air conditioner.
•
When the unit is turned off,
Setback
indicates the
temperatures that are set for the setback function.
c
Fan speed/Airflow direction
1
Push
several times until the desired operation mode
Cool
,
Heat
,
Vent
,
Fan
,
Dry
, or
Auto
is selected.
2
Push
. The operation lamp will light and the system starts
operating.
3
Use
to set the temperature.
4
Push
.
5
Use
to select airflow
Level
or
Direction
setting.
6
With fan speed setting selected, use
to select the desired
fan speed.
7
With airflow direction setting selected, use
to change the
setting to
Swing
,
Pos. 0
,
Pos. 1
,
Pos. 2
,
Pos. 3
, and
Pos. 4
.
8
Push
to display the basic screen.
9
Push
. The operation lamp will turn off and the system stops
operating.
Additional features of the controller: KEY LOCK
1
Push
for 4 seconds to enable the key lock mode. The key
lock icon is displayed.
2
To cancel the key lock mode, push
for 4 seconds. The key
lock icon disappears.
7.
Description of the items in the main menu
1 LOCK
To prohibit buttons, functions or modes.
2 ROTATION
To enable the duty rotation functionality.
(Only available with indoor units that support duty rotation)
3 AIRFLOW DIRECTION
1
/INDIVIDUAL AIR DIRECTION
(only if the individual airflow function is installed)
To set the airflow direction for each 4 flaps individually.
4 QUICK START
(SkyAir only)
To quickly set the room temperature to a comfortable temperature.
5 VENTILATION
To set the ventilation rate and the ventilation mode (HRV only).
6 ENERGY SAVING OPTIONS
This allows you to restrict the setting temperature range and
display the energy consumption.
Setpoint Range Setting
Energy saving list
Setback condition
Sensing sensor (Low)
,
2
(Only if sensing sensor is installed)
Sensing sensor (Stop)
,
(Only if sensing sensor is installed)
Setpoint Auto Reset
OFF Timer
Auto display OFF
For more information refer to the detailed user reference
guide
3
Energy Consumption
7 SCHEDULE
4
To set the startup time and operation stop time for any day of the
week. It is possible to set up to 5 actions per day. Both operation
modes (normal and setback) can be selected. Additionally the
holiday settings and schedule nr can be set.
8 MAINTENANCE INFORMATION
Is used to display the service contact and model info.
9 CONFIGURATION
To set the LCD contrast. You can also switch between standard
and detailed display. When detailed display is selected, the detailed
display settings can be changed. You can also set
Quiet mode
and
Draft prevention
.
10 CURRENT SETTINGS
This shows a list of the current settings for the available items.
11 CLOCK & CALENDAR
This allows you to set the date and time. Time can be displayed in
either 12 hour or 24 hour time format.
12 LANGUAGE
This allows you to set the displayed language.
8.
Lock
1
Display the main menu.
2
Press the
button for 4 seconds.
3
Use
to select the
Lock
item and press
.
4
Use the submenu's to prohibit buttons, functions or modes.
For more information refer to the detailed user reference guide
.
9.
Rotation
1
Display the main menu.
2
Push the
button for 4 seconds.
3
Use
to select the
Rotation
function and press
.
4
Use the submenu to
Enable
or
Disable
Rotation
and to
configure the rotation cycle.
For more information refer to the detailed installer reference
guide
10. Airflow direction
/Individual air direction
For more information refer to the detailed user reference guide
.
11. Quick start (SkyAir only)
1
Display the
Main Menu
and proceed step (9) to display the basic
and
).
2
Quick Start
will appear on the basic screen when the Quick Start
function is turned ON.
12. Ventilation
Only in case an HRV is connected. Refer to the HRV manuals for
more information.
13. Energy saving options
For more information refer to the detailed user reference guide
.
14. Schedule
14.1 To enable/disable the schedule
1
Display the
Enable/Disable setting
and
).
2
Use
to change the setting to
Enable
or
Disable
.
3
Push
to display the confirmation screen.
4
Use
to select
Yes
and push
.
14.2 To select the schedule number
1
Display the
Select Schedule
screen (14.2) (Refer to
and
).
2
Use
to change the setting to
Schedule nr 1
,
Schedule nr 2
,
or
Schedule nr 3
.
3
Push
to display the confirmation screen.
4
Use
to select
Yes
and push
.
14.3 To use the holidays
The schedule timer will be disabled for the days that have been set
as holiday.
1
Display the
Holidays
screen (14.3) (Refer to
2
Use
to select the desired day. Push
to display
to
set the holiday.
3
Push
to display the confirmation screen.
4
Use
to select
Yes
and push
.
14.4 To change the schedule settings of the selected schedule nr
The schedule timer will be disabled for the days that have been set
as holiday.
1
Display the
Settings
screen (14.4) (Refer to
2
Use
to select the desired day (1).
3
Use
to highlight the Operation start
Time
and
to set
the desired Operation start
Time
(2).
4
Use
to highlight the action and
to select the desired
Act
.
5
Use
to highlight the temperature and
to select the
desired value.
6
To set a different day of the week, use
to highlight the day.
Use
to change the day.
7
To copy all actions of the day previously set, push
.
8
When the entire schedule settings are completed, push
to
display the confirmation screen.
9
Use
to select
Yes
and push
.
15. Filter auto clean
This function is available only on the model whose panel has
automatic cleaning function of filter. Needs to be set when
operation is OFF.
16. Maintenance information
1
Display the
Maintenance Information
screen (16) (Refer to
and
).
2
The phone number for the
Contact info
will appear at the top of the
screen. The model info of the
Indoor unit
and
Outdoor unit
of your
product will appear on the bottom of the screen.
3
Push
to return to the
Main Menu
.
17. Configuration
17.1 To select quiet mode enable/disable
1
Display the
Quiet Operation Mode
settings screen.
2
Display the
Enable/Disable
screen (17.1) (Refer to
and
).
3
Use
to select
Enable
or
Disable
.
4
Push
to display the confirmation screen.
5
Use
to select
Yes
and push
.
17.2 To select quiet mode settings
1
Display the
Quiet Operation Mode
settings screen.
2
Display the
Settings
screen (17.2).
3
Use
to select the
start
or
End time
.
Installation and
operation manual
a
3P419248-1-KA
OPERATION
Also see operation manual attached to the outdoor and
indoor unit.
WARNING
Do
NOT
play with the unit or its remote controller.
Accidental operation by a child may result in impairment of
bodily functions and harm health.
WARNING
Never disassemble the remote controller. Touching the
interior parts may result in electric shocks or fire. Consult
your Daikin dealer or authorized contactor for internal
inspections and adjustments.
WARNING
To avoid electric shocks, do not operate with wet hands.
WARNING
Do
NOT
modify or repair the remote controller. This
may result in electric shocks or fire. Consult your
Daikin dealer.
Do
NOT
relocate or reinstall the remote controller by
yourself. Improper installation may result in electric
shocks or fire. Consult your Daikin dealer.
Do
NOT
use flammable materials (e.g. hairspray or
insecticide) near the product. Do not clean the
product with organic solvents such as paint thinner.
The use of organic solvents may cause crack damage
to the product, electric shocks, or fire.
INFORMATION
This is the only button that works when the backlight is not
lit.
With icons
With icons and text (default)
With icons
With icons and text
Operation mode
cool
Heat
Vent
Air Clean
Fan
Dry
Auto (Cool)
Auto(Heat)
1
9
4
5
3
2
8
6
7
28
°C
1
11
3
8
4
5
10
2
9
6
Heat
Set to
28
°C
Error: Push Menu button
1
11
3
8
7
4
5
10
2
9
6
F r i
11: 03
14
3
13
15
12
16
F r i
11: 03
Error: Push Menu button
Heat
Set to
Room
14
3
7
13
15
12
16
R e t u r n S e t t i n g
a
c
b
Cool
R e t u r n
Set to
Cool
INFORMATION
When in
Dry
or
Vent
mode, the fan speed can not be set.
INFORMATION
When in
Dry
or
Vent
mode, the fan speed can not be set.
1.
This function is not compatible with SkyAir
RR+RQ units.
2.
In case of a simultaneous operation system, the
system is controlled by the sensing sensor
mounted in the master indoor unit.
3.
The detailed user reference guide and installer
reference guide are available on
http://
www.daikineurope.com/support-and-manuals/
product-information/
.
R e t u r n
S e t t i n g
R e t u r n
S e t t i n g
A i r fl ow l e ve l / d i re c t i o n
Le ve l
D i re c t i o n
Po s i t i o n 0
Low
1
2
3 4
0
0
1
2
3
4
Cool
R e t u r n
S e t t i n g
Set to
Cool
4.
The schedule will not be available when a
centralised controller or the BRP7A51 Digital
Input Adapter is connected.
INFORMATION
Repeat this procedure to turn
Quick Start
function off.
R e t u r n
S e t t i n g
Enable/Disable
S c h e d u l e
Disable
S e t t i n g
Select Schedule
S c h e d u l e
Schedule nr 1
R e t u r n
INFORMATION (Act column)
There are 3 types of operations:
1.
The temperature setpoints can be configured.
2.
The setback temperature setpoints can be configured.
3.
The temperature and setback temperature setpoints
are disabled.
INFORMATION (Cool and Heat column)
__: Indicates that the temperature setpoint for cool/heat
and setback temperature setpoint for this time period is not
specified. The last active setpoint will be utilized.
- -: Indicates that the setback function is disabled for this
time period with action OFF.
R e t u r n
S e t t i n g
S c h e d u l e
Holidays
Multiple Selection
Sun Mon Tue Wed Thu Fri Sat
(1)
S e t t i n g
S c h e d u l e n r 1
Mon
Time Act Cool Heat
–
6
:00
:
:
:
:
R e t u r n
(2)
S e t t i n g
S c h e d u l e n r 1
Mon
Time Act Cool Heat
–
6 :00
:
:
:
:
ON
OFF
1
2
3
"Загрузка инструкции" означает, что нужно подождать пока файл загрузится и можно будет его читать онлайн. Некоторые инструкции очень большие и время их появления зависит от вашей скорости интернета.