
Блендеры BRAYER BR1246 - инструкция пользователя по применению, эксплуатации и установке на русском языке. Мы надеемся, она поможет вам решить возникшие у вас вопросы при эксплуатации техники.
Если остались вопросы, задайте их в комментариях после инструкции.
"Загружаем инструкцию", означает, что нужно подождать пока файл загрузится и можно будет его читать онлайн. Некоторые инструкции очень большие и время их появления зависит от вашей скорости интернета.


12
13
EN
EN
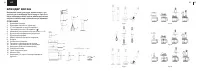
• When you press and hold the button (4) « » you can
control the disc (15) rotation speed by turning the
control knob (5).
• For operation at the maximal rotation speed, press
and hold down the button (3) «T».
• During the operation put the products into the pusher
opening and use the pusher (9) to feed products.
Press the pusher (9) gently while feeding products.
Never push products with your hands or other
objects, use the pusher (9) only.
•
Watch the filling of the bowl (13), as it fills, switch the
blender off and remove the food from the bowl (13).
•
Release the button (3 or 4) to switch off.
• After using the unit, wait until the chopping knife (11)
fully stops.
• Remove the power plug from the mains socket.
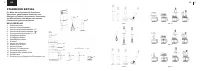
• Disconnect the motor unit from the lid (10) by
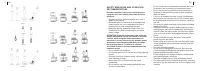
pressing the release buttons (2) (pic. 6).
• Remove the lid (10) from the bowl (13) by turning the
lid (10) counterclockwise.
• Remove the knife (11), take the cubic attachment
(12) out of the bowl (13).
• Take the products out of the bowl (13).
CLEANING
CUBIC ATTACHMENT
Continuous operation time while using the cubic
attachment should not exceed 3 cycles of 10
seconds each. Make at least a 3 minutes break
between the operation cycles.
• Use the cubic attachment for cutting soft fruit and
boiled vegetables into cubes.
•
Unplug the unit after you finish using it.
• Wash the parts that contacted products with warm
water and a neutral detergent and dry them.
• For easy cleaning of the attachment (12) mesh use
the device (17).
• Wash only the lower part of the blender attachment
(1), clean the outer surface with a slightly damp cloth.
Never immerse the blender attachment (1) into water
or any other liquids completely.
• Wipe the motor unit, the geared lid (10) and the
whisk attachment gear (6) with a soft slightly damp
cloth and then wipe them dry.
• After processing salty or sour products, it is
necessary to rinse the blender attachment (1) or the
chopping knife (14) with water immediately.
• While possessing products with dyeing properties
(for instance, carrot or beetroot) the attachments and
bowls can get colored, wipe the attachments and the
bowls with a cloth, dampened in vegetable oil; after
that wash the attachments and bowls with a neutral
detergent, rinse and dry them.
• Do not immerse the motor unit, the gear (6), the lid
(10) into any liquids, do not wash them under water
jet or in a dishwashing machine.
• Do not use abrasives and solvents to clean the motor
unit body and the removable parts.
STORAGE
• Clean the unit parts before taking it away for long
storage.
• Do not wind the power cord around the motor unit.
• Keep the unit in a dry cool place out of reach of
children and disabled persons.
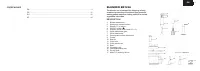
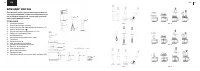
DELIVERY SET
1. Motor unit — 1 pc.
2. Blender attachment — 1 pc.
3. Whisk gear — 1 pc.
4. Whisk attachment — 1 pc.
5. Geared lid — 1 pc.
6. Bowl – 1 pc.
7. Cup — 1 pc.
8. Potato mash making attachment — 1 pc.
9. Grating/shredding disc - 1 pc.
10. Cubic knife – 1 pc.
11. Cubic attachment – 1 pc.
12. Instruction manual — 1 pc.
TECHNICAL SPECIFICATIONS
• Power supply: 220-240 V, ~ 50-60 Hz
• Rated input power: 1400 W
• Chopper bowl – 2 l
ATTENTION!
Do not use the attachment for
processing hard or frozen products to avoid damaging
it.
• Before assembling make sure that the power plug is
not inserted into the mains socket.
•
Place the bowl (13) on a flat and steady surface.
• Install the cubic attachment (12) into the bowl (13),
the groove on the attachment (12) should match the
ledge on the bowl (13).
• Install the cubic knife (11) on the attachment (12).
• Place the lid (10) on the bowl (13) and turn it
clockwise as far as it will go.
• Press on the locks (2) and install the motor unit on
the lid (10) feeding chute, make sure that the motor
unit is fixed properly. Install the motor unit evenly in
vertical position (pic. 6).
• Insert the pusher (9) into the lid (10) opening.
• Insert the power plug into the mains socket.
• To switch the unit on, press and hold down the button
(4) « ».
ATTENTION!
The blades of the chopping knife (9)
are very sharp and may be dangerous. Handle the
chopping knife (9) very carefully!
Характеристики

Остались вопросы?Не нашли свой ответ в руководстве или возникли другие проблемы? Задайте свой вопрос в форме ниже с подробным описанием вашей ситуации, чтобы другие люди и специалисты смогли дать на него ответ. Если вы знаете как решить проблему другого человека, пожалуйста, подскажите ему :)


