
Вытяжки Smeg KA1VA - инструкция пользователя по применению, эксплуатации и установке на русском языке. Мы надеемся, она поможет вам решить возникшие у вас вопросы при эксплуатации техники.
Если остались вопросы, задайте их в комментариях после инструкции.
"Загружаем инструкцию", означает, что нужно подождать пока файл загрузится и можно будет его читать онлайн. Некоторые инструкции очень большие и время их появления зависит от вашей скорости интернета.


Recirculation mode:
Leave the motor intake free. Install the active carbon
filters as shown in page 6.
Warning: if the hood is not supplied with an active
carbon filter, it is necessary to buy it separately and
assemble it before using the hood.
i)
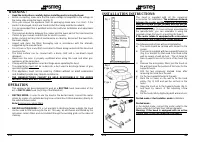
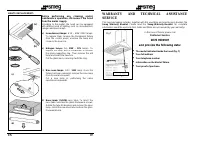
Chimney assembly :
Adjust the two telescopic chimneys to the required
length (fig. 6).
Secure the chimneys by tightening the two
H
screws
.
Place the chimney group on the top side of the hood
carefully. Put the chimney bracket
K
on the
B
chimney (fig. 6). Mark the holes on the wall for fixing
the chimney bracket to the wall.
Remove the chimney set, drill and fix the support
bracket to the wall by means of wall anchors. Put the
chimney group back in place and fix it to the hood with
the Z screws and to the chimney bracket with the L
screws as shown in figure 6.
ELECTRICAL CONNECTION
It is recommended that all electrical connection
operations are performed by a qualified technician.
The appliance is supplied WITHOUT A PLUG. It is
therefore necessary to fix a plug to the cable or hard
wire direct to a spur. The plug and fuse must be in
accordance with the rating plate inside the hood. Then
connect it to a nearby, easily reachable socket in
accordance with the rules in force.
In the case of a direct connection to the mains supply,
it is necessary to put a switched spur between the
appliance and the mains supply. The switch must be
suitable for the load, compliant with the rules in force
and must have a minimum contact opening of not less
than 3mm.
EN
03
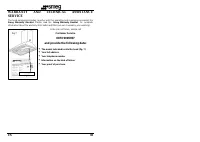
OPERATING INSTRUCTIONS:
ü
CONTROL PANEL:
In order to achieve the best performance, it is recommended to start the hood a few
minutes before starting cooking and keep it on for at least 15 minutes after finishing
cooking or after all fumes and odours have disappeared.
To start the hood, identify your type of control panel and follow the instructions:
Ø
SLIDER:
- Key (
A)
to turn on/off the hood’s light.
- Four-position Cursor (
B)
:
0:
Off
1/2/3:
On/Speed adjustment
Ø
ELECTROMECHANICAL PUSHBUTTONS:
Light ON/OFF Button
0
Motor OFF button
1-2-3
On/speed adjustment button
Ø
WITH KNOBS
:
-
Two-position
Knob
(A)
to turn on/off
the light (0-1)
-
Four-position
Knob
(B)
:
0
Motor OFF
1-2-3
Speed adjustment
EN
04
A
B
(A)
(B)
(A)
(B)
Fig.4
Fig.5
Fig.6
K
B
Z
Z
Характеристики

Остались вопросы?Не нашли свой ответ в руководстве или возникли другие проблемы? Задайте свой вопрос в форме ниже с подробным описанием вашей ситуации, чтобы другие люди и специалисты смогли дать на него ответ. Если вы знаете как решить проблему другого человека, пожалуйста, подскажите ему :)


