
Вытяжки Korting KHP 6772 GN - инструкция пользователя по применению, эксплуатации и установке на русском языке. Мы надеемся, она поможет вам решить возникшие у вас вопросы при эксплуатации техники.
Если остались вопросы, задайте их в комментариях после инструкции.
"Загружаем инструкцию", означает, что нужно подождать пока файл загрузится и можно будет его читать онлайн. Некоторые инструкции очень большие и время их появления зависит от вашей скорости интернета.

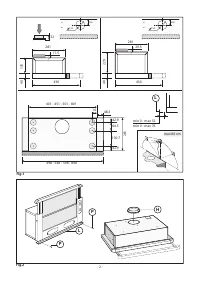


which are suitable for the type of cabinet, making holes in ac-
cordance with the diagram shown in Fig.1. To fit the appliance
correctly, align the front panel of the cooker hood with the
cabinet door and adjust spacer
L
using screws
P
(Fig.2), then
ensure the appliance meets the cabinet at the rear.
• Extraction through an outside wall:
The appliance expels the fumes through an outside wall or
a duct. It is necessary to buy a telescopic pipe in accordance
with the standards in use (inflammable) and connect it to
flange
H
(Fig.3A).
• Recirculation:
To transform the cooker hood from the extraction version to
the re circulating one ask your supplier for an activated carbon
filter. The filter must be fitted to the extracting group cooker
hood in the centre of the fan grille by twisting it by 90 degrees
until it is gripped securely (Fig.5). For this operation remove the
anti-grease filter(s)
G
(Fig.4). The clean air is returned into the
room through a connecting tube passing inside the cupboard
and connected to the ring
H
(Fig.3B).
USE AND MAINTENANCE
•
We recommend that the cooker hood is switched on before
any food is cooked. We also recommend that the appliance is
left running for 15 minutes after the food is cooked, in order
to thoroughly eliminate all contaminated air. The effective
performance of the cooker hood depends on constant main-
tenance; the anti-grease filter and the active carbon filter both
require special attention.
• The anti-grease filter
is responsible retaining the grease
particles suspended in the air, therefore it is subject to clog-
ging with variable frequency according to the use of the
appliance.
- To prevent the danger of possible fires, at least every 2
months one must wash the anti-grease filters by hand using
non-abrasive neutral liquid detergents or in the dishwasher
at low temperatures and on short cycles.
- After a few washes, colour alterations may occur. This does
not give the right to claim their replacement.
• The active carbon filters
are used to purify the air that is
sent back into the room and its function is to mitigate the
unpleasant odours produced by cooking.
- The non-regenerable active carbon filters must be replaced
at least every 4 months. The saturation of the active charcoal
depends on the more or less prolonged use of the appliance,
on the type of kitchen and on the frequency with which anti-
grease filter is cleaned.
• Before remounting the anti-grease filters and the regen
-
erable active charcoal filters it is important that they are
completely dry.
• Clean the hood frequently, both internally and exter
-
nally, using a cloth dampened with denatured alcohol or
neutral liquid detergents that are non abrasive.
•
The lighting .system is designed for use during cooking
and not for the prolonged general lighting of the room. The
prolonged use of the lighting system significantly decreases
the average duration of the bulbs.
•
If the appliance is equipped with courtesy lights it is possible
to use them for general room lighting for a prolonged amount
of time.
• Attention:
the non compliance with the hood cleaning
warnings and with the replacement and cleaning of the filters
entails risk of fires. One therefore recommends keeping to the
suggested instructions.
• Replacing halogen light bulbs (Fig.6):
To replace the halogen light bulbs
B
, remove the glass pane
C
using a lever action on the relevant cracks. Replace the bulbs
with new ones of the same type.
Caution:
do not touch the
light bulb with bare hands.
• Commands (Fig.7) slider
the key symbols are explained
below:
A
=
Light switch
A1
=
Off key
A2
=
On key
B
=
Speed control
B1
=
Off key
B2
=
FIRST SPEED key
B3 =
SECOND SPEED key
B4
=
THIRD SPEED key
C
=
Gemma warning light key.
• Replacing the halogen/incandescent lamps (Fig.8):
Only use lamps of the same type and wattage installed on
the device.
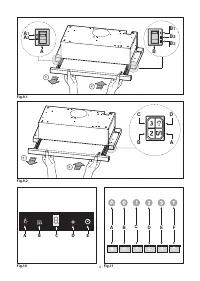
• Commands (Fig.9.1) slider
the key symbols are explained
below:
This hood is fitted with a
microswitch
which allows the activa-
tion of the motor speed) through the opening of the telescopic
undercarriage. If the telescopic undercarriage is closed the
motor speeds cannot be activated. This microswitch does
not have an impact on the activation of the lights which must
be switched on through the appropriate switch (see Fig.9A).
A
=
Light switch
A1
=
Off key
A2
=
On key
B
=
Speed control
B1
=
FIRST SPEED key
B2
=
SECOND SPEED key
B3
=
THIRD SPEED key.
Warning!
If the telescopic undercarriage is closed with the
speed set at 2, once it is re-opened, the hood will be reacti-
vated with the same speed in use when the hood was closed.
• Slider controls (Fig.9.2), the symbols are shown below:
This hood is equipped with a
microswitch
.
If the telescopic trolley is closed with the speed set i.e. at 2 and
the light are on, once it is reopened, the hood reactivates at
the same working speed at which it was switched off.
A =
FIRST SPEED Off/On Switch
B =
SECOND SPEED Switch
C =
THIRD SPEED Switch.
D =
Light On/Off Switch
• Commands (Fig.10):
Push-button A =
On/off lights switch.
Push-button B =
On/off cooker hood switch. The appliance
switches on at speed level 1, If the cooker hood is on depress
the push-button for 2 sec. to switch off the cooker hood. If
the cooker hood is at speed level 1 it will not be necessary
to depress the push-button to switch the cooker hood off.
Decreases the motor speed.
Display C =
Indicates the motor speed level selected and
activates the timer.
Push-button D =
Switches on the cooker hood. Increases the
motor speed. Touching the key at 3rd speed, the intensive
function runs for 10’, then the appliance go back to work at
- 6 -


