
Вытяжки Korting KHC 9958 X - инструкция пользователя по применению, эксплуатации и установке на русском языке. Мы надеемся, она поможет вам решить возникшие у вас вопросы при эксплуатации техники.
Если остались вопросы, задайте их в комментариях после инструкции.
"Загружаем инструкцию", означает, что нужно подождать пока файл загрузится и можно будет его читать онлайн. Некоторые инструкции очень большие и время их появления зависит от вашей скорости интернета.


outside the lower part. Do not connect the cooker hood ex-
haust to the same conductor used to circulate hot air or for
evacuating fumes from other appliances generated by other
than an electrical source. Before proceeding with the assembly
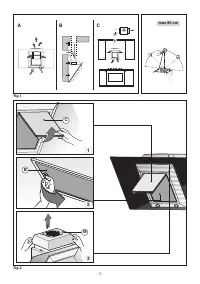
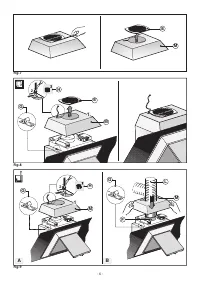
operations, remove the anti-grease filter(s) (Fig.2.2 - Fig.3.2)
so that the unit is easier to handle.
- in the case of assembly of the appliance in the suction version
prepare the hole for evacuation of the air.
•
We recommend the use of an air exhaust tube which has the
same diameter as the air exhaust outlet hole. if a pipe with
a smaller diameter is used, the efficiency of the product may
be reduced and its operation may become noisier.
•
if the appliance is supplied with the small cupola M remove
it by releasing it as indicated in Fig.2.3 - Fig.3.3.
Before proceeding with the assembly operations, for easier
manoeuvrability of the appliance disengage the anti-grease
filter by pulling handle B as indicated in Fig.2.2 - Fig.3.2.
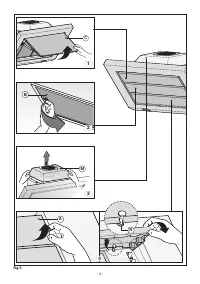
if one owns a model with perimeter suction panel, before
carrying out this operation, perform the following phases:
- Open panel C as indicated in Fig.2.1 - Fig.3.1.
- if one owns the version with three A panels release them
from the fixing pins by pulling outwards (Fig.3.4) and then
remove them from safety pins N (Fig.3.4) placed inside the
hood. To put them back perform the operation in reverse
order. ATTENTION! During this disassembly and assembly
operation ensure to hold the panel securely to prevent
accidental falls.
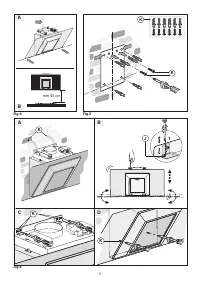
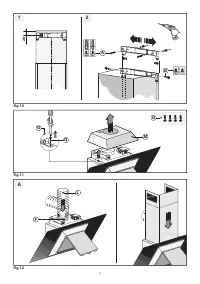
• Wall mounting:
Trace the bottom side of the hood on the wall. Consider the
measurements shown in Fig.4A and minimum distance from
the cooking surface (Fig.4B).
- Position the fixing template on the wall, making sure that
the line coincides with the line previously made on the wall.
- Mark the fixing holes and cut them into the material (Fig.5).
- Fix the 2 top screws K and screw anchors (Fig.5), without
tightening them completely.
- Position the appliance at the wall (Fig.6A).
- Make sure the 2 levelling screws J are tightened (Fig.6B.1).
- Align the appliance horizontally using the two levelling
screws J (Fig.6B.1).
- Once the adjustment has been made, fasten the hood per-
manently using the screws K (Fig.6C - Fig.6D).
- For easy accessibility to the motor unit in the case of assistan-
ce, after having levelled and fixed the appliance definitively,
we recommend that the brackets are removed (Fig.6B.1).
- When carrying out the fixing operations, use only screws
and screw anchors suited to the type of wall (e.g. reinforced
concrete, plasterboard etc.).
- if the screws and screw anchors are supplied with the ap-
pliance, make sure that they are suited to the type of wall to
which the hood must be fixed.
• Installation of models without decorative ducts:
Extractor hood
- Unclip the canopy M and remove the grille E (Fig.7).
- Pass the power supply cable through the slot in the canopy
M, as indicated in Fig.9A.1.
- Taking the grommet H, position it between the power cable
and the slot (Fig.9A.2).
- Connect the flexible hose L (not supplied) to the hood
(Fig.9B).
- Re-position the small cupola M paying attention that it is
hitched perfectly to the fixing pins G (Fig.9B).
• Filtering version:
- Unclip the canopy M and remove the grille E (Fig.7).
- Pass the power supply cable through the slot in the canopy
M, as indicated in Fig.8.1.
- Taking the grommet H, position it between the power cable
and the slot (Fig.8.2).
- Fix the small cupola M and the grille E making sure that is it
perfectly hooked on to the fastening pins G (Fig.8).
• Optional accessories:
This model may have decorative ducts as optional accessories
- ask your retailer for information.
Before installing decorative flues it is necessary to remove
the small cupola M and loosen the 4 screws Q that lock the
fastening pins G as shown in Fig.11.
• Installation of models with decorative ducts:
Extractor hood
Make sure the electrical power supply is within the measure-
ments of the decorative connector. Adjust the width of the
support bracket of the top connector (Fig.10.2). Then fix it
to the ceiling so that it is on the same axis as the hood using
screws A and observing the distance from the ceiling shown
in Fig.10.1. Connect flange F to the air exhaust hole using
flexible hose L (Fig.12A). Slide the top connector inside the
lower duct and place this on the body (Fig.12B). Pull out the
top duct as far as the bracket and secure it using screws B
(Fig.10.2). To transform the hood from a ducting version into
a filtering version, ask your dealer for the charcoal filters and
follow the installation instructions.
• Filter hood:
Please note:
The filters must be ordered from your dealer as an acces-
sory.
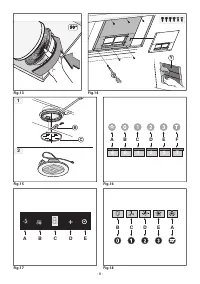
- To transform the hood from the SUCTION version to the
FILTERING version, charcoal filters must be ordered from
your dealer as an accessory. Two types of kit are available,
one with non-renewable filters (Fig.13) and the other with
renewable filters (washable) (Fig.14). Unlike traditional carbon
filters, this carbon filter can be washed and reactivated for
approximately 12-15 times. With normal hood use, this filter
should be cleaned once every 2-3 months. The filter can be
washed into a dishwasher at the highest temperature using a
standard dishwasher detergent. After washing, dry the filter in
the oven at 100°C for 10-15 minutes to reactivate it. The filter
will retain its odour-absorbing capacity for three years, after
which it will have to be replaced.
- if a bracket is found in the packaging like that indicated in
Fig.14 loosen the screws already installed inside the hood and
install the bracket using the previously-removed screws.
- To replace re-usable carbon filters Y, remove the brackets
from their seat, pulling them outwards (Fig.14).
- if your product is not supplied with the bracket, it means
that the active charcoal filter cannot be renewed (Fig.13).
These must be applied to the suction unit inside the hood,
centring them in it and turning them 90° until they snap into
place (Fig.13).
USE AND MAINTENANCE
•
We recommend that the cooker hood is switched on before
any food is cooked. We also recommend that the appliance is
left running for 15 minutes after the food is cooked, in order
- 10 -
Характеристики

Остались вопросы?Не нашли свой ответ в руководстве или возникли другие проблемы? Задайте свой вопрос в форме ниже с подробным описанием вашей ситуации, чтобы другие люди и специалисты смогли дать на него ответ. Если вы знаете как решить проблему другого человека, пожалуйста, подскажите ему :)


