
Вытяжки Korting KHC 6930 RI - инструкция пользователя по применению, эксплуатации и установке на русском языке. Мы надеемся, она поможет вам решить возникшие у вас вопросы при эксплуатации техники.
Если остались вопросы, задайте их в комментариях после инструкции.
"Загружаем инструкцию", означает, что нужно подождать пока файл загрузится и можно будет его читать онлайн. Некоторые инструкции очень большие и время их появления зависит от вашей скорости интернета.


type of wall (e.g. reinforced concrete, plasterboard, etc.). If
the screws and screw anchors are provided with the product,
check that they are suitable for the type of wall on which the
hood is to be fi xed.
• Fixing the decorative telescopic fl ue
Arrange the electrical power supply within the dimensions of
the decorative fl ue. If your appliance is to be installed in the
ducting version or in the version with external motor, prepare
the air exhaust opening. Adjust the width of the support
bracket of the upper fl ue (Fig.3). Then fi x it to the ceiling using
the screws
A
(Fig.3) in such a way that it is in line with your
hood and respecting the distance from the ceiling indicated
in Fig.2. Connect the fl ange
C
to the air exhaust hole using a
connection pipe (Fig.4). Insert the upper fl ue into the lower
fl ue and rest above the frame. Extract the upper fl ue up to
the bracket and fi x it with the screws
B
(Fig.3). To transform
the hood from a ducting version into a fi ltering version, ask
your dealer for the charcoal fi lters and follow the installation
instructions.
• Filtering version
Install the hood and the two flues as described in the
paragraph for installation of the hood in ducting version. To
assemble the fi ltering fl ue refer to the instructions contained
in the kit. If the kit is not provided, order it from your dealer
as accessory. The fi lters must be applied to the suction unit
positioned inside the hood. They must be centred by turning
them 90 degrees until the stop catch is tripped (fi g. 7).
USE AND MAINTENANCE
•
We recommend that the cooker hood is switched on before
any food is cooked. We also recommend that the appliance is
left running for 15 minutes after the food is cooked, in order
to thoroughly eliminate all contaminated air.
The eff ective performance of the cooker hood depends on
constant maintenance; the anti-grease fi lter and the active
carbon fi lter both require special attention.
• The anti-grease fi lter
is used to trap any grease particles
suspended in the air, therefore is subject to saturation (the
time it takes for the fi lter to become saturated depends on
the way in which the appliance is used).
- To prevent potential fi re hazards, the anti-grease fi lters
should be washed a minimum of every 2 months (it is
possible to use the dishwasher for this task).
- After a few washes, the colour of the fi lters may change.
This does not mean they have to be replaced.
If the replacement and washing instructions are not followed,
the anti-grease fi lters may present a fi re hazard.
• The active carbon fi lters
are used to purify the air which
is released back into the room. The fi lters are not washable
or re-usable and must be replaced at least once every four
months.
The active carbon fi lter saturation level depends on the
frequency with which the appliance is used, the type of
cooking performed and the regularity with which the anti-
grease fi lters are cleaned.
• Clean the cooker hood frequently, both inside and outside,
using a cloth which has been dampened with denatured
alcohol or neutral,
non
-abrasive liquid detergents.
• The light on the cooker hood is designed for use during
cooking and not for general room illumination. Extended
use of the light reduces the average duration of the bulb.
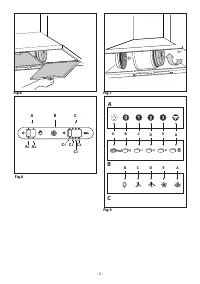
• Commands:
(fi g.5)
luminous
the key symbols are explained
below:
A
= LIGHT
B
= OFF
C
= SPEED I
D
= SPEED II
E
= SPEED III
F
= AUTOMATIC STOP TIMER - 15 minutes
•
If your appliance does not have the
INTENSIVE
speed
function, press key E for two seconds and it will be activated
for 10 minutes after which it will return to the previously
set speed.
When the function is active the LED fl ashes. To interrupt it
before the 10 minutes have expired press key
E
again.
•
By pressing key
F
for two seconds (with the hood switched
off ) the “
clean air
” function is activated. This function switches
the appliance on for ten minutes every hour at the fi rst speed.
As soon as this function is activated the motor starts up at the
fi rst speed for ten minutes, During this time key
F
and key
C
must fl ash at the same time.
After ten minutes the motor switches off and the LED of key
F
remains switched on with a fi xed light until the motor starts
up again at the fi rst speed after fi fty minutes and keys
F
and
C
start to fl ash again for ten minutes and so on.
By pressing any key for the exclusion of the hood light the
hood will return immediately to its normal functioning (e.g.
if key D is pressed the “
clean air
” function is deactivated and
the motor moves to the 2nd speed straight away. By pressing
key
B
the function is deactivated).
• Active carbon/grease fi lter saturation:
- When button
A
fl ashes at a frequency of
2 seconds
, the
grease
fi lters must be cleaned.
- When button
A
fl ashes at a frequency of
0.5 seconds
, the
carbon
fi lters must be replaced.
After the clean fi lter has been replaced, the electronic memory
must be reset by pressing button
A
for approximately
5
seconds
, until the light on the button stops fl ashing.
• Commands:
(fi g.9A-C)
mechanical
_(fi g.9B)
elliptic
the key
symbols are explained below:
A
= LIGHT
B
= OFF
C
= SPEED I
D
= SPEED II
E
= SPEED III
G
= MOTOR WORKING indicator
• Commands:
(pic.8)
slider
the key symbols are explained
below:
A
= Light switch
A1
= Off key
A2
= On key
B
= Gemma warning light key
C
= Speed control
C1
= Off key
C2
= FIRST SPEED key
C3
= SECOND SPEED key
C4
= THIRD SPEED key
THE MANUFACTURER DECLINES ALL RESPONSIBILITY FOR
EVENTUAL DAMAGES CAUSED BY BREACHING THE ABOVE
WARNINGS.
- 5 -


