
Вытяжки Korting KHC 6839 RGB - инструкция пользователя по применению, эксплуатации и установке на русском языке. Мы надеемся, она поможет вам решить возникшие у вас вопросы при эксплуатации техники.
Если остались вопросы, задайте их в комментариях после инструкции.
"Загружаем инструкцию", означает, что нужно подождать пока файл загрузится и можно будет его читать онлайн. Некоторые инструкции очень большие и время их появления зависит от вашей скорости интернета.


5
Т Р Е Б О В А Н И Я Б Е З О П АС Н О С Т И П Р И М О Н ТАЖ Е
В Н И М А Н И Е! П Е Р Е Д Н АЧ А Л О М М О Н ТА Ж А И З Д Е Л И Я Н Е О Б ХОД И М О О Б Е С ТО Ч И Т Ь
Э Л Е К Т Р И Ч Е С К У Ю С Е Т Ь!
6
3. MOUNTING OF THE COOKER HOOD
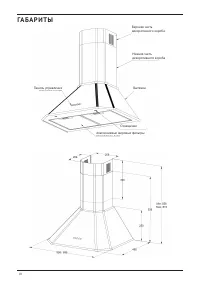
3.1. LOCATION OF THE COOKER HOOD
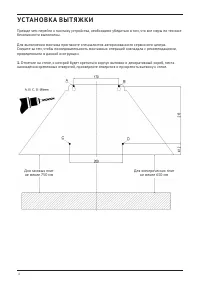
The assembly height of the fume hood: for gas furnaces, surface of hood filter and surface of furnace should
be minimum 70cm and maximum 80cm; and for electric furnaces, surface of hood filter and surface of
furnace should be minimum 60cm and maximum 70cm (illustration 1).
Illustration 1
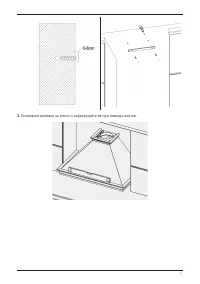
3.2. MOUNTING OF HANGER SCREWS ON THE WALL
Attach the mounting template, which comes out of the mounting accessories, to the surface where the
cooker hood will be hanged, according to the appropriate height that should be from the surface of the
cooker. Drill with an auger of Ø8mm from the places indicated by A, B, C marks (illustration 2). Bang the
dowels of 8mm, which came out of mounting accessories, to these holes with the help of a hammer, without
damaging the dowels, and tighten these dowels (illustration 3) with 2 hanger screws of 4x40 YHB, which
again came out of mounting accessories, in a way that the head of the screw will be left out about 6-8mm
(illustration 4).
GAS COOKER
Min 70cm / Max 80cm
ELECTRIC COOKER
Min 60cm / Max 70cm
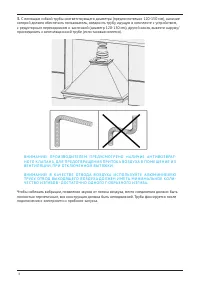
При наличии в комнате печи, газового котла или колонки необходимо учитывать, что во время
работы вытяжка забирает из помещения воздух, необходимый для горения. Это относится также к
помещению с герметичными окнами и дверями.
Для обеспечения безопасной работы вытяжки в замкнутом пространстве должен быть обеспечен
дополнительный приток воздуха извне (открытая форточка в другой комнате, открытая дверь на
кухню или специально оборудованная приточная вентиляция).
В Н И М А Н И Е! В Ы Т Я Ж К А ДО Л Ж Н А Б Ы Т Ь П ОД К Л Ю Ч Е Н А К ОТД Е Л Ь Н О М У В О З ДУХО
-
В ОДУ, Н Е СО В М Е Щ Е Н Н О М У С Д РУ Г И М И УС Т Р О Й С Т В А М И.
При использовании воздуховода, состоящего из нескольких частей, каждая следующая часть долж
-
на быть расположена снаружи относительно предыдущей.
В случае комплектации вытяжки электрическим кабелем без вилки необходимо обесточить элек
-
трическую сеть и произвести подключение вытяжки к электрической сети согласно следующей
схеме:
КОРИЧНЕВЫЙ провод = L («live», «фаза»)
ГОЛУБОЙ провод = N («neutral», «ноль»)
ЗЕЛЕНО-ЖЕЛТЫЙ провод = Е («earth», «земля»)
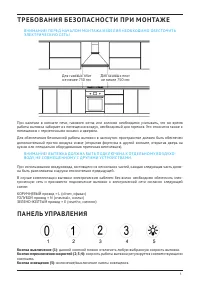
ПАНЕЛЬ УПРАВЛЕНИЯ
12
4. USE OF THE COOKER HOOD
4.1. CONTROL PANEL
4.1.1. TOUCH CONTROL PANEL
1 2 3 4 5 6 7
1. Motor on / off. It is used to start and stop the motor of the cooker hood.
2. Reducing the speed. Used to reduce motor speed while the cooker hood is in operating state.
3. Display. Information on the operating status of the cooker hood is read. The aluminum filter should be
cleaned when the C mark appears. To clear the C warning, the speed reduction button numbered 2 should
be pressed for 5 seconds while the device is off.
4. Increasing the speed. Used to increase the motor speed while the cooker hood is in operating state.
5. Timer. It is used for automatic turn-off of the cooker hood after 15 minutes. Ventilation mode is activated
when it is pressed for 3 seconds. The screen will be rotating and the cooker hood will operate to ventilate the
ambient in the speed 1 for 10 minutes on hourly for 24 hours. To deactivate, it should be pressed on the
same button for 3 seconds or the cooker hood is turned off by pressing the motor turn on/off button
numbered 1.
6. Turn on / off the lamp. It is used to turn on and off the cooker lightings.
7. Remote control sensor.
4.1.2. TOUCH CONTROL PANEL 3-SPEED
1 2 3 4
1. Turning on/off the motor in speed 1. It is used to start and stop the motor of the cooker hood in speed 1.
2. Turning on/off the motor in speed 2. It is used to start and stop the motor of the cooker hood in speed 2.
3. Turning on/off the motor in speed 3. It is used to start and stop the motor of the cooker hood in speed 3.
4. Turn on / off the lamp. It is used to turn on and off the cooker lightings.
Timer:
It is used for automatic turn-off of the cooker hood after 15 minutes. Timer mode is activated when
the desired speed is pressed for 3 seconds. The button light will blink.
4.1.3. CONTROL PANEL OF MECHANICAL PUSH BUTTON
1 2 3 4 5
1. Switch off the motor. It is used to stop the motor of the cookerhood.
2. 1st cycle. It is used to operate the motor of the cookerhood in 1st cycle.
3. 2nd cycle. It is used to operate the motor of the cookerhood in 2nd cycle.
4. 3rd cycle.It is used to operate the motor of the cookerhood in 3rd cycle.
5. Turn on/off the lamp. It is used to turn on and off the cooker lights.
4.2. USAGE OF THE COOKER HOOD
Your device has been manufactured in a suitable way for use with chimney and without chimney.
4.2.1. USE WITH CHIMNEY
Your device should be connected to a chimney in the room so that it will be able to discharge the indoor air to
outer environment. The minimum Ø120mm air escape pipe should be used. For your device to operate more
efficiently, an air escape pipe that is as short possible and having few elbows should be used.
If your device is fitted with a carbon filter, it has to be removed.
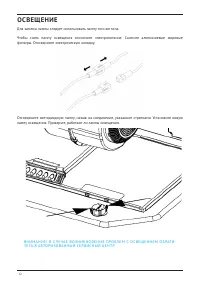
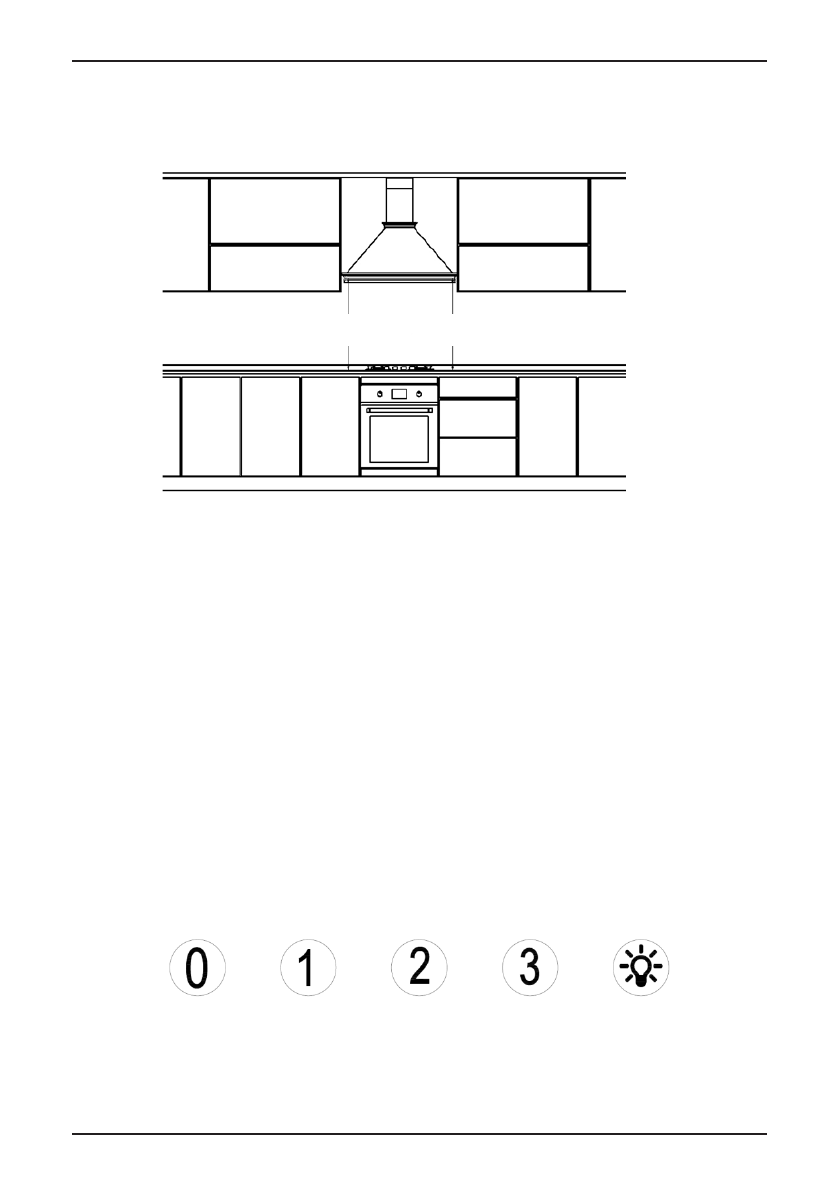
Кнопка выключение (1)
: данной кнопкой можно отключить любую выбранную скорость вытяжки.
Кнопки переключения скоростей (2;3;4):
скорость работы вытяжки регулируется соответствующими
кнопками
.
Кнопка освещения (5):
включение/выключение лампы освещения.
Для газовых плит
не менее 750 мм
Для газовых плит
не менее 750 мм
Характеристики

Остались вопросы?Не нашли свой ответ в руководстве или возникли другие проблемы? Задайте свой вопрос в форме ниже с подробным описанием вашей ситуации, чтобы другие люди и специалисты смогли дать на него ответ. Если вы знаете как решить проблему другого человека, пожалуйста, подскажите ему :)


