
Вытяжки Korting KHC 6770 GW - инструкция пользователя по применению, эксплуатации и установке на русском языке. Мы надеемся, она поможет вам решить возникшие у вас вопросы при эксплуатации техники.
Если остались вопросы, задайте их в комментариях после инструкции.
"Загружаем инструкцию", означает, что нужно подождать пока файл загрузится и можно будет его читать онлайн. Некоторые инструкции очень большие и время их появления зависит от вашей скорости интернета.


F ) D i s c o n n e c t t h e e l e c t r i c a l p l u g p r i o r t o a n y
maintenance.
G) This appliance is not intended for use by young children
or infi rm persons without supervision
H) Young children should be supervised to ensure they do
not play with the appliance
I) There shall be adequate ventilation of the room when the
rangehood is used at the same time as appliances burning
gas or other fuels
L) There is a risk of fi re if cleaning is not carried out in
accordance with the instructions
This appliance conforms to the European Directive EC/2002/96,
Waste Electrical and Electronic Equipment ( WEEE). By making
sure that this appliance is disposed of in a suitable manner,
the user is helping to prevent potential damage to the
environment or to public health.
The
symbol on the product or on the accompanying
paperwork indicates that the appliance should not be treated
as domestic waste, but should be delivered to a suitable electric
and electronic appliance recycling collection point. Follow local
guidelines when disposing of waste. For more information
on the treatment, re-use and recycling of this product, please
contact your local authority, domestic waste collection service
or the shop where the appliance was purchased.
INSTALLATION INSTRUCTIONS
Assembly and electrical connections must be carried out
by specialised personnel.
• Electric Connection
The appliance has been manufactured as a class II, therefore
no earth cable is necessary.
The plug must be easily accessible after the installation of
the appliance.
If the appliance is equipped with power cord without plug, a
suitably dimensioned omnipolar switch with 3 mm minimum
opening between contacts must be fitted between the
appliance and the electricity supply in compliance with the
load and current regulations.
The connection to the mains is carried out as follows:
BROWN =
L
line
BLUE =
N
neutral
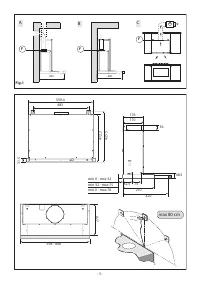
• If the hob is electric, gas, or induction, the minimum distance
between the same and the lower part of the hood must be
at least
65 cm
.
If a connection tube composed of two parts is used, the upper
part must be placed outside the lower part.
Do not connect the cooker hood exhaust to the same conduc-
tor used to circulate hot air or for evacuating fumes from other
appliances generated by other than an electrical source.
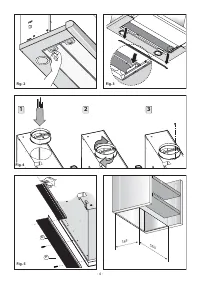
The following procedures must be performed before the
appliance is installed:
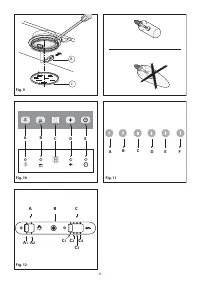
- For easier handling of the appliance, remove the grease
fi lter(s) (Fig. 2).
- If the product is fi tted with a fi lter, take out the re-usable
carbon fi lter by pulling the bracket outwards and removing it
from its housing (Fig. 3).
- In the case of assembly of the appliance in the suction version
prepare the hole for evacuation of the air.
- Fit the fl ange to the air outlet hole by turning it until it clicks
into place, then fi x it using a screw (Fig. 4).
(*) Warning: plastic spacer fi tting.
This product may also be supplied with a plastic spacer
O
, which
should be fi tted before the hood is installed (Fig. 5).
- Fix the spacer to the hood using screws
P
(Fig. 5).
- To assemble the unit correctly, align the front panel of
the hood with the wall cabinet and decide on the distance
necessary to fi ll in any space remaining between the hood
and the wall.
- Once the distance has been established, use a cutter to
remove the excess plastic (Fig. 5).
•
This product may be installed in
2
diff erent ways:
- Fixing the hood to the lower part of the wall cabinet
Type
A
installation, fi gure
6
- Fixing the hood to the wall
Type
B
installation, fi gure
7
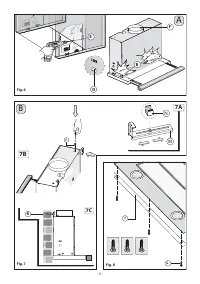
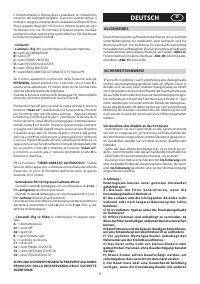
• Fixing the hood to the lower part of the wall cabinet
(Fig. 6A)
1.
Using the drill template supplied, make 2 holes (
E
) in the
sides of the wall cabinet, in line with hooks
D
(Fig. 6).
Position the hood inside, so that the internal side hooks
D
can
be positioned into the two holes
E
.
2.
Fix it in place using 4 screws
B
which are suited to the type
of cabinet installed, as indicated in fi gure 6.
- Fixing the hood to the wall
(Fig. 7B)
1.
Using the drill template supplied, make 2 fi xing holes in
accordance with the measurements listed.
When carrying out the fi xing procedures, use only screws
and screw anchors which are suited to the type of wall (e.g.
reinforced concrete, plasterboard etc.). If the screws and
screw anchors are supplied with the appliance, make sure
that they are suited to the type of wall to which the hood
must be fi xed.
Adjust the position of the brackets
M
in accordance with the ca-
binet depth, using the caged nut
N
as indicated in fi gure
7A
.
2.
Fix the hood to the bracket using screw
G
as indicated in
fi gure
7B
.
3.
Fix the hood to the wall using the 2 screws
R
(Fig.
7C
).
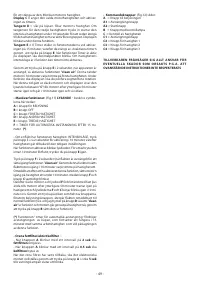
- Fitting the spacers
Depending on your appliance model, use the following
installation instructions:
1.
spacer
I
(Fig. 8).
To fi ll in any space remaining between the hood and the wall,
simply position spacer
I
next to the wall and fi x it in place with
the
3
screws
L
as indicated in fi gure 8.
2.
spacer
O
(Fig. 5).
see note
(*) Warning: plastic spacer fi tting
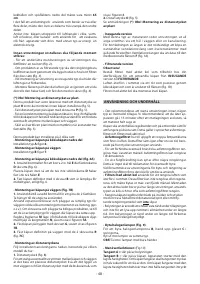
• Extractor version
When installed in this way the appliance expels fumes outside,
either through a perimeter wall or existing ducting. It is
therefore necessary to purchase a non-fl ammable air exhaust
tube which complies with all current legislation and connect
it to the fl ange
F
supplied (Fig. 1A).
• Filter hood
Please note:
In order to transform the hood from
EXTRACTOR HOOD
into
FILTER HOOD
the carbon fi lters must be ordered at your
distributor as accessory.
The air is released back into the room through connection
piping which passes through the cabinet and is connected
to fl ange
F
(Fig. 1B).
The active carbon fi lters must be fi tted inside the hood.
- 23 -
Характеристики

Остались вопросы?Не нашли свой ответ в руководстве или возникли другие проблемы? Задайте свой вопрос в форме ниже с подробным описанием вашей ситуации, чтобы другие люди и специалисты смогли дать на него ответ. Если вы знаете как решить проблему другого человека, пожалуйста, подскажите ему :)


