
Вытяжки Korting KHA 9770 X - инструкция пользователя по применению, эксплуатации и установке на русском языке. Мы надеемся, она поможет вам решить возникшие у вас вопросы при эксплуатации техники.
Если остались вопросы, задайте их в комментариях после инструкции.
"Загружаем инструкцию", означает, что нужно подождать пока файл загрузится и можно будет его читать онлайн. Некоторые инструкции очень большие и время их появления зависит от вашей скорости интернета.

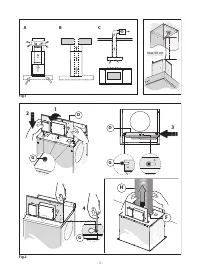


If a connection tube composed of two parts is used, the upper
part must be placed outside the lower part. Do not connect the
cooker hood exhaust to the same conductor used to circulate
hot air or for evacuating fumes from other appliances gener-
ated by other than an electrical source. Before proceeding
with the assembly operations, remove the anti-grease filter(s)
(Fig.15) so that the unit is easier to handle.
- In the case of assembly of the appliance in the suction version
prepare the hole for evacuation of the air.
•
We recommend the use of an air exhaust tube which has the
same diameter as the air exhaust outlet hole. If a pipe with
a smaller diameter is used, the efficiency of the product may
be reduced and its operation may become noisier.
N.B.!
- Two people are needed to install this product.
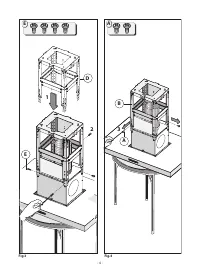
Attention!
- Before installing the appliance, fix the electrical box
D
.
- Lift the electrical box and follow
phases 1-2-3
indicated in
figure 2.
- Position the bracket in correspondence with the 3 screws
G
already set up on the container and screw them is indicated
in phase 4 - figure 2.
- Fix the air exhaust pipe
H
(not included) on the air outlet
flange
F
as indicated in figure 2.
• Mounting hood:
- Remove the structure
D
from the packaging and fix it to the
motor container with the 4 screws
E
fig.3.
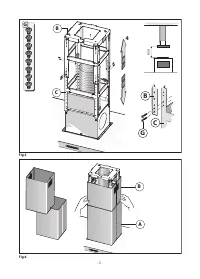
- Remove the 2 screws
A
fastening the upper structure
B
to
the lower structure
C
as indicated in fig.4.
- Adjust the desired height paying attention to the quota in-
dicated in figure 5 and block it with the 8 screws
G
provided.
- Couple the lower chimney
A
to the upper one
B
and insert
it on the structure as indicated in figure 6.
- Position the perforation template on the ceiling making
sure the arrow is positioned on the same side as the appli-
ance control (Fig.7).
- Drill 4 Ø8 holes in the ceiling and tighten the 3 screws with-
out pulling them completely making sure not to insert the
screw in the hole marked with an
X
on the perforation tem-
plate fig.8 (the screws and expansion plugs must be suited
for the type of wall).
- Take the hood and insert the upper telescopic structure on
the 3 screws
E
not tightened completely corresponding to
the 3 slots and turn them slightly to fit them as indicated in
figure 9 - phase 1-2.
Tighten the fourth screw
X
and pull the other 3 to perma-
nently block the upper part of the structure
B
as indicated in
figure 9 - phase 3-4.
-
Suction version
: Fix the flexible tube to the pre-arranged
air exhaust hole (Fig.10).
-
Filtering version
:
-Connect the flexible tube
H
to the deflector
M
and secure
the screw I as indicated in (Fig.11).
The filters must be applied to the suction unit inside the
hood, centring them and turning them 90 degrees until they
click stop (Fig.16).
- Perform the electrical connection (fig.12).
- Fix the upper chimney
B
to the structure with the 4 screws
F
(fig.13).
- If the cooker hood is supplied with a lower chimney piece
that must be fixed to the hood body with screws, remove the
anti-grease filters from the hood by acting on the relevant
handles (Fig.15).
- If necessary, fix the lower duct to the hood from the inside,
using the screws
P
(Fig.13). Re-locate the filters in their seat.
USE AND MAINTENANCE
•
We recommend that the cooker hood is switched on before
any food is cooked. We also recommend that the appliance is
left running for 15 minutes after the food is cooked, in order
to thoroughly eliminate all contaminated air.
The effective performance of the cooker hood depends on
constant maintenance; the anti-grease filter and the active
carbon filter both require special attention.
• The anti-grease filter
is responsible retaining the grease
particles suspended in the air, therefore it is subject to clog-
ging with variable frequency according to the use of the
appliance.
- To prevent the danger of possible fires, at least every 2
months one must wash the anti-grease filters by hand using
non-abrasive neutral liquid detergents or in the dishwasher
at low temperatures and on short cycles.
- After a few washes, colour alterations may occur. This does
not give the right to claim their replacement.
• The active carbon filters
are used to purify the air that is
sent back into the room and its function s to mitigate the
unpleasant odours produced by cooking.
- The non-regenerable active carbon filters must be replaced
at least every 4 months. The saturation of the active charcoal
depends on the more or less prolonged use of the appliance,
on the type of kitchen and on the frequency with which anti-
grease filter is cleaned.
- Regenerable active charcoal filters must be washed by hand,
with non abrasive neutral detergents, or in the dishwasher at
a maximum temperature of 65°C (the washing cycle must be
complete without dishware). Remove excess water without
damaging the filter, remove the plastic parts, and let the mat
dry in the oven for at least 15 minutes approximately at a
maximum temperature of 100°C. To keep the regenerable
charcoal filter functioning efficient this operation must be
repeated every 2 months. These must be replaced at least
every 3 years or when the mat is damaged.
• Before remounting the anti-grease filters and the regen
-
erable active charcoal filters it is important that they are
completely dry.
• Clean the hood frequently, both internally and exter
-
nally, using a cloth dampened with denatured alcohol or
neutral liquid detergents that are non abrasive.
•
The lighting .system is designed for use during cooking
and not for the prolonged general lighting of the room. The
prolonged use of the lighting system significantly decreases
the average duration of the bulbs.
•
If the appliance is equipped with courtesy lights it is possible
to use them for general room lighting for a prolonged amount
of time.
• Attention:
The non compliance with the hood cleaning
warnings and with the replacement and cleaning of the filters
entails risk of fires. One therefore recommends keeping to the
suggested instructions.
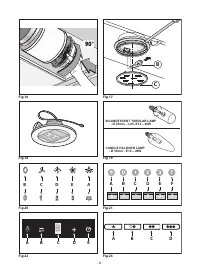
• Replacing halogen light bulbs (Fig.17):
To replace the halogen light bulbs
B
, remove the glass pane
C
using a lever action on the relevant cracks.
Replace the bulbs with new ones of the same type.
Caution:
Do not touch the light bulb with bare hands.
• Replacing LED lamps (Fig.18):
If the appliance version is with LED lamps, the intervention of
a specialised technician is necessary to replace them.
- 10 -
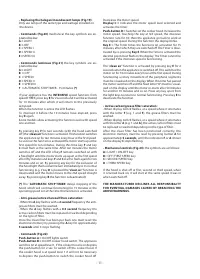
Характеристики

Остались вопросы?Не нашли свой ответ в руководстве или возникли другие проблемы? Задайте свой вопрос в форме ниже с подробным описанием вашей ситуации, чтобы другие люди и специалисты смогли дать на него ответ. Если вы знаете как решить проблему другого человека, пожалуйста, подскажите ему :)


