
Вытяжки KitchenAid KEIPP 12020 - инструкция пользователя по применению, эксплуатации и установке на русском языке. Мы надеемся, она поможет вам решить возникшие у вас вопросы при эксплуатации техники.
Если остались вопросы, задайте их в комментариях после инструкции.
"Загружаем инструкцию", означает, что нужно подождать пока файл загрузится и можно будет его читать онлайн. Некоторые инструкции очень большие и время их появления зависит от вашей скорости интернета.


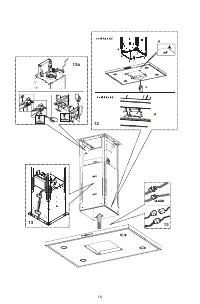


11
8.
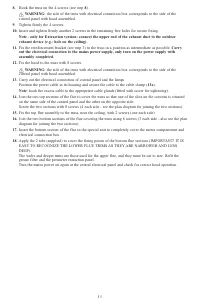
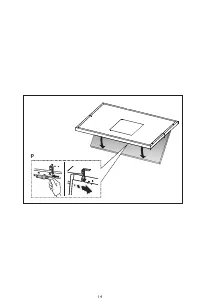
Hook the truss on the 4 screws (see step
8
).
WARNING:
the side of the truss with electrical connection box corresponds to the side of the
control panel with hood assembled.
9.
Tighten firmly the 4 screws.
10.
Insert and tighten firmly another 2 screws in the remaining free holes for secure fixing.
Note
-
only for Extraction version: connect the upper end of the exhaust duct to the outdoor
exhaust device (e.g.: hole on the ceiling).
11.
Fix the reinforcement bracket (see step 3) to the truss in a position as intermediate as possible.
Carry
out the electrical connection to the mains power supply, only turn on the power supply with
assembly completed.
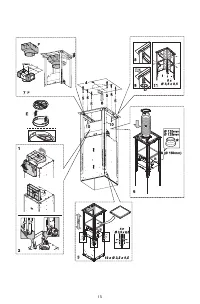
12.
Fix the hood to the truss with 8 screws.
WARNING:
the side of the truss with electrical connection box corresponds to the side of the
control panel with hood assembled.
13.
Carry out the electrical connection of control panel and the lamps.
Position the power cable in its housing and secure the cable to the cable clamp (
13a
).
Note
: hook the excess cable to the appropriate cable glands (fitted with screw for tightening).
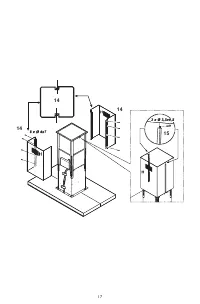
14.
Join the two top sections of the flue to cover the truss so that one of the slots on the sections is situated
on the same side of the control panel and the other on the opposite side.
Screw the two sections with 8 screws (4 each side - see the plan diagram for joining the two sections).
15.
Fix the top flue assembly to the truss, near the ceiling, with 2 screws (one each side).
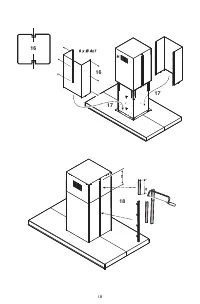
16.
Join the two bottom sections of the flue covering the truss using 6 screws (3 each side - also see the plan
diagram for joining the two sections).
17.
Insert the bottom section of the flue in the special seat to completely cover the motor compartment and
electrical connection box.
18.
Apply the 2 tabs (supplied) to cover the fixing points of the bottom flue sections (IMPORTANT! IT IS
EASY TO RECOGNIZE THE LOWER FLUE TRIMS AS THEY ARE NARROWER AND LESS
DEEP).
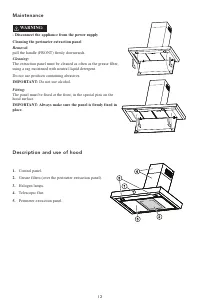
The wider and deeper trims are those used for the upper flue, and they must be cut to size. Refit the
grease filter and the perimeter extraction panel.
Turn the mains power on again at the central electrical panel and check for correct hood operation.
Характеристики

Остались вопросы?Не нашли свой ответ в руководстве или возникли другие проблемы? Задайте свой вопрос в форме ниже с подробным описанием вашей ситуации, чтобы другие люди и специалисты смогли дать на него ответ. Если вы знаете как решить проблему другого человека, пожалуйста, подскажите ему :)


