
Вытяжки Falmec Eclisse 120 - инструкция пользователя по применению, эксплуатации и установке на русском языке. Мы надеемся, она поможет вам решить возникшие у вас вопросы при эксплуатации техники.
Если остались вопросы, задайте их в комментариях после инструкции.
"Загружаем инструкцию", означает, что нужно подождать пока файл загрузится и можно будет его читать онлайн. Некоторые инструкции очень большие и время их появления зависит от вашей скорости интернета.


27
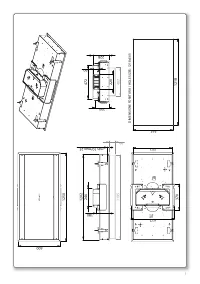
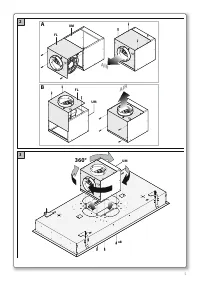
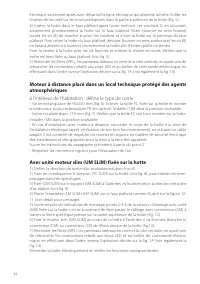
Then remove the central glass panel (G), see fig. 1. To remove the glass, disconnect the elec-
tronic pushbutton panel connector.
This way you have direct access to the motor unit fastening holes.
- Find the type of installation for the extraction version:
With the motor unit (UM) fastened to the range hood:
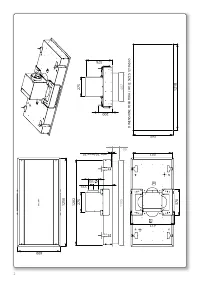
1) Remove the FC flange fitted on the range hood and the FM flange fitted on the UM (fig.
1B). Define the direction of the air outlet by rotating the FL flange of the motor unit (see fig.
2). Fix UM to the range hood according to the output direction of the wanted air (see fig. 3).
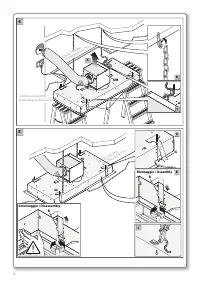
2) Fasten the safety chains to the ceiling using the screws and plugs provided (see fig. 4).
3) Lift the hood near the false ceiling: using a hose, connect the UM motor outlet to the
external air exhaust pipe. Carry out the electric connection only after having disconnected
the electric power supply powering the range hood. Introduce the safety chains inside the
holes in the upper part of the range hood (fig. 5).
4) Insert the range hood in the previously reinforced false ceiling. As the hooks G open they
provisionally support the range hood to the false ceiling.
Tighten all the screws (B) by turning them clockwise in order to open the hook and fasten
the hood to the false ceiling panel. To remove the hood from the false ceiling, undo the
screws (B) by turning them anticlockwise, supporting the hood suitably to prevent it from
falling.
Fix the chain to the range hood using the provided screws and cut the excess chain. Check
that the range hood is fastened securely to the false ceiling (see fig. 5).
5) Remount the filters (MFL), the side glass panels and the central glass panel, reconnecting
the connectors relating to the LED strips and to the electronic pushbutton panel, following
the procedure described in fig. 1 A in the reverse order (also see fig. 14).
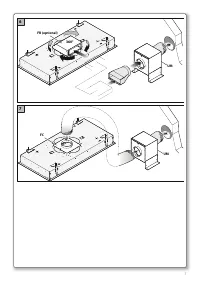
Remote motor positioned in a technical compartment protected
against the weather inside the house: define the type of outlet:
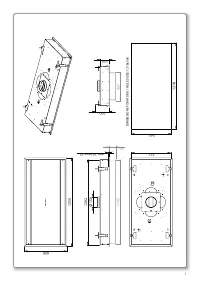
- 90x220 mm rectangular outlet (fig. 6). Remove the FC flange fitted on the range hood and
assemble the rectangular pipe FR flange (optional) (fig. B2). Install the UM in the desired
position.
- 150 mm diam. circular outlet (fig. 7). Verify that the FC flange is assembled on the range
hood. Install the UM in the desired position.
- In the event of an installation with remote motor, connect the range hood body to the
electrical system’s earth (after having checked that it works properly), by means of suitable
cable. It is recommended that you comply with the current regulations on electrical safety
of systems and devices for earthing equipment.
- Follow the instructions in the previous paragraph, starting from point 2.
- Comply with current regulations for air discharge.
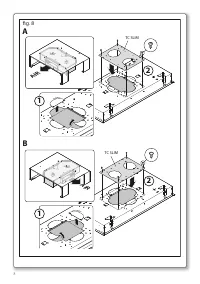
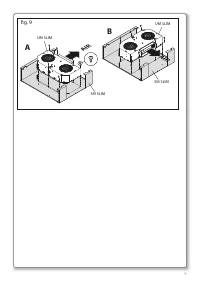
With the slim motor unit (UM SLIM) fastened on the range hood:
1) Define the required air outlet direction, solution A or B.
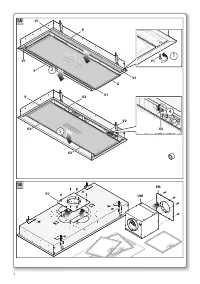
2) Remove the blind plug ( TC SLIM) from the range hood (see fig. 8) and relative knockouts.
3) Fasten (UM SLIM) to the support (SM SLIM) using the supplied screws according to the
direction of the air outlet (see fig. 9).
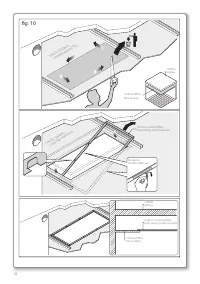
4) Place the assembly (SM SLIM+UM SLIM) on the false ceiling, as shown in figure 10-11 (see
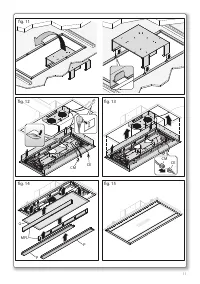
detail for centring).
5) Now follow the assembly instructions in sections 2-3-4 of “Assembly with unit (UM) faste-
ned to the range hood” version; remember that the wiring with connector (CM) must be fed
through the specific slot located at the top of the range hood (fig. 12).
English
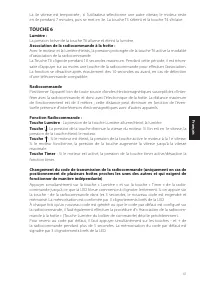
Характеристики

Остались вопросы?Не нашли свой ответ в руководстве или возникли другие проблемы? Задайте свой вопрос в форме ниже с подробным описанием вашей ситуации, чтобы другие люди и специалисты смогли дать на него ответ. Если вы знаете как решить проблему другого человека, пожалуйста, подскажите ему :)


