
Вытяжки Elica CHROME EDS IX A/46 - инструкция пользователя по применению, эксплуатации и установке на русском языке. Мы надеемся, она поможет вам решить возникшие у вас вопросы при эксплуатации техники.
Если остались вопросы, задайте их в комментариях после инструкции.
"Загружаем инструкцию", означает, что нужно подождать пока файл загрузится и можно будет его читать онлайн. Некоторые инструкции очень большие и время их появления зависит от вашей скорости интернета.


14
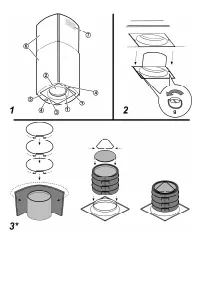
these screws in a safe place) and position it over the
motor assembly.
The bracket should be fixed in place again only after the
perforated frame has been fitted to the ceiling.
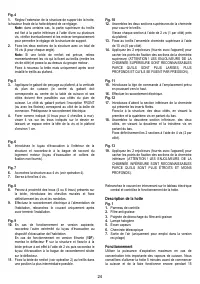
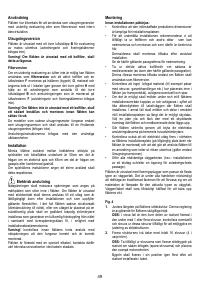
Fig. 5
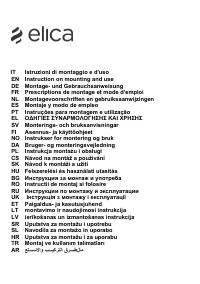
3.
Apply the drilling template to the ceiling so that it is
vertically in line with the hob (the centre of the template
should be aligned with the centre of the hob and the
sides should run parallel to the sides of the hob; the side
of the template displaying the text FRONT (or the arrows)
should correspond to the connection box side). Make the
electrical connection.
4.
Make holes as indicated (4 holes for 4 wall dowels), Screw
in 4 screws into the holes indicated in the drawing leaving
a space between the head of the screw and the ceiling of
about 1 cm.
Fig. 6
5.
Fit an exhaust pipe inside the truss and connect it to the
motor compartment connection ring (exhaust pipe and
fixing brackets are not supplied).
Fig. 7
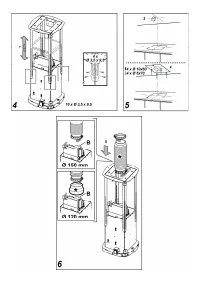
6.
Hook the frame onto the 4 screws (see step 4).
7.
Tighten the 4 screws.
Fig. 8
8.
Drill around the holes (4 or 6 holes) on the flange, fit the
rawl plugs into the wall and fix the screws and washers in
place.
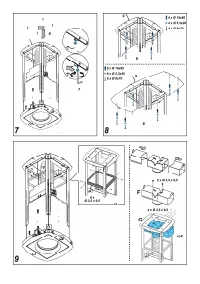
9.
Carry out the electrical connection to the mains power
supply, only turn on the power supply upon completion of
assembly.
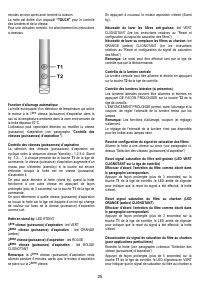
Fig. 9
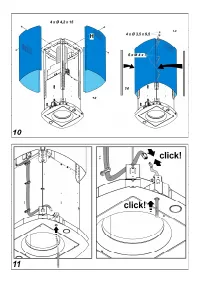
10.
For extractor versions, connect the other end of the
exhaust pipe to the flue.
For filter versions (
10F
), fit deflector
F
to the truss and
secure it to the bracket supplied using 4 screws, then
connect the exhaust pipe to the connection ring located on
the deflector.
11.
Fix the reinforcement bracket (see step 2) to the
perforated frame in a position which is as near to the
middle as possible.
Fig. 10
12.
Join the two upper sections of the duct covering the
perforated frame.
Fix each individual section in place using 2 screws (1 per
side) near the ceiling.
13.
Fix the upper duct to the perforated frame using 10
screws (5 per side).
14.
Apply 2 casings (supplied) to cover the fixing points on
the upper duct sections (CAUTION: THE UPPER DUCT
CASINGS ARE EASY TO RECOGNISE BECAUSE
THEY ARE WIDER, DEEPER AND ARE FITTED BY
PRESSING THEM INTO PLACE).
Fig. 11
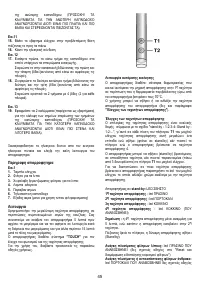
15.
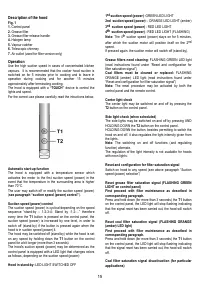
Fit the control shaft in the correct position by pushing it
upwards.
16.
Connect the electricity.
Fig. 12
17.
First insert the lower section of the duct, on which the
threaded inserts can be found.
Fix it to the frame, tightening the first and fourth screws
on both sides (counting from the bottom).
18.
Join the second lower section by tightening the second
and third screws on each side (counting from the
bottom).
Fix the 2 sections in place using 4 screws (2 per side).
Fig. 13
19.
Apply 2 casings (supplied) to cover the fixing points on
the lower duct sections (CAUTION: THE LOWER DUCT
CASINGS ARE EASY TO RECOGNISE BECAUSE
THEY ARE NARROWER AND LESS DEEP).
Turn the mains power on again at the central electrical panel
and check for correct hood operation.
Характеристики

Остались вопросы?Не нашли свой ответ в руководстве или возникли другие проблемы? Задайте свой вопрос в форме ниже с подробным описанием вашей ситуации, чтобы другие люди и специалисты смогли дать на него ответ. Если вы знаете как решить проблему другого человека, пожалуйста, подскажите ему :)


