
Вытяжки Bertazzoni K90CONXA - инструкция пользователя по применению, эксплуатации и установке на русском языке. Мы надеемся, она поможет вам решить возникшие у вас вопросы при эксплуатации техники.
Если остались вопросы, задайте их в комментариях после инструкции.
"Загружаем инструкцию", означает, что нужно подождать пока файл загрузится и можно будет его читать онлайн. Некоторые инструкции очень большие и время их появления зависит от вашей скорости интернета.


GB
Introduction
PLEASE READ ALL INSTRUCTlONS CAREFULLY BEFORE COMMENCING INSTALLATlON. CHECK THAT THE
ELECTRICAL SUPPLY DATA QUOTED ON THE RATlNG PLATE OF THE APPLIANCE AGREES WITH THAT OF
YOUR SUPPL Y. (SEE NOTE "SAFETY REQUIREMENTS")
These instructions are designed to tell you of the various technical details of your cooker hood and to make you familiar
with its use. Since these instructions cover more than one type of the hood within the same series, it may be that
reference is made to components that do not form part of the hood that you are installing. The hood may be used an
exhaust hood.
Suggestions for using the hood in exhaust position
When an exhaust hood and a heat source requiring ambient air (e.g. gas, oil, coal stoves, etc.) are used at the same
time, attention is required because the air necessary for combustion is exhausted from the room through the hood and,
this creates depression. There is no such danger when the maximum depression in the room is 0,04mbar. In this
condition no exhaust gas from the heat source is piped. To assure this condition, make openings in the room which
cannot be closed (doors, windows, etc. are not sufficient) and through which the air necessary for combustion can freely
flow.
Note:
All the exhaust ductwork in the apartment or house should be studied. In case of doubts, get advise or
authorization from the person or ageney responsible for the building. When using gas burners, gas ovens, etc. as well as
when using the hood in the filter version, these precautions are not necessary.
Note:
The efficiency of the exhaust hood decreases as the length of the ducts and number of elbows inerease. When
using the exhaust version, follow these rules: Do not connect the exhaust hood to chimney, flues, and air ducts serving
the room. Before venting into exhaust flues and ducts no longer in use, ask for the approval of the person or agency
responsible for the building. The evacuated air must not be let into a warm air duct. For the evacuation of the exhausted
air please note ufficial instructions.
Installatlon
The hood must be mounted over the centre of the cooking area. The minimum distances between the cooking area and
the underpart of the hood are 650 mm.
Warning:
If the room contains a flued fuel burning appliance which is not of the "balance flue" type make sure these is
an adequate air inlet to the room at all times so that fumes are not drawn down the flue.
N.B.
The distances, however, are subject to the safety rules in effect in the various countries. Before drilling the wall
make sure that no pipes or cables will be damages.
If there is no outer waste-pipe for the exhaust version, an air outlet with a diameter of Ø160mm, in case you use the
spigot reduction (pict.3/F) you need an exhaust outlet
Attentlon:
Take attention that the wall will support the weight of the cooker hood (about 30 Kg). The serews supplied
with this rangehood are designed for fixing to reinforced concrete, masonry walls or hollow building blocks.
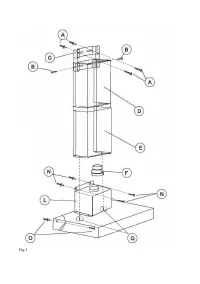
Wall fixing of the eooker hood
1) Set the dislance between the cooker hob and the hood (Pict.2 ).
2) If your hood is fitted with a metal filter frame the mounting operation can be made more easily by removing it (Pict. 1)
before beginning to work. The frame must be remounted when the operation is finished.
3) Drill the holes into the wall (Pict.3/N) at the right distance showen here after, and fix the cookerhood.
4) For a correct installation the hood is provided (in the rear side of its body) with one or two holes 8 mm diam. into which
one or two wall fixing screws mustI be inserted (Pict.3/O).
5) For the exhaust version, please connect the flange to an outlet ducting of 125 mm diameter (Pict 3/F)
- Insure that all parts are properly fixed and that it is impossible to touch moving parts.
N.B.: When using a 150 mm air outlet, do not fasten the air outlet pipe with the screws, as this might cause the metal
valve to malfunction.
Installation ofthe pipes
1) Fix the bracket (Pict.3/C) with 2 plugs and screws (Pict.3/A) in the required hight for the pipe.
2) Screw the short pipe (Pict.4/D) with 2 screws on the braeket (Pict.3/B).
3) Insert the 2 nuts in the holes on the lower part of the long pipe. Put the long pipe over the short one (Pict.3/E) by
pulling a part the laterals of the pipe.
4) Fix the long pipe wilh 2 serews on the hood (Pict. 3/Q).
Electrlc connectlon
Make sure the supply voltage ratings correspond with those stated on the appliance data plate
Attention:
if the appliance is not provided with a plug or cannot be easily connected to a wall socket, then the electrical
circuit must incorporate a circuit breaker having at least a 3 mm separation between contacts. If the appliance is provided
wlth a supply cord and plug, the appliances must be positioned so that the plug is accessible.
Attentlon:
the electrical supply cable must be connected as follow:
Green/Yellow=ground
-
Blue = neutral
-
Brown = line
Important: the hood manufacturer wllI not be responsible for any damage or loss caused by failure to observe these instructions.
Important: a damaged power supply cord must be replaced by the service.
Operating instructions
The cooker hood should be switched on either before or at the same as cooking or frying commences. The grease and
carbon filters are more effective if the fan is not switched off immediately after cooking or frying is completed, but only
after a period of some 20-30 minutes. Before using the cooker hood please ensure that all plastic films like on metal
grease filter an stainless steel ducting are removed.
User instructions
Характеристики

Остались вопросы?Не нашли свой ответ в руководстве или возникли другие проблемы? Задайте свой вопрос в форме ниже с подробным описанием вашей ситуации, чтобы другие люди и специалисты смогли дать на него ответ. Если вы знаете как решить проблему другого человека, пожалуйста, подскажите ему :)


