
Воздуходувки GreenWorks 82V - инструкция пользователя по применению, эксплуатации и установке на русском языке. Мы надеемся, она поможет вам решить возникшие у вас вопросы при эксплуатации техники.
Если остались вопросы, задайте их в комментариях после инструкции.
"Загружаем инструкцию", означает, что нужно подождать пока файл загрузится и можно будет его читать онлайн. Некоторые инструкции очень большие и время их появления зависит от вашей скорости интернета.


English (original instructions)
WARNING
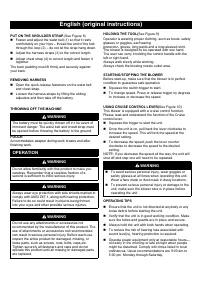
To avoid serious personal injury, the blower tube must
be used when operating this unit.
NOTE: The blower tube is not assembled on this unit.
Installation is required to provide safe and easy use for
the operator.
WARNING
If any parts are damaged or missing do not operate this
product until the parts are replaced.
Failure to heed this warning could result in serious
personal injury.
WARNING
Do not attempt to modify this product or create
accessories not recommended for use with this
product. Any such alteration or modification is misuse,
and could result in a hazardous condition, leading to
possible serious personal injury.
WARNING
Do not connect to power supply until assembly is
complete. Failure to comply could result in
accidental starting and possible serious personal injury.
WARNING
To prevent serious personal injury, make sure the
unit is in the OFF position, it is unplugged, and the
impellers have stopped before attaching or removing
tubes.
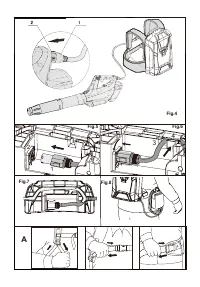
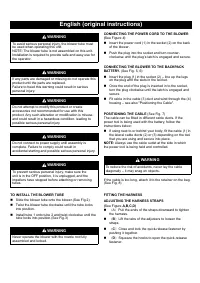
TO INSTALL THE BLOWER TUBE
Slide the blower tube onto the blower.(See Fig.2)
Twist the blower tube clockwise until the tube locks
into position.
Install tube 1 onto tube 2 and twist clockwise until the
tube locks into position.(See Fig.3)
WARNING
Never operate the blower with the nozzle not fully
assembled and locked.
CONNECTING THE POWER CORD TO THE BLOWER
(
See Figure 4
)
Insert the power cord (1) in the socket (2) on the back
of the blower.
Push the plug into the socket and turn counter-
clockwise until the plug’s latch is engaged and secure.
CONNECTING THE BLOWER TO THE BACKPACK
BATTERY.
(See Fig. 5, 6)
Insert the plug (1) in the socket (2) – line up the lugs
on the plug with the slots in the socket.
Once the end of the plug is inserted in to the socket,
turn the plug clockwise until the latch is engaged and
secure.
Fit cable in the cable (3) duct and wind through the (4)
housing – see also "Positioning the Cable".
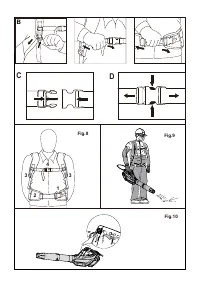
POSITIONING THE CABLE
(See Fig. 7)
The cable can be fitted in different cable ducts. If the
power tool is being used with the battery, follow the
instructions below:
If using next to or behind your body, fit the cable (1) in
the lateral cable ducts (2) or (3) depending on the tool
that you are using and secure into place.
NOTE:
Always use the cable outlet at the side in which
the power tool is being held and controlled.
WARNING
To reduce the risk of accidents, never lay the cable
diagonally – it may snag on objects.
If the cable is too long, attach it to the retainer on the bag.
(See Fig. 8)
FITTING THE HARNESS
ADJUSTING THE HARNESS STRAPS
(
See Figure
A,B,C,D)
(
A
)
Pull the ends of the straps downward to tighten
the harness.
(
B
)
Lift the tabs of the adjusters to loosen the
straps.
(
C
)
Close and lock the quick-release fastener by
pushing it together.
(
D
)
Squeeze the hooks to open the quick-release
fastener.
Характеристики

Остались вопросы?Не нашли свой ответ в руководстве или возникли другие проблемы? Задайте свой вопрос в форме ниже с подробным описанием вашей ситуации, чтобы другие люди и специалисты смогли дать на него ответ. Если вы знаете как решить проблему другого человека, пожалуйста, подскажите ему :)


