Водонагреватели Thermex Giro 150 - инструкция пользователя по применению, эксплуатации и установке на русском языке. Мы надеемся, она поможет вам решить возникшие у вас вопросы при эксплуатации техники.
Если остались вопросы, задайте их в комментариях после инструкции.
"Загружаем инструкцию", означает, что нужно подождать пока файл загрузится и можно будет его читать онлайн. Некоторые инструкции очень большие и время их появления зависит от вашей скорости интернета.
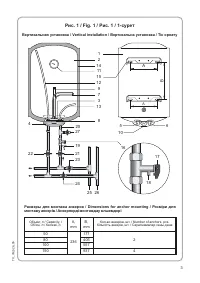
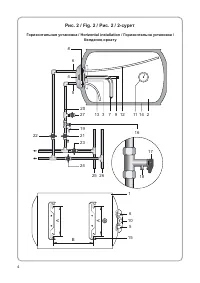


channels, and pipes passing through it. The EWH is suspended using the casing brackets on the
anchor hooks fixed in the wall.
The manufacturer shall not bear responsibility for the EWH fall due to its incorrect installation.
The installation of hooks in the wall shall prevent the spontaneous movement of the EWH brackets
over them. For the purposes of EWH maintenance, the distance from the protective cover to the
nearest surface in the direction of the removable flange axis shall be at least 0.5 meters.
In order to avoid causing harm to the property of the customer and (or) third parties in case of faulty hot
water supply system, it is necessary to install the EWH in premises that are equipped with
waterproofing floors and drainage to the sewage system, and under no circumstances should you
place non-waterproof items exposed to water under the EWH. When placing the EWH in unprotected
premises, it is necessary to install a protective tray (not included in the EWH supply package) under
the EWH equipped with drainage into the sewage system.
In case EWH is installed in places that are difficult to access with a view to perform technical and
warranty maintenance (mezzanines, alcoves, ceiling void, etc.), the EWH shall be installed and
dismantled by the customer independently or at his/her own expense.
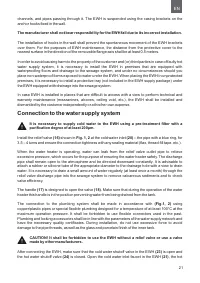
Connection to the water supply system
It is necessary to supply cold water to the EWH using a pre-treatment filter with a
purification degree of at least 200μm.
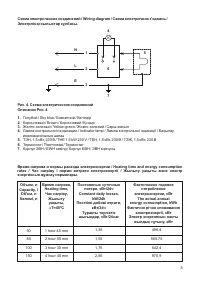
Install the relief valve
(16)
shown in
Fig. 1, 2
at the cold water inlet
(20)
–
the pipe with a blue ring, for
3
,
5
–
4 turns and ensure the connection tightness with any sealing material (flax, thread-fill tape, etc.).
When the water heater is operating, water can leak from the relief valve outlet pipe to relieve
excessive pressure, which occurs for the purpose of ensuring the water heater safety. The discharge
pipe shall remain open to the atmosphere and be directed downward constantly. It is advisable to
attach a rubber or silicone tube of the appropriate diameter to the drainage hole with a view to drain
water. It is necessary to drain a small amount of water regularly (at least once a month) through the
relief valve discharge pipe into the sewage system to remove calcareous sediments and to check
valve efficiency.
The handle
(17)
is designed to open the valve
(18)
. Make sure that during the operation of the water
heater this handle is in the position preventing water from being drained from the tank.
The connection to the plumbing system shall be made in accordance with
(Fig.1, 2)
using
copper/plastic pipes or special flexible plumbing designed for a temperature of at least 100°C at the
maximum operation pressure. It shall be forbidden to use flexible connectors used in the past.
Plumbing and locking accessories shall be in line with the parameters of the water supply network and
have the necessary quality certificates. During installation, do not use excessive force to avoid
damage to the pipe threads, as well as the glass and porcelain finish of the inner tank.
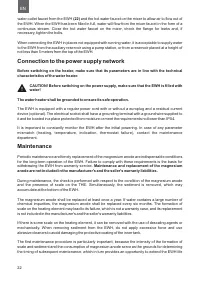
CAUTION! It shall be forbidden to use the EWH without a relief valve or use a valve
made by other manufacturers.
After connecting the EWH, make sure that the cold water shutoff valve in the EWH
(23)
is open and
the hot water shutoff valve
(24)
is closed. Open the cold water inlet faucet in the EWH
(21)
, the hot
21
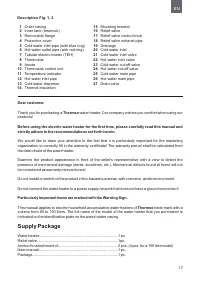
The following components are mounted on a removable flange
,
: tubular heating element
(3) Fig.1, 2
(THE)
, a thermostat
, and a magnesium anode
. The heater is used for heating water, and the
(7)
(8)
(9)
thermostat makes it possible to adjust the heating temperature to +70°C (± 5°C). The magnesium
anode is designed to neutralize the effects of electrochemical corrosion on the inner tank.
The water temperature in the inner tank is adjusted by means of the thermostat handle
located on
(10)
the protective cover of the water heater.
By turning the
handle
anticlockwise (up tothe stop) EWH is
disconnected from the power, by turning in a clockwise direction the temperatureslowly increases up
to +70° C (± 5° C).
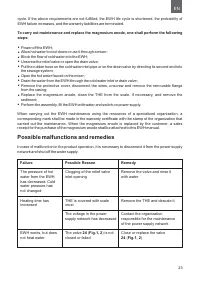
The thermostat also contains a thermal switch – the device protects the EWH from
overheating, which disconnects the heater from the power supply network when the water
temperature exceeds +93° (±5° ). EWH may heat up during operation. The activation of the
С
С
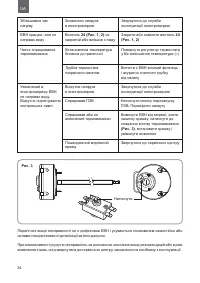
thermal protection of the water heater is not its malfunction. To return the water heater to the working
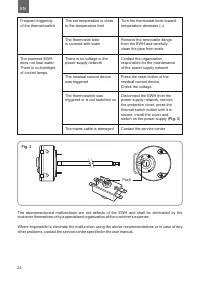
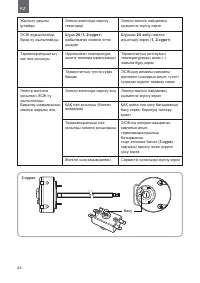
s t a t e , p r e s s t h e t h e r m o s w i t c h r o d l o c a t e d u n d e r t h e p r o t e c t i v e c o v e r o f t h e E W H
.
(Fig. 3)
The relief valve functions as a non-return valve by preventing the water from entering the water pipe in
case of pressure drop in the latter and in case of increase in the pressure in the tank with strong water
heating and as a relief valve by relieving the overpressure in the tank when the water is heated up
strongly.
Depending on the EWH model, the protective cover
has one or two control lamps indicating the
(4)
instrument operation or power selection keys.
In models with a single control lamp, the lamp indicates the EWH operation mode – it is lit up when the
water is heated and goes out when the set temperature has been reached.
In models with two control lamps, the
Lamp indicates the EWH operation mode – it is lit up
«
Heating
»
when the water is heated and goes out when the set temperature has been reached. The
«
Power
»
Lamp is lit up constantly it indicates the device connection to the power supply network.
–
For models with power selection keys, the indicator of the EWH operation mode is used for the lamps
intended for highlighting power selection keys
they are lit up when the water is heated and go out
–
when the set temperature has been reached.
A Residual Current Device is mounted on the EWH electric cord, which ensures the EWH
disconnection from the power supply network when a leakage current appears on the grounded
elements of the electrical appliance.
Placement and Installation
The advantage of GIRO water heaters is their versatility. EWH design provides for both vertical
(Fig. 1) and horizontal (Fig. 2) installation methods
for the GIRO 50, GIRO 80, and GIRO 100
models. The GIRO 150 is designed for vertical mounting only (Fig. 1). It is not allowed to install
the GIRO 150 in a different position.
It is advisable to install the EWH as close as possible to the place of use of hot water in order to reduce
heat losses in the pipes.
When selecting the installation site, the total weight of the EWH filled with water shall be taken into
account. The wall and the floor with a weak load-carrying capacity shall be strengthened,
respectively. When drilling (making) holes in the wall, it is necessary to take into account the cables,
20
EN
EN
Содержание
- 3 Рис
- 6 Комплект поставки; Thermex
- 8 Описание и принцип действия; Heating; Указание мер безопасности
- 10 Подключение к электросети; для моделей; Подключение к водопроводу; ной очистки воды со степенью очистки не менее 200 мкм.
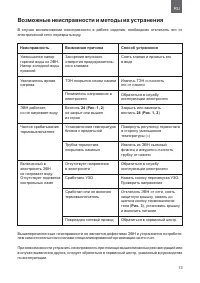
- 12 Возможные неисправности и методы их устранения; отметка с печатью организа
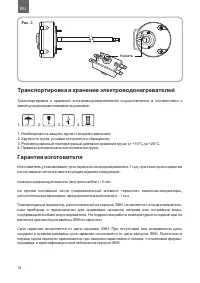
- 14 комплекта поставки ЭВН.; Утилизация; Транспортировка и хранение электроводонагревателей
- 16 Supply Package; mail
- 48 Warranty certificates /
- 50 Заполняется сервисным центром
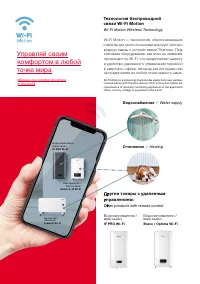
- 51 Отопление; Водоснабжение


