
Видеорегистратор Soundmax SM-DVR51FHD - инструкция пользователя по применению, эксплуатации и установке на русском языке. Мы надеемся, она поможет вам решить возникшие у вас вопросы при эксплуатации техники.
Если остались вопросы, задайте их в комментариях после инструкции.
"Загружаем инструкцию", означает, что нужно подождать пока файл загрузится и можно будет его читать онлайн. Некоторые инструкции очень большие и время их появления зависит от вашей скорости интернета.


4
4
Instruction Manual
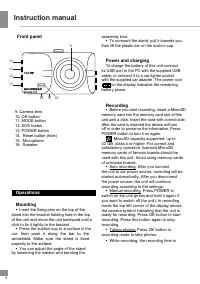
shown in white figures in the top
left
corner
of the display. The unit will save video files
automatically after each
1
/3/5
minutes (see
“Setup“ paragraph below for more details).
When the memory card is filled, old files will be
deleted and the new files will be recorded
instead. Press OK button to stop and to
continue recording.
• Before removing memory card stop
recording. Press on the card until a click to
remove it.
• Motion detector recording is available
after you switch on this item in the setting
menu (see “Setup“ paragraph below for more
details). The unit will go to recording mode if
there is image motion in front of the lens. When
a motion is detected, the unit will start to record
a video fragment (no matter whether there is
motion or not during the recording period), after
the fragment is recorded, the unit comes to
standby mode till a motion is detected again.
• G-sensor. If overload resulting from an
impact exceeds the setup value (1 g =
9.8m/s^2; see “Setup“ paragraph below for
more details), the current video fragment
will be automatically protected from re-
recording.
Playback mode
•
Stop the
recording
and p
ress
MODE
to enter playback mode. Press UP/DOWN
button to choose the file. Press OK button to
play the selected file. Press OK button to
stop or resume playback.
• In file playback mode select a file, then
press the M
ENU
button. A menu
will appear
in which you can select to delete, protect
or slide show the file. Select either option,
then press OK button to confirm.
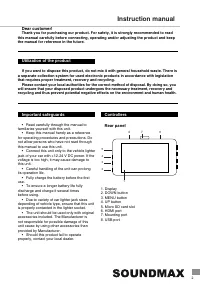
Connection to PC
• Connect this unit
to a computer using
the supplied USB connection cable
. Now
this unit can
be used as a mass storage
device ("Mass Storage") or as a webcam for
your PC ("PC Camera")
.
•
The computer will launch the automatic
driver management software. Follow the on-
screen instructions to properly install the
camera driver.
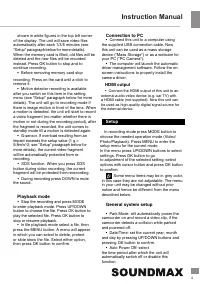
Setup
In recording mode press MODE button to
choose the needed operation mode (Video/
Photo/Playback).
Press MENU
to enter the
setup menu for the current mode.
In the menu press
UP
/
DOWN
buttons to select
settings. Press OK button to go
to adjustment of the selected setting; select
options with cursor button and press OK button
to confirm.
Some menu items may be in grey color,
in this case they are not adjustable. The menu
in your unit may be changed without prior
notice and hence be different from the menu
described below.
General system setup
•
Park Mode: will automatically power the
camcorder on and record a video clip, if the
camcorder detects a collision while parked
and powered off.
• Date/Time: set the current year, month
and day by pressing
UP
/
DOWN
buttons and
pressing OK button to confirm.
• Auto Power Off: select
the time period after which the unit will
automatically switch off or disable this
function.
• SOS function. When you press SOS
button during video recording, the current
fragment will be protected from rerecording.
•
During recording press
DOWN
to mute
the sound
.
HDMI output
• Connect the HDMI output of this unit to an
external audio-video device (e.g. car TV) with
a HDMI cable (not supplied). Now this unit can
be used as high-quality digital signal source for
the external device.
Содержание
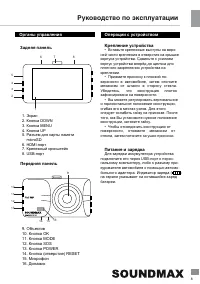
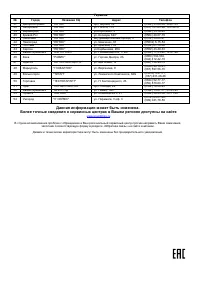
- 8 Органы управления; отогните; Питание и зарядка; Для зарядки аккумулятора устройства; DOWN; MODE
- 9 Запись; чении источника питания в автомобиле
- 10 Воспроизведение; предварительно остановив видеозапись; Подключение к ПК; Режим парковки: в этом режиме
- 11 Настройки в режиме записи видео; Разрешение влияет на качество и; Настройки фото; Последовательность; Настройки в режиме просмотра; ить
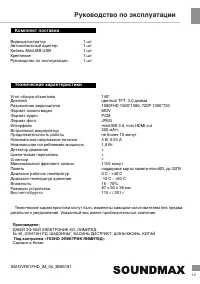
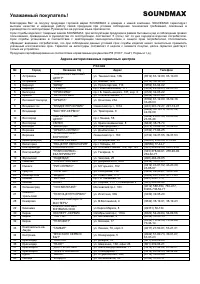
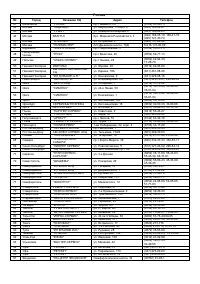
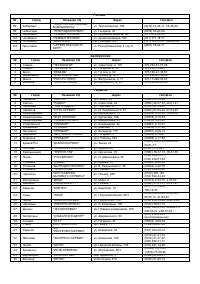
- 12 Комплект поставки; Крепление; Технические характеристики; питания; Под контролем «ТЕХНО ЭЛЕКТРИК ЛИМИТЕД»; Сделано в Китае
- 13 Устранение неисправностей; Общая информация
- 17 Данная информация может быть изменена.


