Видеокамеры Sony DCR-PC2E / DCR-PC3E - инструкция пользователя по применению, эксплуатации и установке на русском языке. Мы надеемся, она поможет вам решить возникшие у вас вопросы при эксплуатации техники.
Если остались вопросы, задайте их в комментариях после инструкции.
"Загружаем инструкцию", означает, что нужно подождать пока файл загрузится и можно будет его читать онлайн. Некоторые инструкции очень большие и время их появления зависит от вашей скорости интернета.


125
Addit
ional Inf
ormat
ion
Дополнительная информация
En g l i sh
Tro u b l e sh o o t i n g
If you run into any problem using your camcorder, use the following table to troubleshoot the
problem. If the problem persists, disconnect the power source and contact your Sony dealer. If
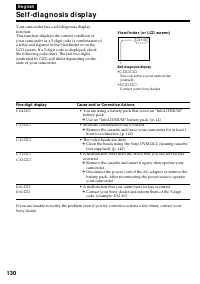
“C:
ss
:
ss
” appears on the LCD screen or in the viewfinder, the self-diagnosis display function has
worked. See page 130.
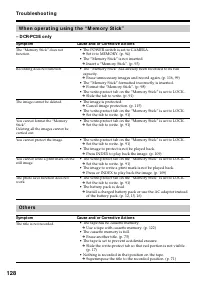
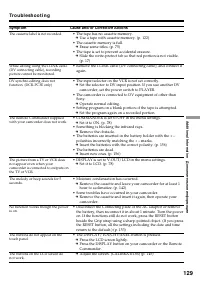
I n t h e r e co r d i n g m o d e
Sympt om
Cause and/ or Correct ive Act ions
• The POWER switch is set to OFF or PLAYER.
c
Set it to CAMERA. (p. 20)
• The tape has run out.
c
Rewind the tape or insert a new one. (p. 17, 30)
• The write-protect tab is set to expose the red mark.
c
Use a new tape or slide the tab. (p. 14)
• The tape is stuck to the drum (moisture condensation).
c
Remove the cassette and leave your camcorder for at least 1
hour to acclimatize. (p. 142)
• START/STOP MODE is set to 5SEC or .
c
Set it to
. (p. 25)
• While being operated in the CAMERA mode, your camcorder
has been in the standby mode for more than 5 minutes.
c
Set the POWER switch to OFF and then to CAMERA again.
(p. 20)
• The viewfinder lens is not adjusted.
c
Adjust the viewfinder lens. (p. 22)
• STEADYSHOT is set to OFF in the menu settings.
c
Set it to ON. (p. 78)
• FOCUS is set to MANUAL.
c
Set it to AUTO. (p. 53)
• Shooting conditions are not suitable for autofocus.
c
Set FOCUS to MANUAL to focus manually. (p. 53)
• START/STOP MODE is set to 5SEC or .
c
Set it to
. (p. 25)
• The digital effect function is working.
c
Cancel it. (p. 46)
• The video heads may be dirty.
c
Clean the heads using the Sony DVM12CL cleaning cassette
(not supplied). (p. 143)
• The contrast between the subject and background is too high.
Your camcorder is not a malfunction.
• Your camcorder is not a malfunction.
• Slow shutter, low lux or NightShot +Slow shutter mode is
activated. This is not a malfunction.
• If 10 minutes elapse after you set the POWER switch to
CAMERA or DEMO MODE is set to ON in the menu settings
without a cassette inserted, your camcorder automatically
starts the demonstration.
c
Insert a cassette or press the LCD screen. The demonstration
stops.
You can also cancel DEMO MODE. (p. 83)
(continued on the following page)
START/STOP does not operate.
The power goes off.
Recording stops in a few seconds.
The image on the viewfinder screen
is not clear.
The fader function does not work.
The autofocusing function does not
work.
The SteadyShot function does not
work.
The
x
indicator flashes in the
viewfinder or on the LCD screen.
A vertical band appears when you
shoot a very bright subject.
Some tiny white spots appear in the
viewfinder or on the LCD screen.
A vertical band appears when you
shoot a subject such as lights or a
candle flame against a dark
background.
An unknown picture is displayed in
the viewfinder or on the LCD screen.
Содержание
- 2 En g l i sh; camcorder. With your Digital; W ARNING; Русский; ПРЕДУПРЕЖДЕНИЕ; ВНИМАНИЕ; or; A TTEN TI ON
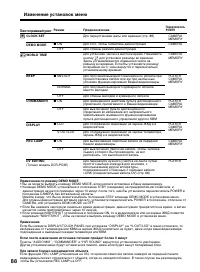
- 4 Оглавление
- 5 и л и
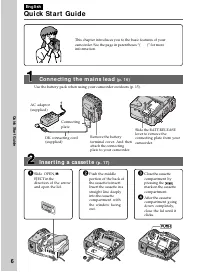
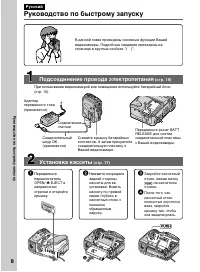
- 8 Руководство по быстрому запуску; Подсоединение провода электропитания; EJECT в; Установка кассеты
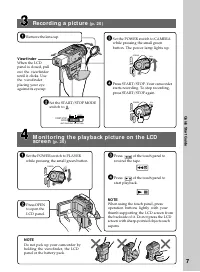
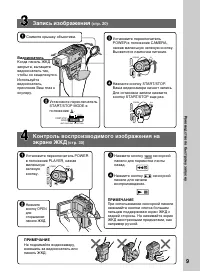
- 9 Запись изображения
- 10 — Ge t t i n g st a r t e d —; Usi n g t h i s m a n u a l; Types of dif f erences; Provided; N o t e o n Ca sse t t e M e m o r y; — Подготовка к эксплуатации —; Использование данного руководства; Примечание по кассетной памяти; Типы различий; Синхронный монтаж DV
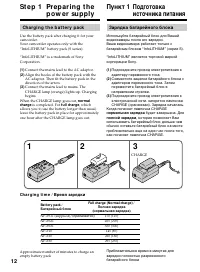
- 12 St e p 1 Pre p a r i n g t h e; Ch a r g i n g t h e b a t t e r y p a ck; Connect the mains lead to the AC adaptor.; normal; CHARGE; Пункт 1 Подготовка; Зарядка батарейного блока; Когда погаснет лампочка CHARGE; нормальная зарядка; будет завершена. Для; полной зарядки; , которая позволяет Вам
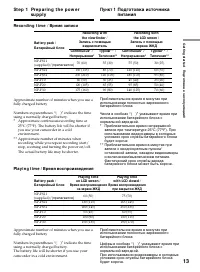
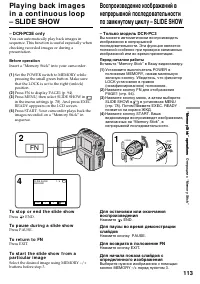
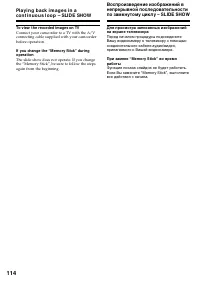
- 13 Re co r d i n g t i m e /; St e p 1 Pr e p a r i n g t h e p o w e r; Recording w it h; Пункт 1 Подготовка источника; )” указывают время при
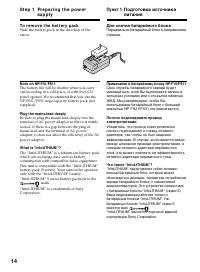
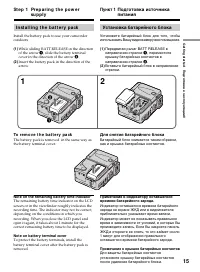
- 14 To r e m o v e t h e b a t t e r y p a ck; Plug t he mains lead deeply; Для снятия батарейного блока; Примечание к батарейному блоку NP-F10/FS11
- 15 , slide the battery terminal; Not e on t he remaining bat t ery t ime indicat or; Примечание к крышке батарейных контактов
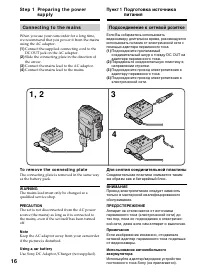
- 16 Co n n e ct i n g t o t h e m a i n s; To r e m o v e t h e co n n e ct i n g p l a t e; Для снятия соединительной пластины
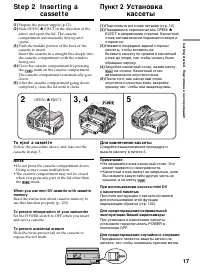
- 17 To e j e ct a ca sse t t e; Not es; St e p 2 I n se r t i n g a; Для извлечения кассеты; Примечания; Пункт 2 Установка
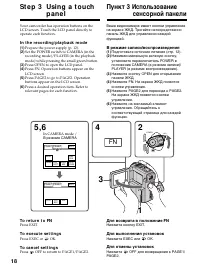
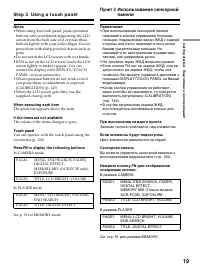
- 18 FN; I n t h e r e co r d i n g /p l a y b a ck m o d e; Press OPEN to open the LCD panel.; To r e t u r n t o FN; Press EXEC or; To ca n ce l se t t i n g s; Press; St e p 3 Usi n g a t o u ch; В режиме CAMERA; Пункт 3 Использование; В режиме записи/воспроизведения; Нажмите ЕХЕС или; Для отмены установок; Нажмите
- 19 St e p 3 Usi n g a t o u ch p a n e l; Пункт 3 Использование сенсорной
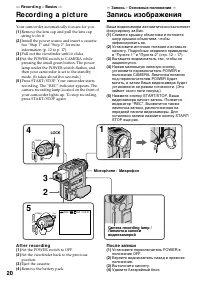
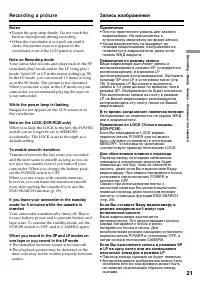
- 20 — Re co r d i n g – Ba si cs —; Re co rd i n g a p i ct u re; Your camcorder automatically focuses for you.; A f t e r r e co r d i n g; Set the POWER switch to OFF.; После записи; Удалите батарейный блок
- 21 • Fasten the grip strap firmly. Do not touch the; Not e on Recording mode; • Плотно пристегните ремень для захвата; Примечание по режиму записи
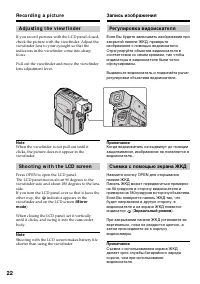
- 22 A d j u st i n g t h e v i e w f i n d e r; Not e; Sh o o t i n g w i t h t h e LCD scr e e n; indicator appears in the; M irror; Примечание; Съемка с помощью экрана ЖКД; Зеркальный режим
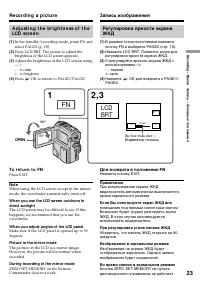
- 23 OPEN; Для возврата в положение FN
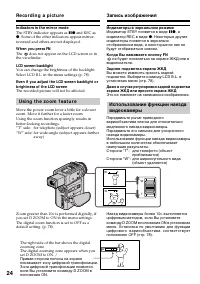
- 24 Индикаторы в зеркальном режиме; Когда Вы нажимаете кнопку FN; Xz; W hen you press FN; Usi n g t h e zo o m f e a t u r e
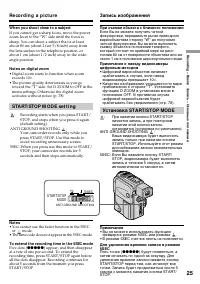
- 25 При съемке объекта с близкого положения; • Цифровой вариообъектив начинает; Установка START/STOP MODE; В режиме 5SEC счетчик ленты не появляется.; W hen you shoot close t o a subject; STA RT/STOP M OD E se t t i n g; zzzzz
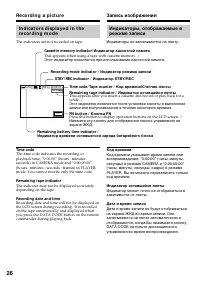
- 26 The indicators are not recorded on tape.; Индикаторы не записываются на ленту.
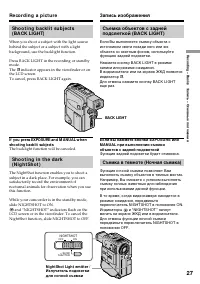
- 27 indicator appears in the viewfinder or on; BACK LIGHT; Функция задней подсветки будет отменена.
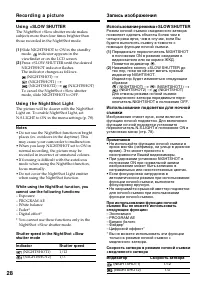
- 28 Использование режима +SLOW SHUTTER; • Не используйте функцию ночной съемки в; Индикатор; Usi n g +SLOW SHUTTER
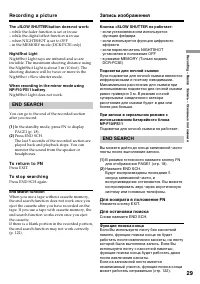
- 29 The +SLOW SHUTTER but t on does not w ork:; NightShot Light does not work.; EN D SEA RCH; End search f unct ion; Подсветка для ночной съемки; END SEARCH; Функция поиска конца
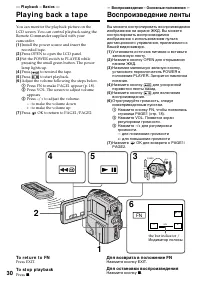
- 30 — Pl a y b a ck – Ba si cs —; Pl a y i n g b a ck a t a p e; — Воспроизведение – Основные положения —; Воспроизведение ленты
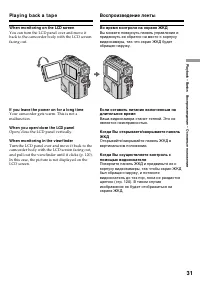
- 31 W hen monit oring on t he LCD screen; Во время контроля на экране ЖКД
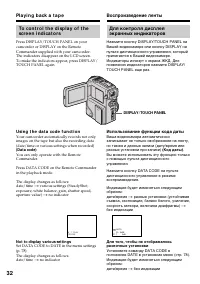
- 32 Usi n g t h e d a t a co d e f u n ct i o n; Not t o display various set t ings; no indicator; Использование функции кода даты; разные установки (устойчивая
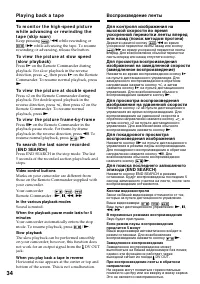
- 33 Для ускоренной перемотки ленты назад; V a r i o u s p l a y b a ck m o d e s; To a d v a n ce t h e t a p e
- 34 Кнопки видеоконтроля; To v i e w t h e p i ct u r e a t d o u b l e sp e e d; Video cont rol but t ons
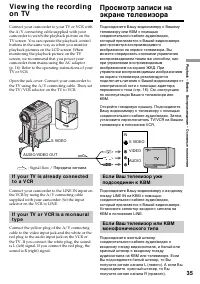
- 35 Передача сигнала
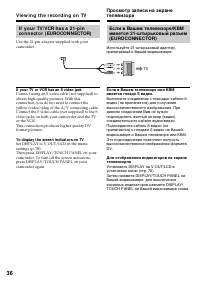
- 36 V i e w i n g t h e r e co r d i n g o n TV; TV
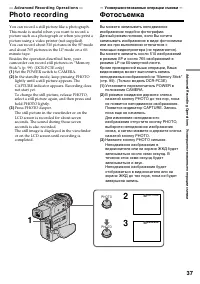
- 37 — A d v a n ce d Re co r d i n g Op e r a t i o n s —; Ph o t o re co rd i n g; Set the POWER switch to CAMERA.; — Усовершенствованные операции съемки —; Фотосъемка
- 38 Ph o t o r e co r d i n g
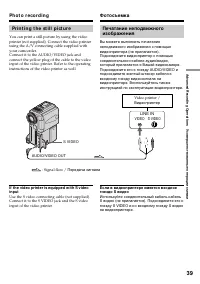
- 39 LINE IN; Pr i n t i n g t h e st i l l p i ct u r e
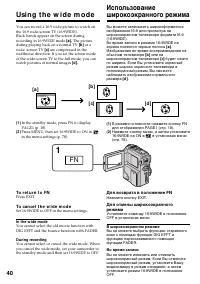
- 40 Set 16:9WIDE to OFF in the menu settings.; In t he w ide mode; Usi n g t h e w i d e m o d e; или на; В широкоэкранном режиме
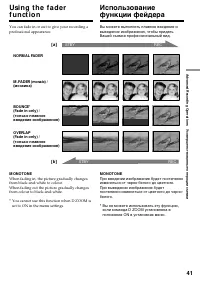
- 41 NORM AL FADER; MONOTONE
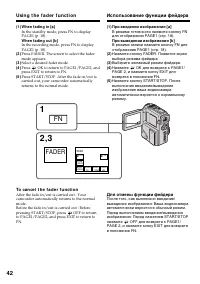
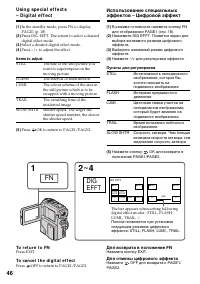
- 42 Usi n g t h e f a d e r f u n ct i o n; Select a desired fader mode.; To ca n ce l t h e f a d e r f u n ct i o n; OFF to return; FADER; Использование функции фейдера; При введении изображения; Выберите желаемый режим фейдера.; Для отмены функции фейдера; OFF для возврата к PAGE1/
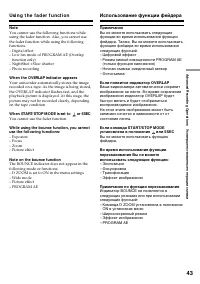
- 43 You cannot use the fader function.; Not e on t he bounce f unct ion; ON в установках меню
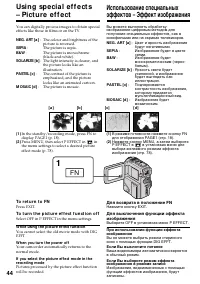
- 44 W hile using t he pict ure ef f ect f unct ion; : Цвет и яркость изображения; SEPIA; : Яркость света будет; PASTEL; в установках меню для; Выберите OFF в установках меню P EFFECT.; Если Вы выключите питание
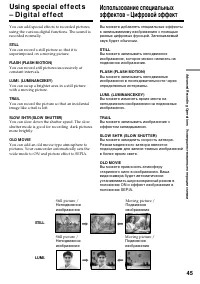
- 45 STILL
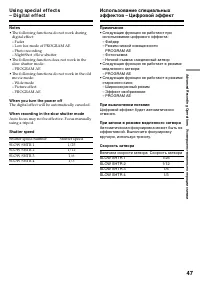
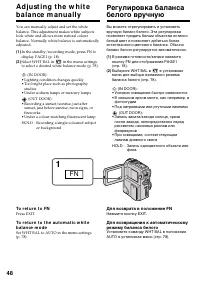
- 46 It ems t o adjust; Пункты для регулировки
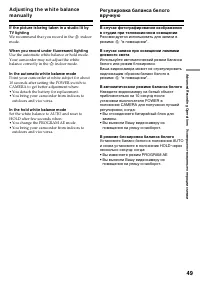
- 49 We recommend that you record in the; W hen you record under f luorescent light ing; In t he hold w hit e balance mode; outdoors and vice versa.; В автоматическом режиме баланса белого; • Вы вынесли Вашу видеокамеру из; В режиме блокировки баланса белого; помещения на улицу и наоборот.
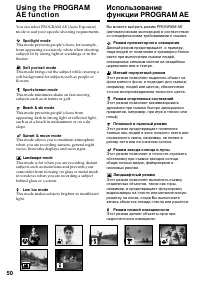
- 51 Usi n g t h e PROGRA M A E f u n ct i o n
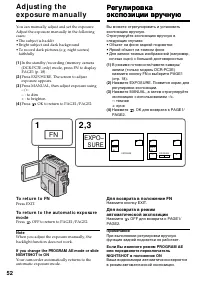
- 52 EXPO–; ночных сцен) с большой достоверностью
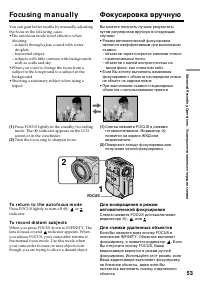
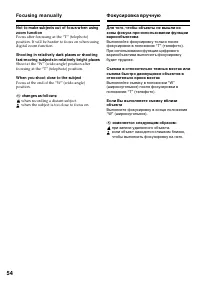
- 53 Fo cu si n g m a n u a l l y; To r e t u r n t o t h e a u t o f o cu s m o d e; FOCUS; Фокусировка вручную; таком фоне, как стена или небо; Для съемки удаленных объектов
- 54 W hen you shoot close t o t he subject; изменяется следующим образом:; чтобы выполнить фокусировку на него.
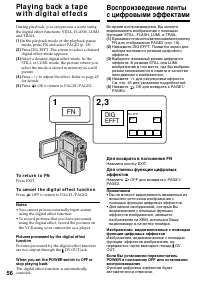
- 55 — A d v a n ce d Pl a y b a ck Op e r a t i o n s —; — Усовершенствованные операции воспроизведения —; • Вы не можете видоизменять введенные из
- 56 • You cannot process externally input scenes
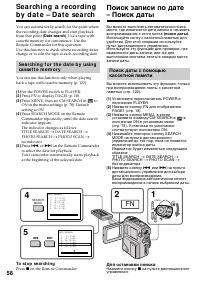
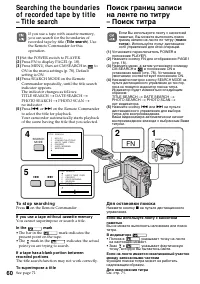
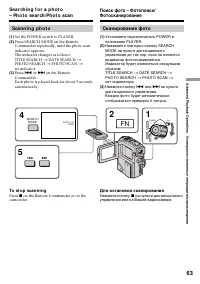
- 58 To st o p se a r ch i n g; Для остановки поиска
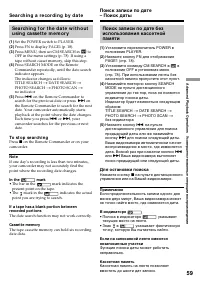
- 59 Se a r ch i n g a r e co r d i n g b y d a t e
- 60 Tit le search; If you use a t ape w it hout casset t e memory; поиск; В индикаторе
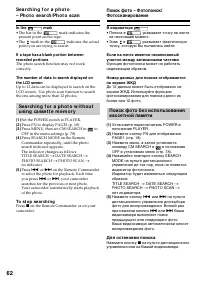
- 62 In t he
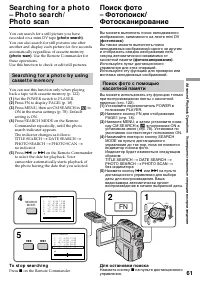
- 63 Sca n n i n g p h o t o; To st o p sca n n i n g; Сканирование фото; Для остановки сканирования
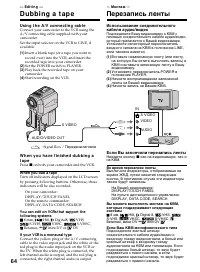
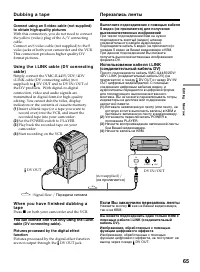
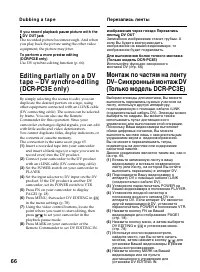
- 64 Usi n g t h e A /V co n n e ct i n g ca b l e; W hen you dub a t ape; D u b b i n g a t a p e; Если Вы закончили перезапись ленты; Нажмите кнопку; Во время перезаписи ленты; или DV; Если Ваш КВМ монофонического типа; Перезапись ленты
- 65 Set the POWER switch to PLAYER.; DV OUT
- 66 If you record playback pause pict ure w it h t he
- 67 MARK
- 68 No connection is necessary.; A u d i o d u b b i n g; Аудиоперезапись
- 69 To p l a y b a ck t h e so u n d; AUDIO DUB; Для воспроизведения звука
- 70 • Новый звук не может быть записан на; Если Вы сделали все подсоединения
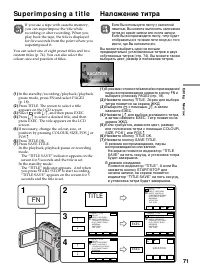
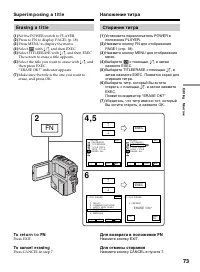
- 71 Su p e r i m p o si n g a t i t l e; TITLE; Наложение титра
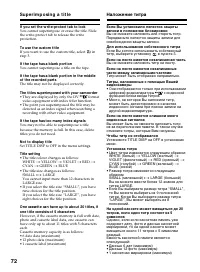
- 72 Для использования собственного титра
- 73 Er a si n g a t i t l e; Выберите; Нажмите кнопку CANCEL в пункте 7.
- 74 SET; Нажмите кнопку TITLE.
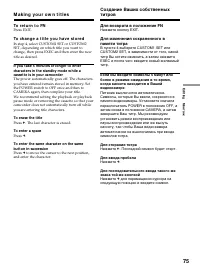
- 75 To erase t he t it le; To ent er a space; M a k i n g y o u r o w n t i t l e s; Для стирания титра; Для ввода пробела
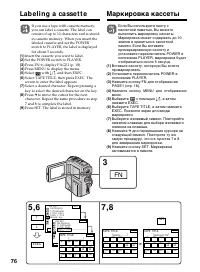
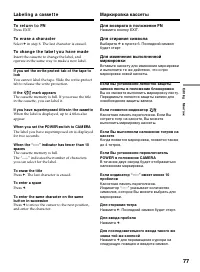
- 76 La b e l i n g a ca sse t t e; Маркировка кассеты
- 77 Если появится индикатор
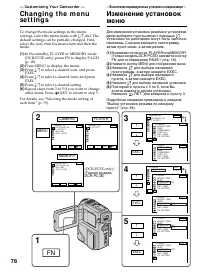
- 78 — Cu st o m i zi n g Y o u r Ca m co r d e r —; MENU
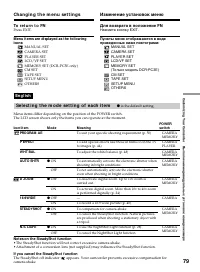
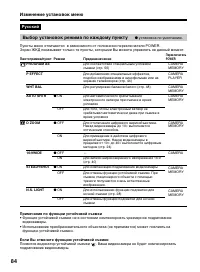
- 84 Выбор установок режима по каждому пункту; установка по умолчанию.; Примечания по функции устойчивой съемки; функцию устойчивой съемки.; Если Вы отмените функцию устойчивой съемки; Появится индикатор устойчивой съемки
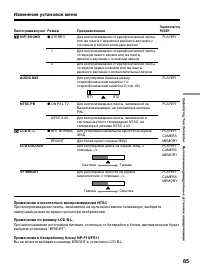
- 85 Примечание относительно воспроизведения NTSC; Вы не можете выбирать команду BRIGHT в установке LCD B.L.
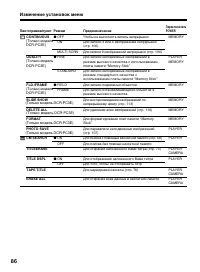
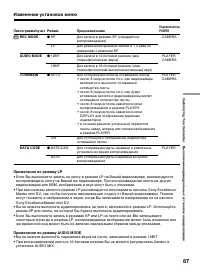
- 87 Примечания по режиму LP
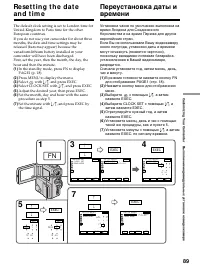
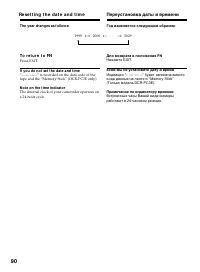
- 90 The year changes as f ollow s:; If you do not set t he dat e and t ime; Re se t t i n g t h e d a t e a n d t i m e; Год изменяется следующим образом:
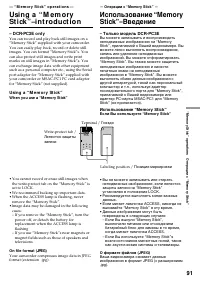
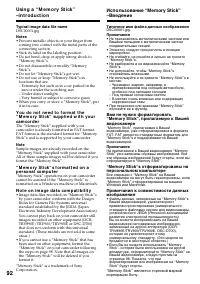
- 91 Usi n g a “ M e m o r y St i ck ”; W hen you use a “M emory St ick”; • You cannot record or erase still images when; — “ M e m o r y St i ck ” o p e r a t i o n s —; – Только модель DCR-PC3E; Если Вы используете “Memory Stick”
- 92 N o t e o n i m a g e d a t a co m p a t i b i l i t y; Типичное имя файла данных изображения; Memory Stick
- 93 “M emory St ick” compart ment /; I n se r t i n g a “ M e m o r y St i ck ”; To e j e ct a “ M e m o r y St i ck ”; W hen t he ACCESS lamp is lit or f lashing; Установка “Memory Stick”; Для извлечения “Memory Stick”; Если лампочка ACCESS горит или мигает
- 94 Usi n g a t o u ch p a n e l; In memory camera mode/; Использование сенсорной панели
- 95 To e x e cu t e se t t i n g s; Для выполнения установок
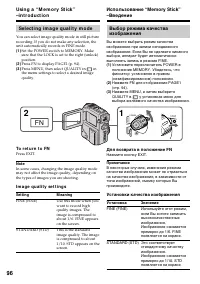
- 96 Se l e ct i n g i m a g e q u a l i t y m o d e; Press MENU, then select QUALITY in; I m a g e q u a l i t y se t t i n g s; Set t ing; у установках меню для; Установки качества изображения; Установка
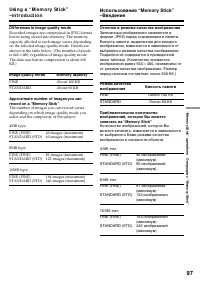
- 97 Dif f erences in image qualit y mode; Отличия в режиме качества изображения; FINE
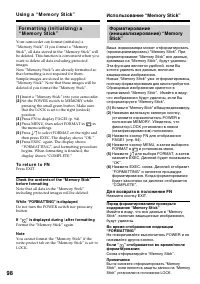
- 98 W hile “FORM ATTING” is displayed; Вставьте “Memory Stick” в Вашу видеокамеру.; Если; Снова отформатируйте “Memory Stick”.
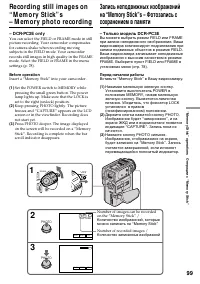
- 99 Bef ore operat ion; Insert a “Memory Stick” into your camcorder.; Number of recorded images /; Перед началом работы
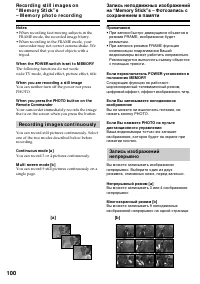
- 100 • When recording fast-moving subjects in the; W hen t he POW ER sw it ch is set t o M EM ORY; Re co r d i n g i m a g e s co n t i n u o u sl y; You can record 3 or 4 pictures continuously.; • При записи быстро движущихся объектов в; Непрерывный режим
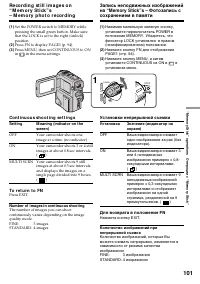
- 101 in the menu settings.; Co n t i n u o u s sh o o t i n g se t t i n g s; Number of images in cont inuous shoot ing; images; Установки непрерывной съемки; изображения
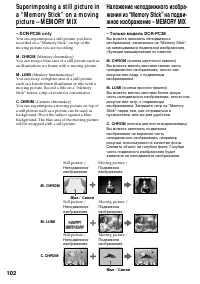
- 102 Cиняя
- 103 MEM; изображения
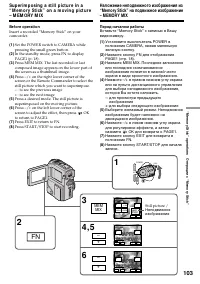
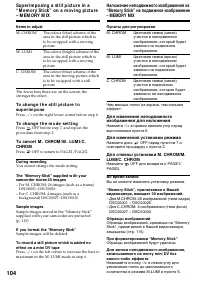
- 104 To ch a n g e t h e m o d e se t t i n g; During recording; Для изменения установки режима; Во время записи
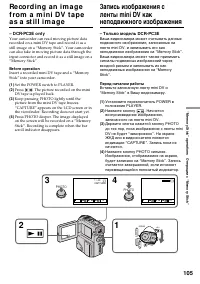
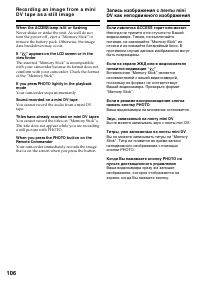
- 106 Your camcorder stops momentarily.; Ваша видеокамера на мгновение остановится.; Звук, записанный на ленту mini DV; Вы не можете записывать звук с ленты mini DV.; Титры, уже записанные на ленты mini DV
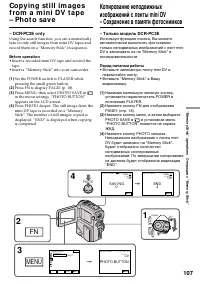
- 107 • Insert a recorded mini DV tape and rewind the; • Вставьте записанную ленту mini DV и
- 108 To st o p o r e n d co p y i n g
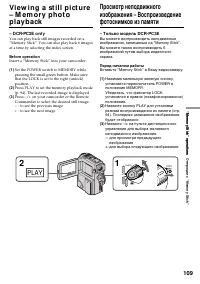
- 109 PLAY
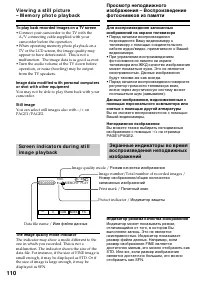
- 110 To play back recorded images on a TV screen; • Connect your camcorder to the TV with the; St ill image; Image number/Total number of recorded images /
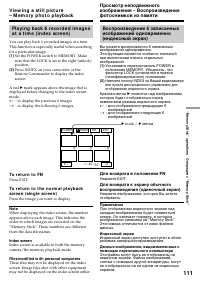
- 111 Press the image you want to display.; A red
- 112 “Memory Stick”
- 113 To st o p o r e n d t h e sl i d e sh o w; To p a u se d u r i n g a sl i d e sh o w; – Только модель DCR-PC3
- 114 To view t he recorded images on TV
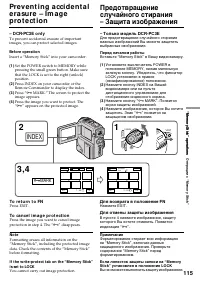
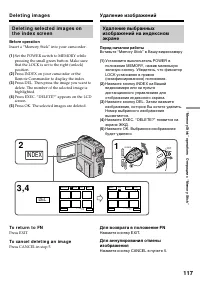
- 115 You cannot carry out image protection.; INDEX
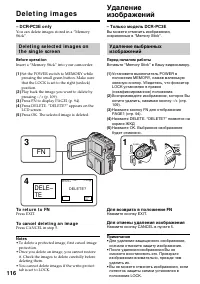
- 116 Press CANCEL in step 5.; • To delete a protected image, first cancel image; D e l e t i n g i m a g e s
- 117 DEL; Удаление изображений; Вставьте “Memory Stick” в Вашу видеокамеру; Нжамите кнопку CANCEL в пункте 5.
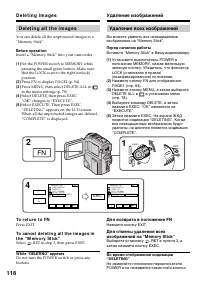
- 118 D e l e t i n g a l l t h e i m a g e s; Select; W hile “DELETING” appears; Удаление всех изображений; Выберите установку
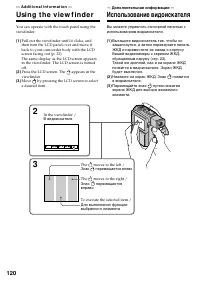
- 120 — A d d i t i o n a l I n f o r m a t i o n —; Usi n g t h e v i e w f i n d e r; — Дополнительная информация —; Использование видоискателя
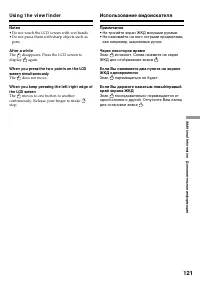
- 121 Пpимeчания
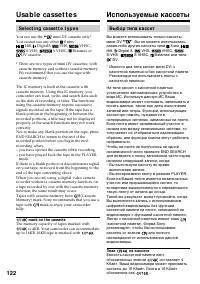
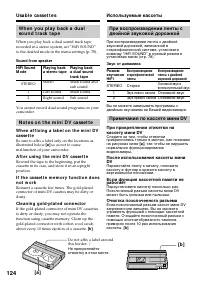
- 122 Usa b l e ca sse t t e s; Se l e ct i n g ca sse t t e t y p e s; mark on t he casset t e; Используемые кассеты; Выбор типа кассет; для полного; Знак; составляет 4
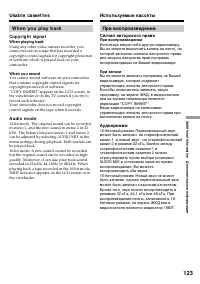
- 123 W h e n y o u p l a y b a ck; Co p y r i g h t si g n a l; W hen playing back; A u d i o m o d e; Сигнал авторского права; При воспроизведении; Аудиорежим
- 124 N o t e s o n t h e m i n i D V ca sse t t e; A f t e r u si n g t h e m i n i D V ca sse t t e; После использования кассеты мини
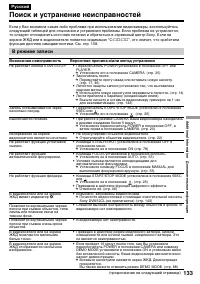
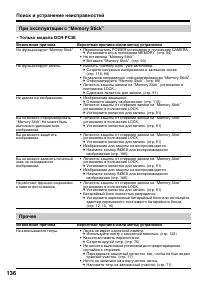
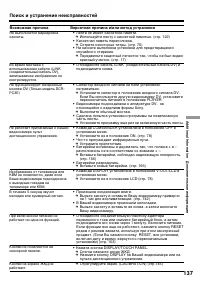
- 133 Поиск и устранение неисправностей; В режиме записи; Возможная неисправность
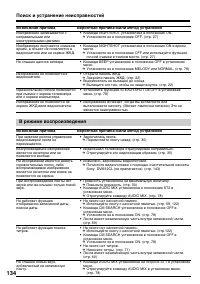
- 134 В режиме воспроизведения; Возможная причина
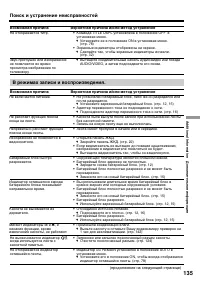
- 135 В режимах записи и воспроизведения.
- 136 Прочее
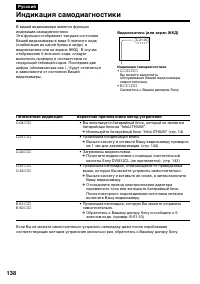
- 138 Пятизначная индикация
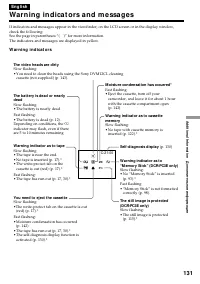
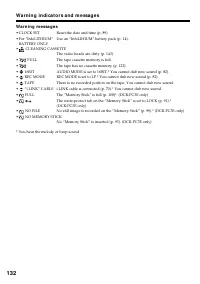
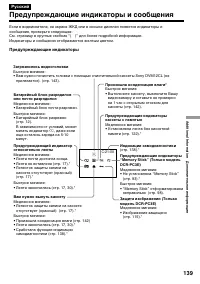
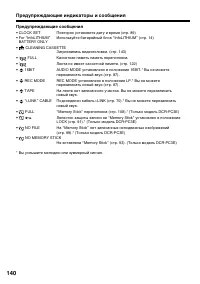
- 139 Индикаторы и сообщения отображаются желтым цветом.; Предупреждающие индикаторы; Загрязнились видеоголовки; Предупреждающие индикаторы и сообщения; Индикации самодиагностики
- 140 Предупреждающие сообщения
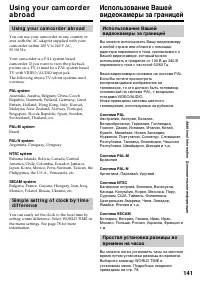
- 141 Usi n g y o u r ca m co r d e r a b r o a d; PAL syst em; Brazil; NTSC syst em; Бразилия; Система NTSC
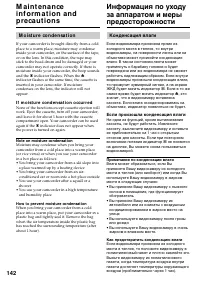
- 142 M o i st u r e co n d e n sa t i o n; I f m o i st u r e co n d e n sa t i o n o ccu r r e d; Not e on moist ure condensat ion; Конденсация влаги; Если произошла конденсация влаги; Примечание по конденсации влаги
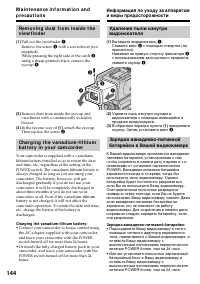
- 143 M a i n t e n a n ce i n f o r m a t i o n; Cl e a n i n g t h e v i d e o h e a d; indicator and “; Cl e a n i n g t h e LCD scr e e n; Информация по уходу; Чистка видеоголовок
- 145 Pr e ca u t i o n s; Ca m co r d e r o p e r a t i o n; Меры предосторожности; Эксплуатация видеокамеры
- 147 Ba t t e r y p a ck; If bat t eries are leaking; Батарейный блок
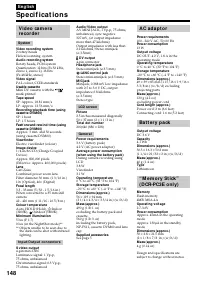
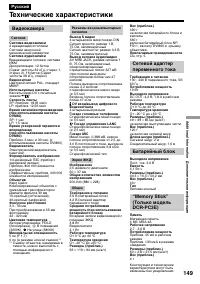
- 149 Технические характеристики; Видеокамера
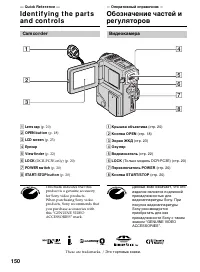
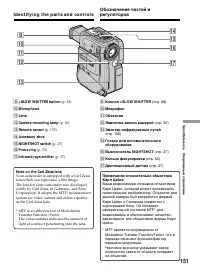
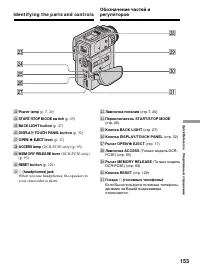
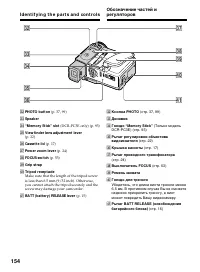
- 151 I d e n t i f y i n g t h e p a r t s a n d co n t r o l s; * MTF is an abbreviation of Modulation; qh; * MTF является сокращением от
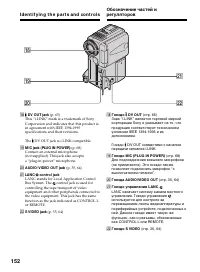
- 152 DV OUT jack; qk; Гнездо DV OUT
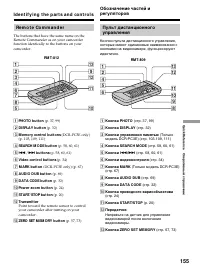
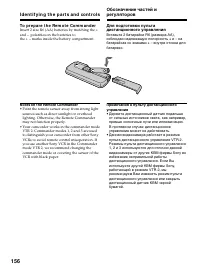
- 156 To p r e p a r e t h e Re m o t e Co m m a n d e r; Not es on t he Remot e Commander; • Point the remote sensor away from strong light; • Держите дистанционный датчик подальше
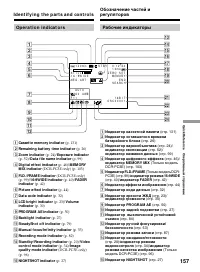
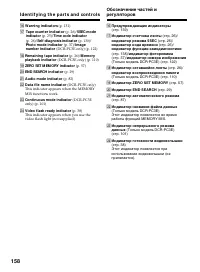
- 157 Op e r a t i o n i n d i ca t o r s
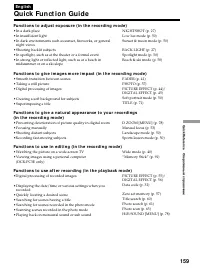
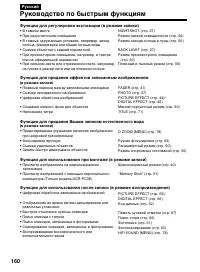
- 160 Руководство по быстрым функциям; Функции для регулировки экспозиции (в режиме записи)
- 162 Алфавитный указатель


