Видеокамеры Sony CCD-TR913E - инструкция пользователя по применению, эксплуатации и установке на русском языке. Мы надеемся, она поможет вам решить возникшие у вас вопросы при эксплуатации техники.
Если остались вопросы, задайте их в комментариях после инструкции.
"Загружаем инструкцию", означает, что нужно подождать пока файл загрузится и можно будет его читать онлайн. Некоторые инструкции очень большие и время их появления зависит от вашей скорости интернета.


68
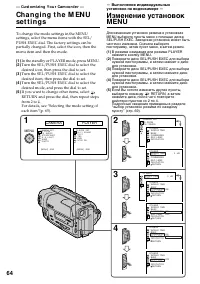
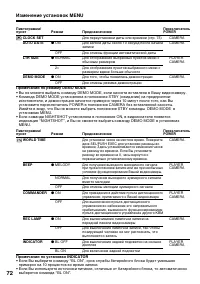
Ch a n g i n g t h e M EN U se t t i n g s
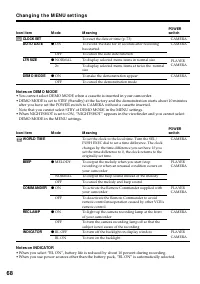
Not es on DEM O M ODE
• You cannot select DEMO MODE when a cassette is inserted in your camcorder.
• DEMO MODE is set to STBY (Standby) at the factory and the demonstration starts about 10 minutes
after you have set the POWER switch to CAMERA without a cassette inserted.
Note that you cannot select STBY of DEMO MODE in the MENU settings.
• When NIGHTSHOT is set to ON, “NIGHTSHOT” appears in the viewfinder and you cannot select
DEMO MODE in the MENU settings.
Icon/ it em
CLOCK SET
AUTO DATE
LTR SIZE
DEM O M ODE
M ode
r
ON
OFF
r
NORMAL
2
×
r
ON
OFF
M eaning
To reset the date or time (p. 73)
To record the date for 10 seconds after recording
has started
To cancel the auto date function
To display selected menu items in normal size
To display selected menu items at twice the normal
size
To make the demonstration appear
To cancel the demonstration mode
POW ER
sw it ch
CAMERA
CAMERA
PLAYER
CAMERA
CAMERA
Icon/ it em
W ORLD TIM E
BEEP
COM M ANDER
REC LAM P
INDICATOR
M ode
r
MELODY
NORMAL
OFF
r
ON
OFF
r
ON
OFF
r
BL OFF
BL ON
M eaning
To set the clock to the local time. Turn the SEL/
PUSH EXEC dial to set a time difference. The clock
changes by the time difference you set here. If you
set the time difference to 0, the clock returns to the
originally set time.
To output the melody when you start/stop
recording or when an unusual condition occurs on
your camcorder
To output the beep sound instead of the melody
To cancel the melody and beep sound
To activate the Remote Commander supplied with
your camcorder
To deactivate the Remote Commander to avoid
remote control misoperation caused by other VCR’s
remote control
To light up the camera recording lamp at the front
of your camcorder
To turn the camera recording lamp off so that the
subject is not aware of the recording
To turn off the backlight on display window
To turn on the backlight
POW ER
sw it ch
CAMERA
PLAYER
CAMERA
PLAYER
CAMERA
CAMERA
PLAYER
CAMERA
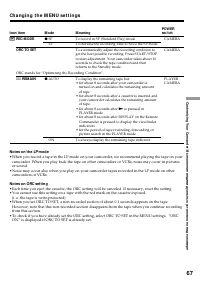
Not es on INDICATOR
• When you select “BL ON”, battery life is reduced by about 10 percent during recording.
• When you use power sources other than the battery pack, “BL ON” is automatically selected.
Содержание
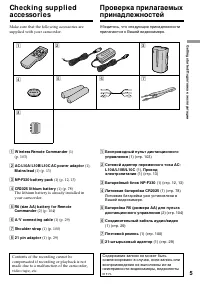
- 2 En g l i sh; camcorder. With your Handycam; W ARNING; Русский; ПРЕДУПРЕЖДЕНИЕ; or
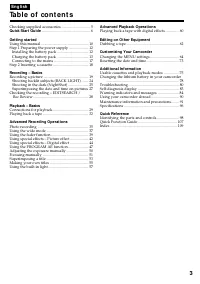
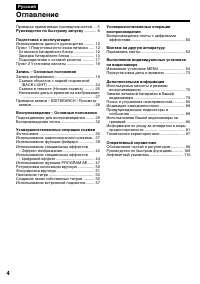
- 4 Оглавление
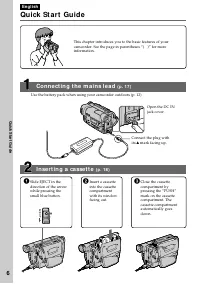
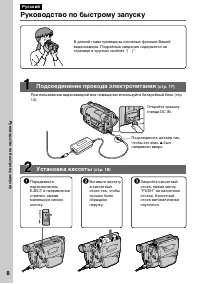
- 8 Руководство по быстрому запуску; был; Установка кассеты
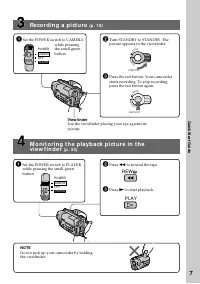
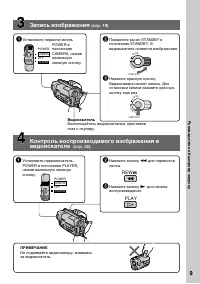
- 9 Запись изображения; Видоискатель; Контроль воспроизводимого изображения в; ПРИМЕЧАНИЕ; Нажмите кнопку
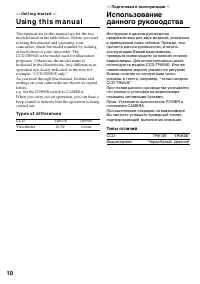
- 10 — Ge t t i n g st a r t e d —; Usi n g t h i s m a n u a l; Ty p e s o f d i f f e r e n ce s; Viewfinder; — Подготовка к эксплуатации —; Типы отличий
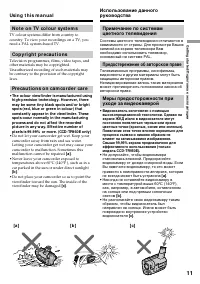
- 11 • Do not let your camcorder get wet. Keep your; Предостережение об авторском праве; • Не допускайте, чтобы видеокамера
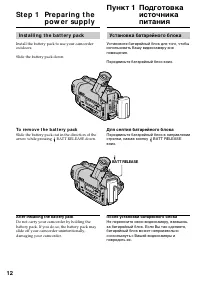
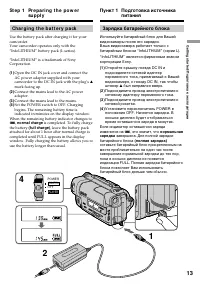
- 12 I n st a l l i n g t h e b a t t e r y p a ck; Slide the battery pack down.; To r e m o v e t h e b a t t e r y p a ck; Af t er inst alling t he bat t ery pack; St e p 1 Pre p a r i n g t h e; BATT RELEASE; Пункт 1 Подготовка; Установка батарейного блока; Передвиньте батарейный блок вниз.; Для снятия батарейного блока; После установки батарейного блока
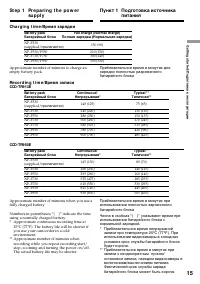
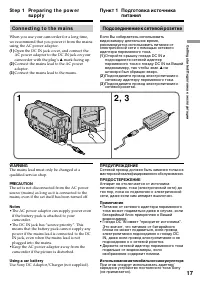
- 13 St e p 1 Pr e p a r i n g t h e p o w e r; Connect the mains lead to the mains.; normal charge; is completed. To fully charge; Пункт 1 Подготовка источника; был направлен вверх.; нормальная; завершена. Для полной зарядки
- 14 “– – – – min” appears in the display window.; Plug t he mains lead deeply; Примечание
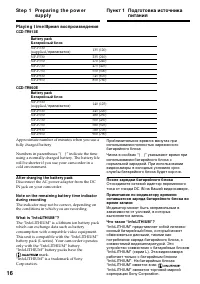
- 15 )” указывают время при; Bat t ery pack
- 16 Pl a y i n g t i m e /; Af t er charging t he bat t ery pack; После зарядки батарейного блока
- 17 Co n n e ct i n g t o t h e m a i n s; • The AC power adaptor can supply power even; Using a car bat t ery; на; • Питание от сетевого адаптера переменного; Использование автомобильного аккумулятора
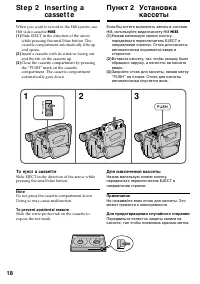
- 18 To e j e ct a ca sse t t e; Not e; St e p 2 I n se r t i n g a; Для извлечения кассеты
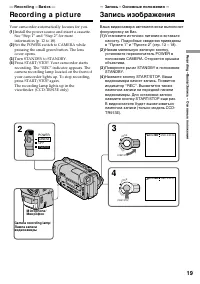
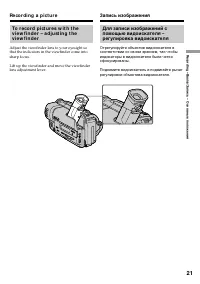
- 19 — Re co r d i n g – Ba si cs —; Re co rd i n g a p i ct u re; Your camcorder automatically focuses for you.; — Запись – Основные положения —
- 20 A f t e r r e co r d i n g; Turn STANDBY down to LOCK.; Af t er use your camcorder; Примечания; После записи; После пользования видеокамерой
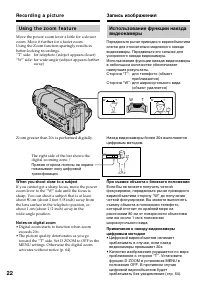
- 22 Usi n g t h e zo o m f e a t u r e; Zoom greater than 20; W hen you shoot close t o a subject; • Digital zoom starts to function when zoom; Сторона “W”: для широкоугольного вида; При съемке объекта с близкого положения; • Цифровой вариообъектив начинает
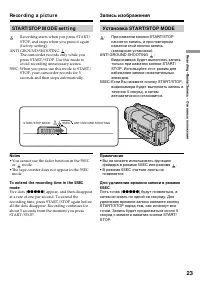
- 23 STA RT/STOP M OD E se t t i n g; Not es; • You cannot use the fader function in the 5SEC; ANTI GROUND SHOOTING; • Вы не можете использовать функцию
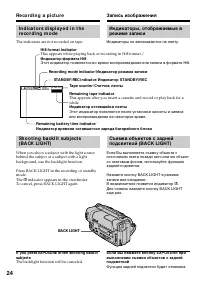
- 24 Recording mode indicat or/; The indicators are not recorded on tape.; BACK LIGHT; Hi8 f ormat indicat or; This appears while playing back or recording in Hi8 format./
- 25 and “NIGHTSHOT” indicators flash in the; Night Shot Light emit t er/; Usi n g +SLOW SHUTTER; и “NIGHTSHOT” начнут
- 26 • Do not use the NightShot function in bright; The +SLOW SHUTTER but t on does not w ork:; Подсветка для ночной съемки
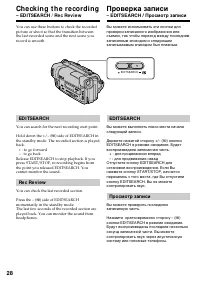
- 28 Ch e ck i n g t h e re co rd i n g; – ED I TSEA RCH / Re c Re v i e w; You can search for the next recording start point.; Re c Re v i e w; You can check the last recorded section.; Проверка записи; – EDITSEARCH / Просмотр записи; Нажмите кратковременно сторону – (
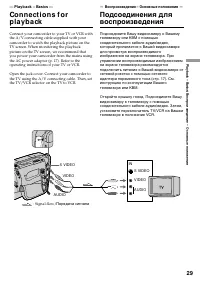
- 29 — Pl a y b a ck – Ba si cs —; Передача сигнала; — Воспроизведение – Основные положения —
- 30 If your TV or VCR has an S video jack; Co n n e ct i o n s f o r p l a y b a ck; TV
- 31 To ca n ce l t h e l a se r l i n k f u n ct i o n; If you t urn t he pow er of f; Laser link turns off automatically.; LASER LINK; Для отмены функции LASER LINK; Если Вы выключите питание
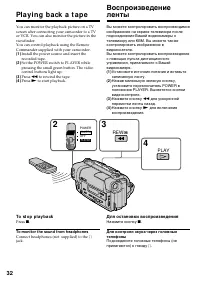
- 32 Pl a y i n g b a ck a t a p e; To st o p p l a y b a ck; To monit or t he sound f rom headphones; Connect headphones (not supplied) to the; PLAY; Для остановки воспроизведения
- 33 DISPLAY; To a d v a n ce t h e t a p e; Воспроизведение ленты
- 34 В переменных режимах воспроизведения
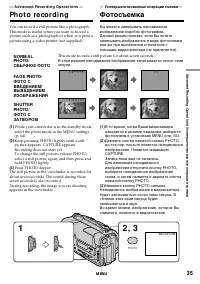
- 35 — A d v a n ce d Re co r d i n g Op e r a t i o n s —; Ph o t o re co r d i n g; ОБЫЧНОЕ ФОТО; This mode records a still picture for about seven seconds./; M ENU; — Усовершенствованные операции съемки —; Фотосъемка; Нажмите кнопку PHOTO сильнее.
- 36 Ph o t o r e co r d i n g
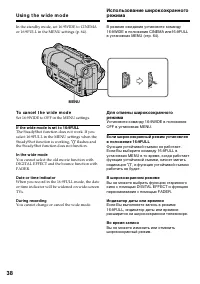
- 37 CI N EM A; back on a normal TV; Usi n g t h e w i d e m o d e; CINEM A; CINEMA
- 38 To ca n ce l t h e w i d e m o d e; Set 16:9WIDE to OFF in the MENU settings.; If t he w ide mode is set t o 16:9FULL; flashes and; In t he w ide mode; You cannot change or cancel the wide mode.; , и функция устойчивой съемки; В широкоэкранном режиме
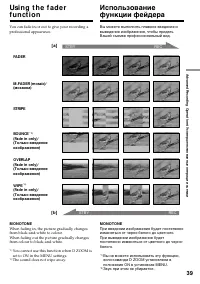
- 39 M ONOTONE; The sound does not wipe away.; FADER; MONOTONE; Звук при этом не убирается.
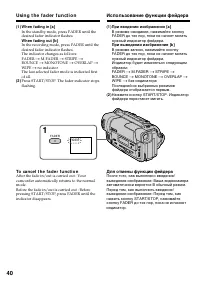
- 40 Usi n g t h e f a d e r f u n ct i o n; To ca n ce l t h e f a d e r f u n ct i o n; Использование функции фейдера; При введении изображение; Для отмены функции фейдера
- 41 – NightShot +Slow shutter; W hen START/ STOP M ODE is set t o; You cannot use the fader function.; Not e on t he bounce f unct ion; – Ночная суперсъемка +медленный затвор; Примечание по функции перескакивания; ON в установках MENU
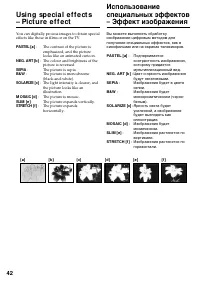
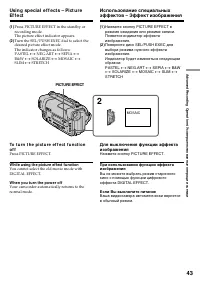
- 42 : The colour and brightness of the; SEPIA; The picture is sepia.
- 43 W hile using t he pict ure ef f ect f unct ion
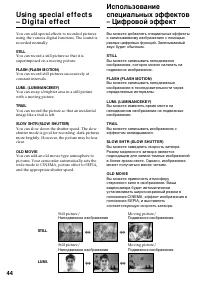
- 44 Неподвижное изображение; STILL
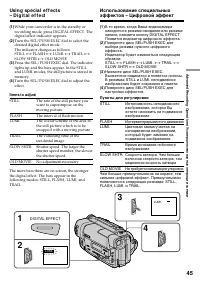
- 45 It ems t o adjust; DIGITAL EFFECT; Пункты для регулировки
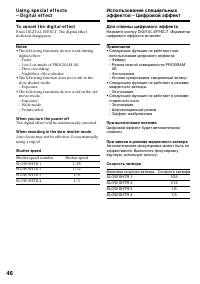
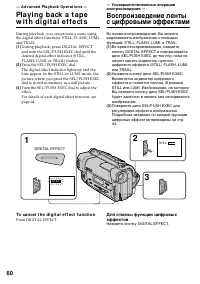
- 46 To ca n ce l t h e d i g i t a l e f f e ct; Для отмены цифрового эффекта
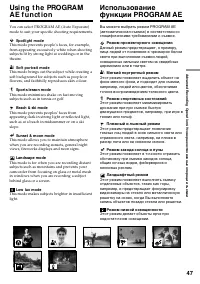
- 47 Spot light mode
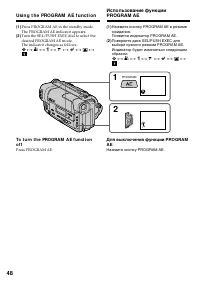
- 48 Usi n g t h e PROGRA M A E f u n ct i o n; Нажмите кнопку PROGRAM AE.
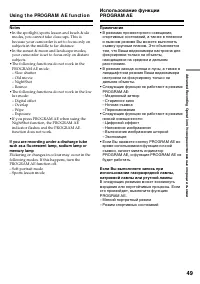
- 49 • In the spotlight, sports lesson and beach & ski; • В режимах прожекторного освещения,
- 50 ночных сцен) с большой достоверностью
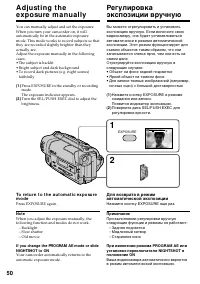
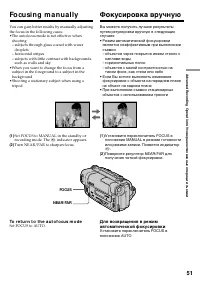
- 51 droplets; To r e t u r n t o t h e a u t o f o cu s m o d e; FOCUS; Fo cu si n g m a n u a l l y; каплями воды
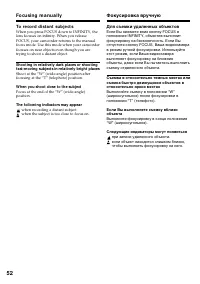
- 52 To r e co r d d i st a n t su b j e ct s; W hen you shoot close t o t he subject; Для съемки удаленных объектов; Следующие индикаторы могут появиться
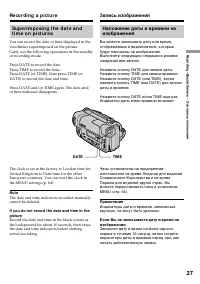
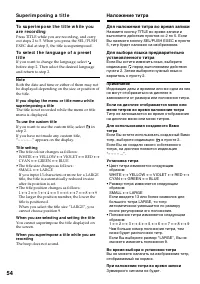
- 53 VACATION; Su p e r i m p o si n g a t i t l e; TITLE; Наложение титра; Нажмите кнопку TITLE в режиме ожидания.
- 54 Для наложения титра во время записи
- 55 Press TITLE in the standby or PLAYER mode.
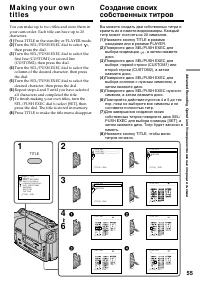
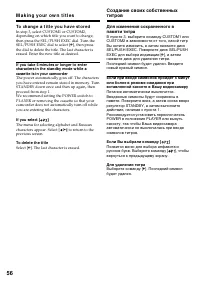
- 56 To ch a n g e a t i t l e y o u h a v e st o r e d; To delet e t he t it le; M a k i n g y o u r o w n t i t l e s; Если Вы выбрали команду [; вернуться к предыдущему экрану.; Для удаления титра
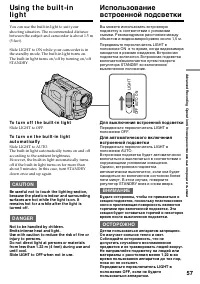
- 57 To t u r n o f f t h e b u i l t -i n l i g h t; CA UTI ON; Для выключения встроенной подсветки; ВНИМАНИЕ
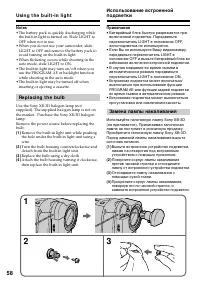
- 58 Re p l a ci n g t h e b u l b; Замена лампы накаливания
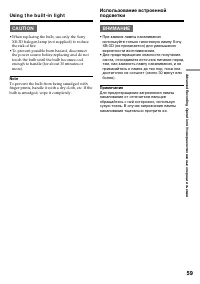
- 59 • When replacing the bulb, use only the Sony; Usi n g t h e b u i l t -i n l i g h t; • При замене лампы накаливания
- 60 — A d v a n ce d Pl a y b a ck Op e r a t i o n s —; To ca n ce l t h e d i g i t a l e f f e ct f u n ct i o n; Press DIGITAL EFFECT.; Нажмите кнопку DIGITAL EFFECT.
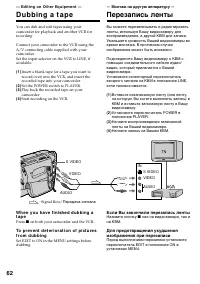
- 62 — Ed i t i n g o n Ot h e r Eq u i p m e n t —; D u b b i n g a t a p e; Set the POWER switch to PLAYER.; — Монтаж на другую аппаратуру —; Перезапись ленты; Начните запись на Вашем КВМ.; Если Вы закончили перезапись ленты
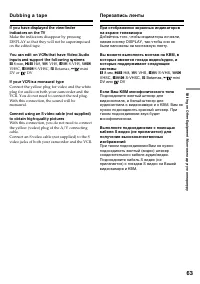
- 63 If your VCR is a monaural t ype; mini; Если Ваш КВМ монофонического типа
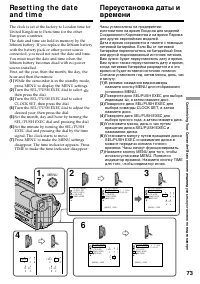
- 64 — Cu st o m i zi n g Y o u r Ca m co r d e r —; In the standby or PLAYER mode, press MENU.; Изменение установок
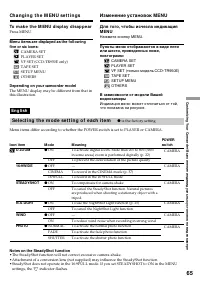
- 65 Ch a n g i n g t h e M EN U se t t i n g s; To m a k e t h e M EN U d i sp l a y d i sa p p e a r; Depending on your camcorder model; Se l e ct i n g t h e m o d e se t t i n g o f e a ch i t e m; is the factory setting.; Изменение установок MENU
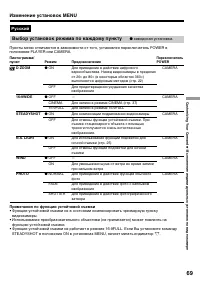
- 69 Примечания по функции устойчивой съемки; функцию устойчивой съемки.; Выбор установок режима по каждому пункту; заводская установка.
- 70 примерно на 10 процентов во время записи.
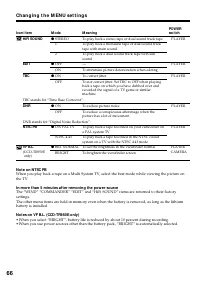
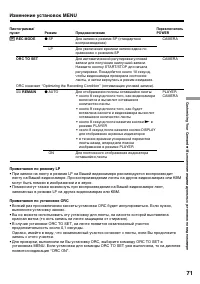
- 71 REC MODE; Примечания по режиму LP; записанных в режиме LP на других видеокамерах или КВМ.; Примечания по установке ORC; выполните установку заново.
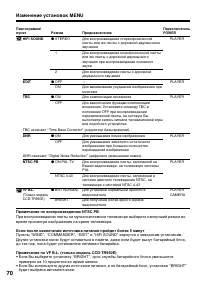
- 72 Примечания по режиму DEMO MODE
- 73 Turn the SEL/PUSH EXEC dial to select
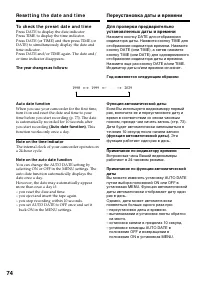
- 74 To ch e ck t h e p r e se t d a t e a n d t i m e; The year changes as f ollow s:; function works only once a day.; Not e on t he t ime indicat or; back ON in the MENU settings.; Re se t t i n g t h e d a t e a n d t i m e; Год изменяется следующим образом:; функция работает один раз в день.; Примечание по индикатору времени
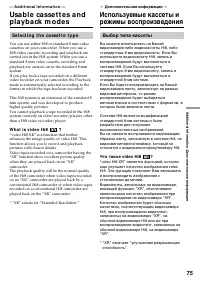
- 75 — A d d i t i o n a l I n f o r m a t i o n —; Se l e ct i n g t h e ca sse t t e t y p e; W h a t i s v i d e o Hi 8; — Дополнительная информация —; Выбор типа кассеты; Что такое video Hi8; * “XR” означает “улучшенная разрешающая
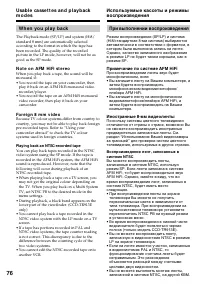
- 76 W h e n y o u p l a y b a ck; N o t e o n A FM Hi Fi st e r e o; • You record the tape on an AFM HiFi monaural; Fo r e i g n 8 m m v i d e o; Playing back an NTSC-recorded t ape; • During playback, a black band appears on the; При выполнении воспроизведения; Примечание по системе AFM HiFi
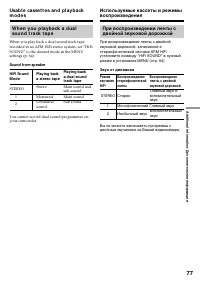
- 77 STEREO Стерео
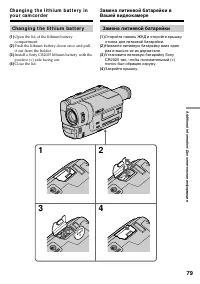
- 79 Ch a n g i n g t h e l i t h i u m b a t t e r y
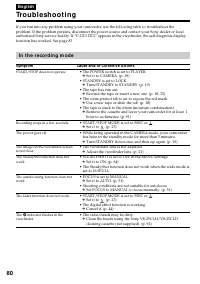
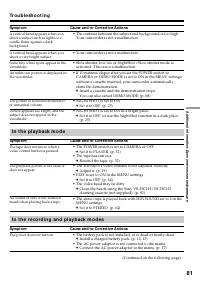
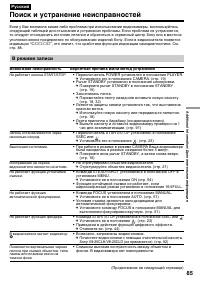
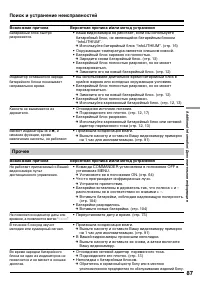
- 85 В режиме записи; Возможная неисправность; Поиск и устранение неисправностей
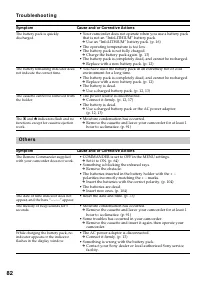
- 87 Прочее; Возможная причина
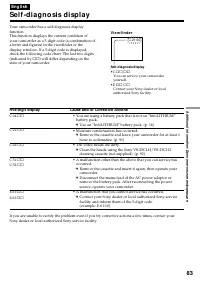
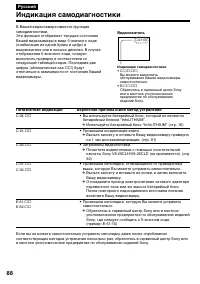
- 88 Индикация самодиагностики
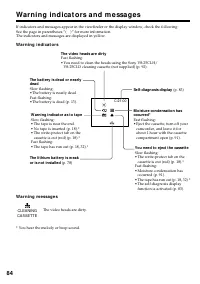
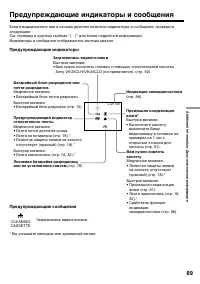
- 89 Предупреждающие индикаторы и сообщения; Индикаторы и сообщения отображаются желтым цветом.; Предупреждающие индикаторы; Загрязнились видеоголовки; Предупреждающие сообщения; Загрязнились видеоголовки.; • Сработала функция
- 90 Usi n g y o u r ca m co r d e r a b r o a d; PAL syst em; Brazil; NTSC syst em; Бразилия; Система NTSC
- 91 M o i st u r e co n d e n sa t i o n; I f m o i st u r e co n d e n sa t i o n o ccu r r e d; Not e on moist ure condensat ion; Конденсация влаги; Если произошла конденсация влаги; Примечание по конденсации влаги
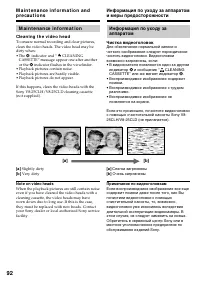
- 92 M a i n t e n a n ce i n f o r m a t i o n; Cl e a n i n g t h e v i d e o h e a d; indicator and “; Not e on video heads; Чистка видеоголовок; Примечание по видеоголовкам
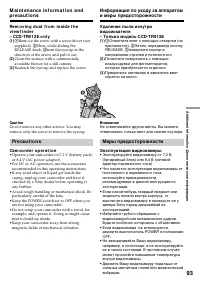
- 93 Caut ion; Pr e ca u t i o n s; Ca m co r d e r o p e r a t i o n; Внимание; Меры предосторожности; Эксплуатация видеокамеры
- 95 N o t e s o n d r y b a t t e r i e s; If bat t eries are leaking; Примечание к сухим батарейкам
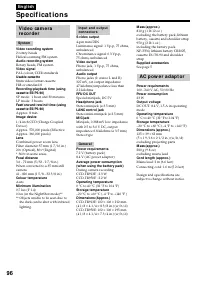
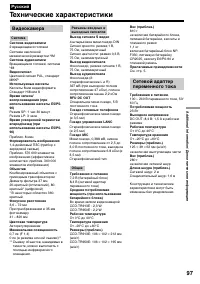
- 97 Видеокамера; Технические характеристики
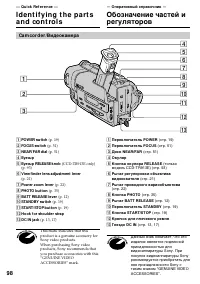
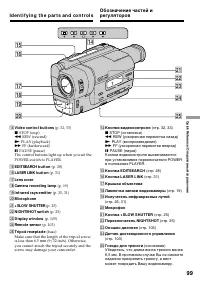
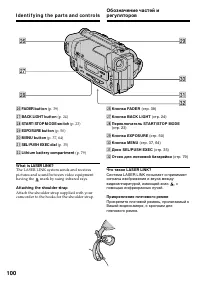
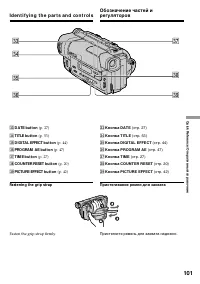
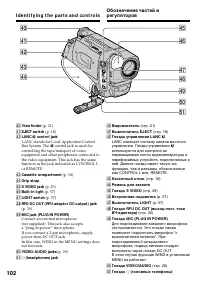
- 99 I d e n t i f y i n g t h e p a r t s a n d co n t r o l s
- 100 mark by using infrared rays.
- 101 Fasten the grip strap firmly.
- 102 control jack is used for
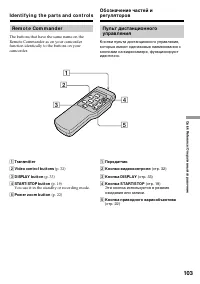
- 103 Re m o t e Co m m a n d e r; Transmit t er; You use it in the standby or recording mode.; Pow er zoom but t on
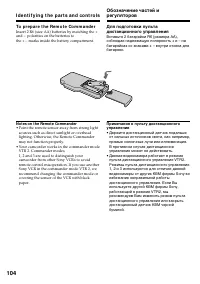
- 104 To p r e p a r e t h e Re m o t e Co m m a n d e r; Not es on t he Remot e Commander; • Point the remote sensor away from strong light
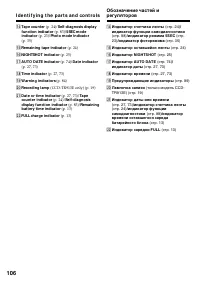
- 105 STBY; V i e w f i n d e r /
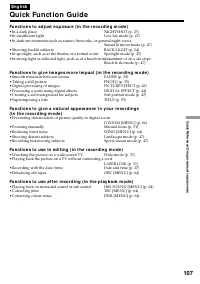
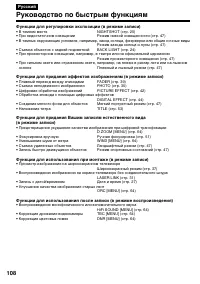
- 108 Руководство по быстрым функциям
- 110 Алфавитный указатель; У – Я


