Вентиляторы VITEK VT-1948 BK - инструкция пользователя по применению, эксплуатации и установке на русском языке. Мы надеемся, она поможет вам решить возникшие у вас вопросы при эксплуатации техники.
Если остались вопросы, задайте их в комментариях после инструкции.
"Загружаем инструкцию", означает, что нужно подождать пока файл загрузится и можно будет его читать онлайн. Некоторые инструкции очень большие и время их появления зависит от вашей скорости интернета.
–
«NATURE» – natural wind, the «SLEEP» indicator (19)
is off; natural wind imitation mode, the air flow speed
is chaotically changing: from soft breeze to strong
gust of wind.
–
«SLEEP» – calming wind, the «SLEEP» indicator (19)
glows green; the air flow speed is changing in
cycles, constantly increasing and decreasing.
–
«NORMAL» – simple ventilation, the «SLEEP» indica-
tor (19) glows red; the blades rotation speed mode is
selected with the button (24) and indicated with the
indicators (21) «LOW, MID, HIGH».
•
To switch the fan off press the «ON/OFF» button (25).
•
You may change the position of the motor unit (9) of the
fan in accordance with the required air flow angle in the
vertical position, the fan slope angle is set manually.
To change the fan slope angle press with a slight effort
on the motor unit (9) upwards or downwards. Clicking
while the fan is being tilted is normal.
•
Insert the power plug into the socket, you will hear a
sound signal.
•
Press the «ON/OFF» button (28) on the remote control
(26), the air flow mode indicator (19) «SLEEP» (red)
and the blades rotation speed indicator (21) «LOW»
will light up on the control panel (10), and the fan will
start operating.
•
By pressing the «SPEED» button (30) again you may set
the required blades rotation speed of the fan, the light
indicators (19) on the control panel (10) inform about
the selected speed:
–
«LOW» – low air flow speed
–
«MID» – medium air flow speed
–
«HIGH» – high air flow speed.
•
Press the «OSC» button (31) on the remote control (26)
to switch the 90° oscillation operation mode of the
fan on, the indicator (18) will light up on the control
panel (10). To switch this function off or to set the unit
body rotation in the desired direction press the «OSC»
button (31) again.
•
Consequently press the «MODE» button (29) on the
remote control (26) to select the air flow mode. You
may choose three operation modes, the operation
modes are indicated with a change of the «SLEEP» indi-
cator’s (19) color on the control panel (10):
–
«NORMAL» – simple ventilation, the «SLEEP» indica-
tor (19) glows red; the blades rotation speed mode
is selected with the button (30) and indicated with
the indicators (21) «LOW, MID, HIGH» on the con-
trol panel (10).
–
«NATURE» – natural wind, the «SLEEP» indicator
(19) is off; natural wind imitation mode, the air flow
speed is chaotically changing: from soft breeze to
strong gust of wind.
–
«SLEEP» – calming wind, the «SLEEP» indicator
(19) glows green; the air flow speed is changing in
cycles, constantly increasing and decreasing.
–
«NORMAL» – simple ventilation, the «SLEEP» indica-
tor (19) glows red; the blades rotation speed mode
is selected with the button (30) and indicated with
the indicators (21) «LOW, MID, HIGH» on the con-
trol panel (10).
•
Select the operation time of the automatic switch-off
timer by consequently pressing the «TIMER» button (27)
on the remote control (26), the light indicators (20) on
the control panel (10) will inform about the set operation
time. You can set the fan operation time from 0.5 hours
to 7.5 hours (with 0.5 hours setting step).To switch the
timer off press the «TIMER» button (27) repeatedly until
all the indicators (20) on the control panel (10) go out.
•
To switch the fan off press the «ON/OFF» button (28).
Using the remote control (26)
To use the remote control (RC) (26) open the battery com-
partment lid (32) and insert 2 «AAA» batteries (not supplied
with the unit) into the battery compartment strictly follow-
ing the polarity, close the battery compartment lid (32).
If you do not use the unit for a long time, remove the batteries
from the battery compartment of the remote control (26).
Note:
–
Replace the batteries in the remote control (26) in
time, to avoid damage of the remote control (26) do
not allow leaking of batteries.
–
Every pressing of the control panel (26) buttons is
accompanied by a sound signal.
•
Insert the power plug into the socket, you will hear a
sound signal.
•
Press the «ON/OFF» button (28) on the remote con-
trol (26), the air flow mode indicator (19) «SLEEP» (red)
and the blades rotation speed indicator (21) «LOW»
will light up on the control panel (10), and the fan will
start operating.
•
By pressing the «SPEED» button (30) again you may set
the required blades rotation speed of the fan, the light
indicators (19) on the control panel (10) inform about
the selected speed:
–
«LOW» – low air flow speed
–
«MID» – medium air flow speed
–
«HIGH» – high air flow speed.
•
Press the «OSC» button (31) on the remote control (26)
to switch the 90° oscillation operation mode of the
fan on, the indicator (18) will light up on the control
panel (10). To switch this function off or to set the unit
body rotation in the desired direction press the «OSC»
button (31) again.
•
Consequently press the «MODE» button (29) on the
remote control (26) to select the air flow mode. You
may choose three operation modes, the operation
modes are indicated with a change of the «SLEEP»
indicator’s (19) color on the control panel (10):
–
«NORMAL» – simple ventilation, the «SLEEP» indica-
tor (19) glows red; the blades rotation speed mode
is selected with the button (30) and indicated with
the indicators (21) «LOW, MID, HIGH» on the con-
trol panel (10).
–
«NATURE» – natural wind, the «SLEEP» indicator (19)
is off; natural wind imitation mode, the air flow speed
is chaotically changing: from soft breeze to strong
gust of wind.
–
«SLEEP» – calming wind, the «SLEEP» indicator (19)
glows green; the air flow speed is changing in
cycles, constantly increasing and decreasing.
–
«NORMAL» – simple ventilation, the «SLEEP» indica-
tor (19) glows red; the blades rotation speed mode
is selected with the button (30) and indicated with
the indicators (21) «LOW, MID, HIGH» on the con-
trol panel (10).
•
Select the operation time of the automatic switch-
off timer by consequently pressing the «TIMER» but-
ton (27) on the remote control (26), the light indica-
tors (20) on the control panel (10) will inform about
the set operation time. You can set the fan operation
time from 0.5 hours to 7.5 hours (with 0.5 hours setting
step).To switch the timer off press the «TIMER» but-
ton (27) repeatedly until all the indicators (20) on the
control panel (10) go out.
•
To switch the fan off press the «ON/OFF» button (28).
MAINTENANCE AND CARE
•
Before cleaning the fan switch it off by pressing the
«ON/OFF» button (25) on the control panel (10) or
the «ON/OFF» button (28) on the remote control (26)
and unplug it.
•
Do not use abrasive cleaners and solvents to clean
the unit.
•
Clean the motor unit (9) with a slightly damp cloth, and
then wipe it dry.
•
If you need to clean the blades (4), unscrew the nut on
the ring (3), remove the ring (3), remove the front grid
(1), and then wipe the blades with a slightly damp cloth.
•
Install the front grid (1) and the ring (3) back to its
place.
•
You may clean the fan blades with a vacuum cleaner
using a proper attachment.
•
Do not immerse the motor unit (9) of the fan into
water or any other liquids. Make sure that no liquids
get into the motor unit (9) of the fan to avoid its dam-
age and prevent risk of electric shock.
Storage
–
Unplug the fan and clean it.
–
Disassemble the fan, if needed.
–
Remove the ring (3), the front grid (1),
unscrew the
blade clamp (2) by turning it clockwise
, remove the
blades (4), unscrew the fixing nut of the rear grid (5)
and remove the grid (6).
–
Unscrew the clamp (11) and remove the motor unit (9)
from the telescopic bar (12).
–
Unscrew 4 nuts and remove the telescopic bar (12)
from the supports (15).
–
Pack the fan into the original package and put it away
for storage in a dry cool place away from children.
DELIVERY SET
Motor unit – 1 pc.
Front grid – 1 pc.
Clamp ring with the screw and nut – 1 pc.
Blade clamp – 1 pc.
Blades – 1 pc.
Rear grid – 1 pc.
Telescopic bar with clamp and decorative
panel – 1 pc.
Supports – 2 pcs.
Screw – 4 pcs.
Remote control – 1 pc.
Instruction manual – 1 pc.
TECHNICAL SPECIFICATIONS
Power supply: 220-240 V ~ 50/60Hz
Maximum power: 60 W
Blades diameter: 40 cm (16»)
The manufacturer reserves the right to change the
specifications of the unit without a preliminary noti-
fication.
Service life of the fan is 3 years
Guarantee
Details regarding guarantee conditions can be obtained
from the dealer from whom the appliance was purchased.
The bill of sale or receipt must be produced when making
any claim under the terms of this guarantee.
2
3
STAND FAN VT-1948 BK
The fan is intended for artificial ventilation of the room.
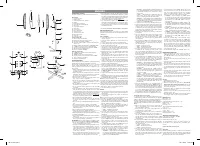
Description
1. Front safety grid
2. Blade clamp
3. Clamp ring with screw and nut
4. Blades
5. Rear grid fastening nut
6. Rear grid with carrying handle
7. Motor axis
8. Slope angle adjuster
9. Motor unit
10. Control panel
11. Motor unit clamp
12. Telescopic bar
13. Telescopic bar clamp
14. Decorative panel
15. Supports
16. Fastening screws
Control panel (10)
17. «OSC» rotation mode button
18. Rotation mode power indicator «OSC»
19. Air flow mode indicator «SLEEP»
20. Automatic switch-off timer operation time indicators
«0,5-1-2-4»
21. Blades rotation speed indicators «LOW, MID, HIGH»
22. «TIMER» timer operation time selection button
23. Speed operation mode selection button «SPEED»
24. Operation mode setting button
25. Fan on/off button «ON/OFF»
Remote control (26)
27. «TIMER» timer operation time selection button
28. «ON/OFF» button
29. «MODE» air flow mode selection button
30. Speed operation mode selection button «SPEED»
31. «OSC» rotation mode button
32. Battery compartment lid
SAFETY MEASURES
Before using the electrical appliance, read this instruction
manual carefully, and keep it for further reference.
Use the unit for intended purposes only, as specified
in this manual. Mishandling the unit can lead to its
breakage and cause harm to the user or damage to his/
her property.
•
Before switching the unit on for the first time, make
sure that your home mains voltage corresponds to unit
operating voltage.
•
Before using the unit, examine the power cord closely
and make sure that it is not damaged. If you find that
the power cord is damaged, do not use the unit.
•
Do not use the fan outdoors.
•
Place the unit on a flat, dry and steady surface away
from sources of heat or open flame.
•
Do not use the unit near containers filled with water,
next to a kitchen sink, in wet basements or near a
swimming pool.
•
Do not immerse the fan, power cord and power plug
into water or any other liquids.
•
Do not touch the unit body and the power plug with
wet hands.
•
If the fan falls into water, unplug it before touching it
and only then you may take the fan out of water. Apply
to the nearest authorized service center for testing or
repairing the unit at the contact addresses given in the
warranty certificate and on the website
www.vitek.ru
.
•
Make sure that the power cord does not contact with
hot surfaces and sharp furniture edges.
•
Do not switch the unassembled fan on.
•
Do not insert any foreign objects into the openings
of the fan protective grids to avoid injuries or unit
damage.
•
Do not touch the rotating blades during the fan opera-
tion.
•
Do not place the fan near curtains or house plants.
•
It is not recommended to stay under the air flow com-
ing from the fan for a long time (especially for children
and elderly people).
•
Do not leave the operating unit unattended.
•
Unplug the fan before cleaning and when you do not
use the unit or before moving it to a new place.
•
When unplugging the fan, pull the plug but not the cord.
•
Clean the unit regularly.
•
Do not leave children unattended to prevent using the
unit as a toy.
•
For children safety reasons do not leave polyethylene
bags, used as packaging, unattended.
ATTENTION!
Do not allow children to play with polyeth-
ylene bags or packaging film.
Danger of suffocation!
•
Do not allow children to touch the unit body and the
power cord during the unit operation.
•
The unit is not intended for usage by physically or men-
tally disabled persons (including children) or by per-
sons lacking experience or knowledge if they are not
under supervision of a person who is responsible for
their safety or if they are not instructed by this person
on the usage of the unit.
•
Do not use the fan if the blades, power cord or power
plug are damaged, if the fan works improperly, after
it was dropped or was damaged in some other way.
•
Do not attempt to repair the unit. Do not disassemble the
unit by yourself, if any malfunction is detected or after it
was dropped, unplug the unit and apply to any authorized
service center at the contact addresses given in the war-
ranty certificate and on the website
www.vitek.ru
.
•
Transport the unit in the original package.
•
For environment protection do not discard the unit
with usual household waste after its service life expira-
tion; apply to a specialized center for further recycling.
•
Keep the unit in a dry cool place out of reach of children
and disabled persons.
THIS UNIT IS INTENDED FOR HOUSEHOLD USAGE ONLY
BEFORE THE FIRST USE
After unit transportation or storage at low temperature
keep it for at least three hours at room temperature before
switching on.
Fan assembling
•
Unpack the unit and remove any stickers that can pre-
vent its operation.
•
Check the unit for damages, do not use it in case of
damages.
•
Set the supports (15) crosswise on a flat dry surface.
•
Set the telescopic bar (12) on the supports (15) and fix
it with four fastening screws (16).
•
Unscrew and remove the clamp (13) by rotating it coun-
terclockwise, set the decorative panel (14) on the tele-
scopic bar (12). Set the clamp (13) back to its place by
turning it clockwise for several times.
•
Extend the bar (12) to the desired height and fix it by
tightening the clamp (13) with a slight effort as you
turn it clockwise.
•
Install the motor unit (9) on the telescopic bar (12)
until bumping and fix it with the clamp (11), do not
apply excessive effort when screwing the clamp of the
motor unit (11).
•
Set the rear grid (6) on the motor unit (9) matching the
guides on the motor unit (9) with the corresponding
openings on the grid (6). The carrying handle on the rear
grid (6) should be turned upwards.
•
Fix the rear grid (6) on the motor unit (9) with the plastic
nut (5) by screwing it clockwise until bumping.
•
Put the blades (4) on the motor axis (7) matching the
groove on the blades with the clamp on the motor
axis and fix them with the plastic clamp (2) rotating it
counterclockwise
and holding the blades (4) with
your free hand.
•
Set the nut and the fixing screw into the clamp ring (3)
sockets.
•
Match the front grid (1) and the rear grid (6), fix them
with the clamp ring (3) and tighten up the clamp ring (3)
by turning the fixing screw tight.
Note!
For easy assembling of the fan grids first install
the clamp ring (3) on the rear grid (6) and tighten up the
fastening screw slightly. Install the bottom part of the front
grid (1) on the clamp ring (3). Then press the bottom part
of the front grid (1) to the clamp ring (3) and squeezing
both grids on the both sides install the grid (1) under the
clamp ring (3). Tighten the fastening screw (4).
•
The fan is ready for operation.
USAGE
•
Before using the unit for the first time, make sure that
the voltage in your mains corresponds to the unit oper-
ating voltage.
•
Insert the power plug into the socket, you will hear a
sound signal.
Note:
every pressing of the control panel buttons (17, 22,
23, 24, 25) is accompanied by a sound signal.
•
Press the «ON/OFF» button (25), there will be a sound
signal, the air flow mode indicator (19) «SLEEP» (red)
and the blades rotation speed indicator (21) «LOW» will
light up, and the fan will start operating.
•
Press upper or lower part of the button (24) again to
select the blades rotation speed; the light indicators (21)
inform about the selected blades rotation speed:
–
«LOW» – low air flow speed
–
«MID» – medium air flow speed
–
«HIGHT» – high air flow speed.
•
Press the «OSC» button (17) to switch the 90° oscilla-
tion operation mode of the fan on, the indicator (18)
will light up.
•
To stop the rotation mode, press the «OSC» button (17)
again, the indicator (18) will go out.
•
Automatic switch-off timer operation time is selected
by the «TIMER» button (22), the light indicators (20) will
inform about the set time. You can set the fan opera-
tion time from 0.5 hours to 7.5 hours (with 0.5 hours
setting step).
•
To switch the timer off press the «TIMER» button (22)
repeatedly until all the indicators (20) go out.
•
Consequently press the «SPEED» button (23) to select
the air flow mode. You may choose three operation
modes, the operation modes are indicated with a
change of the «SLEEP» indicator’s (19) color:
–
«NORMAL» – simple ventilation, the «SLEEP» indica-
tor (19) glows red; the blades rotation speed mode is
selected with the button (24) and indicated with the
indicators (21) «LOW, MID, HIGH».
ENGLISH
IM VT-1948.indd 1
08.11.2016 15:27:54


