Вентиляторы VITEK VT-1934 - инструкция пользователя по применению, эксплуатации и установке на русском языке. Мы надеемся, она поможет вам решить возникшие у вас вопросы при эксплуатации техники.
Если остались вопросы, задайте их в комментариях после инструкции.
"Загружаем инструкцию", означает, что нужно подождать пока файл загрузится и можно будет его читать онлайн. Некоторые инструкции очень большие и время их появления зависит от вашей скорости интернета.


5
ENGLISH
knowledge if they are not under supervision of
a person who is responsible for their safety or
if they have not been instructed by this person
on the usage of the unit.
•
Do not use the fan if the blades, power cord
or power plug are damaged, if the fan works
improperly, after it was dropped or was dam-
aged in some other way.
•
Do not attempt to repair the unit. Do not dis-
assemble the unit by yourself, if any malfunc-
tion is detected or after it has fallen, unplug the
unit and apply to any authorized service center
at the contact addresses given in the warranty
certificate and on the website www.vitek.ru.
•
Transport the unit in the original package.
•
Keep the unit in a dry cool place out of reach
of children and people with disabilities.
THE UNIT IS INTENDED FOR HOUSEHOLD USE
ONLY, ITS COMMERCIAL USAGE AND USAGE IN
PRODUCTION AREAS AND WORK SPACES ARE
PROHIBITED.
BEFORE THE FIRST USE
After the unit transportation or storage at low
temperature keep it for at least three hours
at room temperature before switching on.
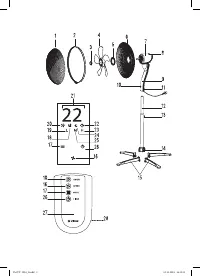
Fan assembling
•
Unpack the fan and remove any advertising
stickers that can prevent its operation.
•
Check the unit for damages, do not use it in
case of damages.
•
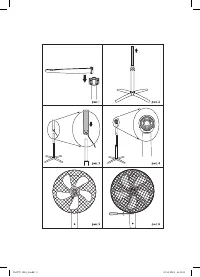
Install the supports (15) (4 pcs.) to the instal-
lation place (14), make sure that the supports
(15) are fixed properly (pic. 1).
•
Extend the bar (12) to the desired height and
fix it by tightening the clamp (13) with a slight
effort as you turn it clockwise (pic. 2).
•
Install the motor unit (7) on the telescopic bar (12)
until bumping and fix it with the clamp (11), do
not apply excessive effort when screwing the
clamp of the motor unit (11) (pic. 3).
•
Unscrew and remove the rear grid (6) fasten-
ing nut (5) (pic. 4).
•
Install the rear grid (6) on the motor unit (7).
The carrying handle on the rear grid (6) should
be turned upwards.
•
Fix the rear grid (6) on the motor unit (7) with the
nut (5) by screwing it clockwise until bumping.
•
Put the blades (4) on the motor axis matching
the ledge on the blade (4) with the groove on
the motor axis and fix them with the clamp (3)
rotating it
counterclockwise
and holding the
blades (4) with your free hand (pic. 5).
•
Set the nut and the fixing screw into the clamp
ring (2) sockets.
•
Match the front grid (1) and the rear grid (6),
fix them with the clamp ring (2) and tighten up
the clamp ring (2) by turning the fixing screw
(pic. 6)tight.
Note! For easy assembling of the fan grids first
install the clamp ring (2) on the rear grid (6) and
tighten it up slightly with the fastening screw. Install
the bottom part of the front grid (1) on the clamp
ring (2). Then press the bottom part of the front
grid (1) to the clamp ring (2) and squeezing both
grids on the both sides install the grid (1) under the
clamp ring (3). Tighten the fastening screw.
•
The fan is ready for operation.
USAGE
Notes:
–
the operation mode selection and setting but-
tons (16, 17, 26) on the control panel (9) are
sensory, you just need to touch the button to
switch the necessary operation mode on.
–
each pressing of an active button is accom-
panied by a sound signal.
–
All operation mode icons on the control
panel (9) will go out after 30 seconds. To switch
the icons on again, touch any button on the
control panel (9) or press the required button
on the remote control (27).
•
Before using the unit for the first time, make
sure that the voltage in your mains corre-
sponds to the unit operating voltage.
•
Insert the power plug into the mains socket
.
•
Press the on/off button (10) “
”, you will
hear a sound signal. The room temperature
will be shown with the icons (21), the buttons
(16, 17, 26) illumination will light up. The fan
will start operating in a ventilation mode, the
icon (20) “
” will light up and the icon (19)
«
L
» will light up on a low air flow speed.
•
Press the button (16) “
” to select the blades
rotation speed; the light indicators (19, 25, 23)
inform about the selected blades rotation
speed:
–
“L” – low air flow speed
–
“M” – medium air flow speed
–
“H” – high air flow speed
•
Press the button (8) to switch the 90° oscilla-
tion operating mode of the fan on.
IM VT-1934_2.indd 5
03.12.2018 16:13:52
Содержание
- 9 Регулярно производите чистку устройства.; ПЕРЕД ПЕРВЫМ ВКЛЮЧЕНИЕМ
- 10 тив часовой стрелки
- 11 своевременно меняйте элементы питания.; УХОД И ОБСЛУ ЖИВАНИЕ; вого шнура из розетки.; ХРАНЕНИЕ; При необходимости разберите вентилятор.; КОМПЛЕКТ ПОСТАВКИ
- 12 ТЕХНИЧЕСКИЕ ХАРАКТЕРИСТИКИ; Срок службы устройства – 3 года


