
Вентиляторы Vitek VT-1928 - инструкция пользователя по применению, эксплуатации и установке на русском языке. Мы надеемся, она поможет вам решить возникшие у вас вопросы при эксплуатации техники.
Если остались вопросы, задайте их в комментариях после инструкции.
"Загружаем инструкцию", означает, что нужно подождать пока файл загрузится и можно будет его читать онлайн. Некоторые инструкции очень большие и время их появления зависит от вашей скорости интернета.

5
ENGLISH
•
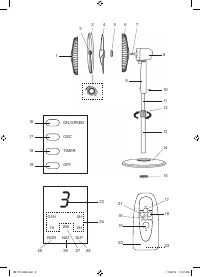
Insert the power plug into the socket, the dis-
play will light up and the icons will be alter-
nately shown on it.
•
Press the «ON/SPEED» on/off and speed
selection button (16), the fan will be switched
on at the second speed, the digital speed
symbol «2» and ventilation mode icon «NOR»
(25) will light up on the display
•
Press the «ON/SPEED» button (16) to select
the blades rotation speed
–
«1» – low air flow speed
–
«2» – medium air flow speed
–
«3» – high air flow speed
•
Press the «OSC» button (17) to switch the 90°
oscillation operation mode of the fan on, the
icon «SW» (27) will light up on the display.
•
To stop the rotation mode, press the «OSC» but-
ton (17) again, the icon «SW» (27) will go out.
Note: - you can select the air flow modes only
when pressing «MODE» button (21) on the
remote control (20).
•
Consequently press the button (21) «MODE»
to select the air flow mode. You may choose
three operation modes, the operation modes
are shown as the icons (25, 26, 28):
–
«MODE» – simple ventilation, the icon
(25) is glowing; the blades rotation speed
depends on the selected mode and is
shown with the digital symbols «1-2-3».
–
«NAT» – natural wind, the icon (26) is glow-
ing; natural wind imitation mode, the air flow
speed is chaotically changing: from soft
breeze to strong gusts of wind.
–
«SLP» –night mode, the icon (28) is glow-
ing; the air flow speed is changing in cycles,
constantly increasing and decreasing.
•
Automatic switch-off timer operation time
is selected by the button (18) «TIMER», the
icon (24) will be glowing.
•
You can set the fan operation time from 0.5
«0,5Н» hour to 7.5 «0,5Н-1Н-2Н-4Н» hours
(with 0.5 hour setting step).
•
The set timer operation time is indicated with
the icons (24).
•
To switch the timer off press the «TIMER» but-
ton (18) repeatedly until the icons (24) go out.
•
To switch the fan off, press the button (9)
«OFF».
•
You may change the position of the motor unit
(8) of the fan in accordance with the required
air flow angle in the vertical position, the fan
slope angle is set manually. To change the
fan slope angle press with a slight effort on
the motor unit (8) upwards or downwards.
Clicking while the fan is being tilted is normal.
USING THE REMOTE CONTROL (20)
AT TENTION!
Batteries leakage can cause injuries or the
unit damage. To avoid the unit damage, fol-
low the instructions given below:
–
use only the «AAA» batteries;
–
do not use old and new batteries at the same
time or different types of batteries;
–
do not recharge the batteries;
–
insert the batteries strictly following the
polarity;
–
remove the batteries if you are not planning to
use the unit for a long time;
–
replace the batteries in time.
–
apply to specialized centers for further recy-
cling of the batteries;
–
avoid the power nippers circuit.
To use the remote control (RC) (20) open the
battery compartment lid (22) and insert 2 «AAA»
batteries (not supplied with the unit) into the
battery compartment strictly following the
polarity, close the battery compartment lid (22).
If you do not use the unit for a long time, remove
the batteries from the battery compartment of
the remote control (20).
Note: - excluding «MODE» air flow mode
selection button (21), the control buttons on the
remote control (20) fully correspond to buttons
on the control panel (9).
MAINTENANCE AND CARE
•
Before cleaning the fan switch it off by pressing
the button (19) «OFF» or the button (19) «OFF»
on the remote control (20) and unplug it.
•
Do not use abrasive cleaners and solvents to
clean the unit.
•
Clean the motor unit (8) with a slightly damp
cloth, and then wipe it dry.
•
If you need to clean the blades (4), unscrew
the screw on the ring (2), remove the ring (2),
remove the front grid (1), and then wipe the
blades (4) with a slightly damp cloth.
•
Install the front grid (1) and the ring (2) back
to its place.
IM VT-1928.indd 5
11/20/19 11:47 AM
Содержание
Характеристики

Остались вопросы?Не нашли свой ответ в руководстве или возникли другие проблемы? Задайте свой вопрос в форме ниже с подробным описанием вашей ситуации, чтобы другие люди и специалисты смогли дать на него ответ. Если вы знаете как решить проблему другого человека, пожалуйста, подскажите ему :)


