
Вентиляторы Stadler Form Peter - инструкция пользователя по применению, эксплуатации и установке на русском языке. Мы надеемся, она поможет вам решить возникшие у вас вопросы при эксплуатации техники.
Если остались вопросы, задайте их в комментариях после инструкции.
"Загружаем инструкцию", означает, что нужно подождать пока файл загрузится и можно будет его читать онлайн. Некоторые инструкции очень большие и время их появления зависит от вашей скорости интернета.


• Only connect the cable to alternating current. Observe the voltage infor-
mation given on the appliance.
• Do not use damaged extension cords.
• Do not run the power cord over sharp edges and make sure that it does
not get trapped.
• Do not pull the plug from the socket with wet hands or by holding on to
the power cord.
• Do not use the appliance in immediate vicinity of a bath tub, a shower or a
swimming pool (observe a minimum distance of 3 m). Place the appliance
such that a person in the bath tub cannot touch the appliance.
• Do not place the appliance near a heat source. Do not subject the power
cord to direct heat (such as a heated hotplate, open flames, hot iron sole
plates or heaters for example). Protect power cords from oil.
• See to it that the appliance is properly positioned to ensure a high stabil-
ity during its operation and make sure that no one can trip over the power
cord.
• The appliance is not splash-proof.
• For indoor use only.
• Do not store the appliance outdoors.
• Store the appliance in a dry place inaccessible to children (pack the ap-
pliance).
• If the supply cord is damaged, it must be replaced by the manufacturer, or
its service agent, or a qualified person in order to avoid a hazard.
• Prior to any maintenance, cleaning and after each use, switch off the ap-
pliance and unplug the mains cable from the socket.
• Repairs to electrical appliances must only be carried out by a qualified
electrical technician.
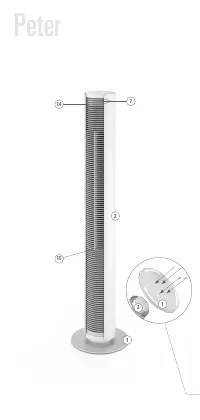
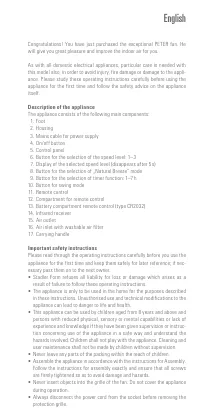
Assembly (see page 2 and 3)
Attach the foot (1) to the bottom of the housing (2) with the 4 screws pro-
vided. Make sure the screws are firmly tightened.
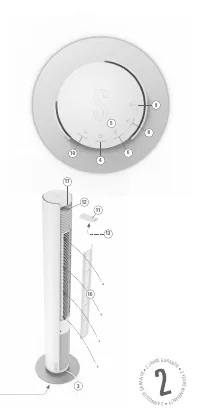
Setting up / operation
1. Place Peter in the desired location on a flat surface. Connect the mains
cable (3) to a suitable power outlet.
2. Switch on the appliance by pressing the on/off button (4). The blue LEDs
on the control panel (5) will then turn on. The appliance gives an audible
signal when a setting is changed via the control panel (5) or the remote
control (11).
3. Press the button for the selection of the speed level (6) to change the
fan speed (levels 1–3). Pressing once increases the speed by one level.
If you would like to increase the speed by another level, press again. The
number of the selected speed level (7) lights up on the front of the unit,
and disappears after 5 seconds.
4. Press the button for the selection of “Natural Breeze” mode (8) for natu-
ral wind conditions. The blue LED beneath the button (8) will now light
up. This mode provides an even more pleasant cooling effect, simulat-
ing a natural breeze. The fan speed of this breeze automatically varies
depending on the selected speed level.
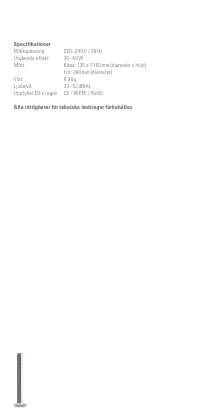
Характеристики

Остались вопросы?Не нашли свой ответ в руководстве или возникли другие проблемы? Задайте свой вопрос в форме ниже с подробным описанием вашей ситуации, чтобы другие люди и специалисты смогли дать на него ответ. Если вы знаете как решить проблему другого человека, пожалуйста, подскажите ему :)


