Вентиляторы Scarlett SC-177 - инструкция пользователя по применению, эксплуатации и установке на русском языке. Мы надеемся, она поможет вам решить возникшие у вас вопросы при эксплуатации техники.
Если остались вопросы, задайте их в комментариях после инструкции.
"Загружаем инструкцию", означает, что нужно подождать пока файл загрузится и можно будет его читать онлайн. Некоторые инструкции очень большие и время их появления зависит от вашей скорости интернета.


IM019
www.scarlett.ru
8
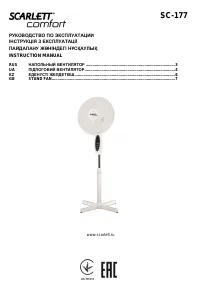
SC-177
Do not attempt to repair, adjust or replace parts in the appliance. Repair the malfunctionin g appliance in the nearest service
center.
If the product has been exposed to temperatures below 0ºC for some time it should be kept at room temperature for at least 2
hours before turning it on.
The manufacturer reserves the right to introduce minor changes into the product design without prior notice, unless such
changes influence significantly the product safety, performance, and functions.
Production date mentioned on the unit and/or on the packing materials and documentations.
ASSEMBLING INSTRUCTIONS
The device is intended for air circulation in the room.
Fan is packed disassembled. Before assembling make sure that all the required parts are undamaged and included into the set.
Do not plug in the device before its assembling is finished.
Tighten stand tube to stand base with screw. Fix base cover to stand base with a screw (supplied with a set).
Unscrew out-joint, put the stand cover and base cover on the stand base, pull the extension pole out then tighten the out -joint
again.
Place control box firmly on top of extension pole, tighten screw B.
Unscrew the blade cap by turning clockwise and rear grill nut by turning counter clockwise and put both blade cap and rear gr ill
nut off the motor shaft.
Put rear grille on motor shaft.
Secure it with rear grille nut.
Slide blades on motor shaft so that claws on motor shaft match the blades slots.
Screw blade cap on shaft by turning counter clockwise.
Put front grille on rear grille and close clips or screw grille ring to secure grilles together.
Adjust the fan vertically by vertical adjustment screw.
The fan is ready for work.
OPERATION MANUAL
CONTROL PANEL
The control panel is located on the fan control unit.
BUTTONS:
Speed/On
- button switches on the power.Speed button switches the fan on and shifts between d ifferent speeds.
Off
- button switches the fan off
Swing
–rotation mode
Timer
- button helps to adjust fan operating time up to maximum time of 7 hours and a half. Each pressing of this button adds
half an hour of fan operating time. For example, if you wish to set operating time of 5 hours and a half, you need to do the
following: Press the button “Timer” several times and see on display: 0.5h, 1h, 4h, that means you have set 5.5h
Mode
- button helps to choose operating mode of fan, sleep or nature.
LIGHT INDICATORS:
0.5h…4h - fan operating time set
High
– high speed;
Med
– middle speed;
Low
– minimum speed;
Nor
– normal operation off the fan;
Slp - air stream by weak waves
Nat - air stream by intense waves
REMOTE CONTROLLER:
On / Speed buttons switches the fan on and shifts between different fan operating modes.
Off button switches the fan off
Mode button helps to choose operating mode of fan.
Normal
– normal operation off the fan;
Natural
– intense wave-like change of the air flow;
Sleep
– wave-like change of the air flow;
Timer button helps to adjust fan operating time. Each pressing of this button adds half an hour of fan operating time.
Swing
–rotation mode
NOTE: Remote controller operates on AA 1.5V batteries which are not included.
MAINTENANCE
Before cleaning unplug fan first.
Do not use abrasive cleansers
Clean front and rear grilles, blades, stand tube and stand base with soft moistened cloth and wipe dry.
STORAGE
Keep the device in normal conditions in dry place.
The symbol on the unit, packing materials and/or documentations
means used electrical and electronic units and battery’s
should not be toss in the garbage with ordinary household garbage. These units should be pass to special receiving point.
For additional information about actual system of the garbage collection address to the local authority.
Valid utilization will help to save valuable resources and avoid negative work on the public health and environment which
happens with incorrect using garbage.


