
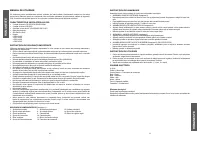
Вентиляторы First FA-5551-GR - инструкция пользователя по применению, эксплуатации и установке на русском языке. Мы надеемся, она поможет вам решить возникшие у вас вопросы при эксплуатации техники.
Если остались вопросы, задайте их в комментариях после инструкции.
"Загружаем инструкцию", означает, что нужно подождать пока файл загрузится и можно будет его читать онлайн. Некоторые инструкции очень большие и время их появления зависит от вашей скорости интернета.
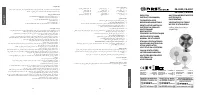


INSTRUCTION MANUAL
Thank you for purchasing this high quality Fan. Our fans have been carefully designed and constructed to
meet the highest standards of performance, quality and safety. Please read the instructions carefully to ensure
satisfactory and trouble free use.
YOUR FAN FEATURES
• 3 Speed Control for FA-5551/FA-5552/FA-5562
• 2 Speed Control for FA-5550
• Oscillation over an Angle of 90° (FA-5550/FA-5551: 80°)
• Protective Grille
• 220-240V • 50Hz
• Max. Power:
• 5550: 20W
• 5551: 40W
• 5552: 45W
• 5562: 45W
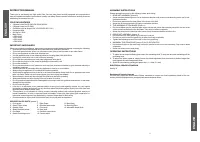
IMPORTANT SAFEGUARDS
When using electrical appliances, basic safety precautions should always be followed, including the following:
• Read all instructions carefully and save these instruction manual for reference.
• To protect against electric shock, do not immerse cord, plug or fan into water or any other liquid.
• Do not use appliance for other than intended use.
• Use the appliance only on the voltage specified on its rating plate (220-240V/50Hz).
• Unplug from outlet when not in use and before cleaning.
• Do not pull the connection cord over sharp edges and never jam it.
• Do not pull the plug out of the socket by pulling the connection cord.
• Do not use outdoors.
• Do not use an extension cord, unless the cord has been checked and tested by your electrical authority or
a qualified technician.
• Close supervision is necessary when any appliance is used by or near children.
• Always use your appliance on a suitabel level and dry platform.
• Avoid using an appliance where it can fall or be pushed into water. Never reach for an appliance after it has
fallen into water. Switch off at the mains power point und unplug immediately.
• Never attempt to insert any object through the grille when the fan is operating.
• Always disconnect fan when moving from one location to another.
• Do not operate any appliance with a damaged cord or plug or after the appliance malfunctions, or has been
damaged in any manner.
• Do not cover the grille.
• If the fan is to be stored for an extended period of time or not used regularly, replace it in the original
packaging (or similar) and store it in a dry and clean place. Before using again, check if the unit is clean and
dry and if the fan blades rotates freely.
• This appliance is not intended for use by persons (including children) with reduced physical, sensory or
mental capabilities, or lack of experience and knowledge, unless they have been given supervision or
instruction concerning use of the appliance by a person responsible for their safety.
• Children should be supervised to ensure that they do not play with the appliance.
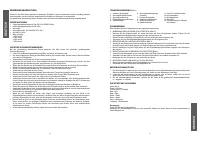
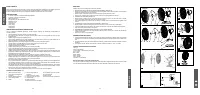
DESCRIPTION OF PARTS
(
picture 1)
ASSEMBLY INSTRUCTIONS
Please assemble correctly by the following orders when using:
1. REAR NET ASSEMBLY (
picture 2)
• Screw the blade fastening screw out in clockwise direction and screw the net fastening screw out in anti-
clockwise direction.
• Fix the rear guard onto the three pillars of the motor front shell.
• Screw the net fastening screw (6) tightly in clockwise direction.
2. THE ASSEMBLY OF FAN BLADE (
picture 3)
• Put the fan blade onto the electrical axle centre and the axle centre bolt must be pressed to the end of the
concave notch at the back of the fan blade. They must be tallied completely.
• Screw the screw into the electrical axle centre in anti-clockwise direction and then fix it.
3. FRONT NET ASSEMBLY (
picture 4)
• Put the hook of the front guard ring on the top of rear net.
• Put the rear net into the front guard ring to make them tally completely.
• Tighten the fastening screw of the lower of the front guard ring.
4. ASSEMBLY THE STAND BASE (
picture 5) for FA-5551/FA-5552
• Put the stand base into the main body, it must be pressed to the end of the main bady. They must to tallied
completely.
• Screw the screw into the main body.
OPERATING INSTRUCTIONS
1. To make the fan head oscillating push down the oscillating knob. To stop the fan head oscillating pull the
oscillating knob.
2. To adjust the airflow upwards, simply loosen the swivel adjustment knob and move to desired angle then
firmly tighten the swivel adjustment knob.
3. Speed is controlled by pressing the piano keys. (1 = slow, 3 = fast)
ELECTRICAL PRINCIPLE DIAGRAM
See fig. 6
Environment friendly disposal
You can help protect the environment! Please remember to respect the local regulations: hand in the non-
working electrical equipments to an appropriate waste disposal center.
3
ENGLISH
2
ENGLISH
1. Front guard
2. Guard Clops Screw
3. Guards Clops
4. Blade Fastening screw
5. Fan Blade
6. Guard Fastening screw
7. Rear Guard
8. Electrical axle centre
9. Front shell
10. Rear shell
11. Oscillate control knob
12. Control switch
13. Main Body
14. Standing Base
15. Adjustable Angle Knob
Характеристики

Остались вопросы?Не нашли свой ответ в руководстве или возникли другие проблемы? Задайте свой вопрос в форме ниже с подробным описанием вашей ситуации, чтобы другие люди и специалисты смогли дать на него ответ. Если вы знаете как решить проблему другого человека, пожалуйста, подскажите ему :)


