
Варочная панель Kuppersberg FT6VS16 W - инструкция пользователя по применению, эксплуатации и установке на русском языке. Мы надеемся, она поможет вам решить возникшие у вас вопросы при эксплуатации техники.
Если остались вопросы, задайте их в комментариях после инструкции.
"Загружаем инструкцию", означает, что нужно подождать пока файл загрузится и можно будет его читать онлайн. Некоторые инструкции очень большие и время их появления зависит от вашей скорости интернета.


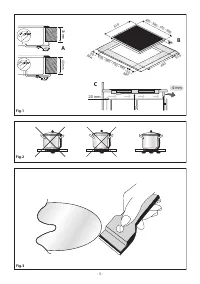


· Use
Use the touch control system in the corresponding position
relative to the individual cooking needs. Keep in mind that the
higher the number, the more heat that it is produced.
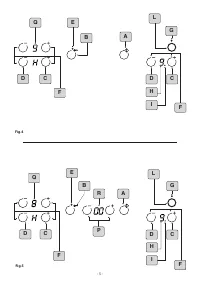
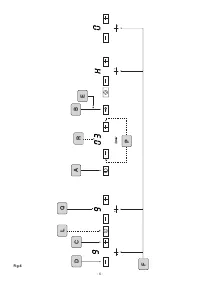
· Operation (fig.4-5-6)
A
=
ON/OFF
button
B
= Lock button
C
=
+
button
D
=
-
button
E
=
ON/OFF
indicator light lock button
F
= Cooking zone selector button
G
= Double cooking zone
ON/OFF
indicator light
I
= Rapid heating function (
Heat up
) active
L
= Double zone selector button
P
= Timer buttons (
+
/
-
)
Q
= Cooking zone display
R
= Timer Display
Depending on the model purchased, the first time the hob
is switched on its safety setting may be activated, i.e. the
“
Lock button indicator light
” (
E
) will be illuminated. To use
the hob, press and hold sensor
E
for 3 seconds, until the
indicator light switches off.
- The appliance can be switched on by selecting start-up
sensor
A
. A zero will appear on all displays for 10 seconds. If
no command is made within 10 seconds, the hob will switch
off again.
- A hotplate can be switched on by selecting the “
+
” or “-”
sensor within 10 seconds. If sensor
D
is used the display will
show selection
9
, while if sensor
C
is used, the display will
show selection
1
.
- Once this step is complete the user may make temperature
adjustments using the “
+
” or “-” buttons.
- The hotplate can be switched off by selecting “0” using sensor
D
; after 3 seconds the cooking zone will switch off.
A hotplate can also be switched off by selecting the “
+
” or “
-
”
sensors simultaneously.
- The hob can be switched off by selecting the main start-up
sensor
A
. If all the hotplates are set to “0” the hob switches
off after 10 seconds.
- If the hob is fitted with extendable hotplates, the second zone
may be switched on after the user has ensured that:
- the LED corresponding to lock button
B
is switched off (if it
is not, deactivate it).
- Press button
A
to switch on the hob.
- Select the desired hotplate and adjust the power level using
the “
+
” and “
-
” buttons.
- Once the power has been adjusted, select button
L
to activate
the double zone.
- To deactivate the double zone, simply press button
L
.
- If an object has been placed on top of the control panel, the
hob will automatically revert to
OFF
mode.
When a hotplate is in the
OFF
mode and the temperature
of the glass surface is greater than approximately 50°, there
will be a light signal “
H
” on the corresponding cooking zone
display.
- Function
B
locks hob operation the moment it is selected.
E.g.: if the function is activated when two zones of the hob are
switched on, the programme remains locked at that level, even
if the user attempts to switch on another zone. The same thing
happens if the appliance is switched off and the lock function
is activated: the user will not be able to switch the hob on.
To activate or deactivate it, hold a finger in front of sensor
B
for approximately two seconds. The function is active when
indicator light
E
is illuminated.
Even when the lock button is activated, button
A
will con-
tinue to work.
Heat up (Rapid heating)
The
Heat up
function can be used to set the cooking zone
to its maximum temperature for a specified period of time,
after which the temperature will return to a lower value
selected previously.
To activate the
Heat up
function, select the hotplate by pres-
sing the + button until setting 9 is displayed; if the button is
pressed again a decimal point “
•
” or the letter “
A
” will appear
on the display (next to the digit 9) for 5 seconds. This means
the
Heat up
function is active.
The desired power level (between 1 and 8) should be selected
within 5 seconds. If power level 9 is selected, the function is
disabled. To deactivate the
Heat up
function, simply select the
+ button and hold it down until setting 9 is reached and the
decimal point disappears from the display. When the “
Heat
up
” function is active, the previously selected temperature
level may be increased by pressing the (
+
) button. Once the
cooking zone has reached the selected temperature, the “
Heat
up
” function is automatically deactivated and the hob emits
a
BEEP
. The cooking zone will operate in a constant manner,
at the set power level.
Timer (fig. 5-6)
Depending on the model of the hob, it may be equipped with
a TIMER function.
This function can be used to set an amount of time (between
00 and 99 minutes) after which the selected cooking zone will
switch off automatically.
Operation:
- Select the
+
or
-
button corresponding to function
P
;
00
will
appear on the timer display.
- Use the “
+
” and “
-
” buttons to set the desired timer period.
- If the
+
button is pressed for more than 2 seconds, the desired
time values can be reached more quickly.
- Select a cooking zone and set the desired temperature level
(between
1
and
9
).
- Once the programmed time has elapsed, display
P
will emit
a sound signal and will begin to flash.
This signal can be deactivated by touching the
+
and
-
buttons
on timer display
P
.
- If you wish to stop the TIMER function before the set time has
elapsed, press the
+
and
-
buttons simultaneously.
THE MANUFACTURER DECLINES ALL RESPONSIBILITY
FOR EVENTUAL DAMAGES CAUSED BY BREACHING THE
ABOVE WARNINGS.
- 14 -
Характеристики

Остались вопросы?Не нашли свой ответ в руководстве или возникли другие проблемы? Задайте свой вопрос в форме ниже с подробным описанием вашей ситуации, чтобы другие люди и специалисты смогли дать на него ответ. Если вы знаете как решить проблему другого человека, пожалуйста, подскажите ему :)


