
Увлажнители Vitek VT-2348 - инструкция пользователя по применению, эксплуатации и установке на русском языке. Мы надеемся, она поможет вам решить возникшие у вас вопросы при эксплуатации техники.
Если остались вопросы, задайте их в комментариях после инструкции.
"Загружаем инструкцию", означает, что нужно подождать пока файл загрузится и можно будет его читать онлайн. Некоторые инструкции очень большие и время их появления зависит от вашей скорости интернета.


4
ENGLISH
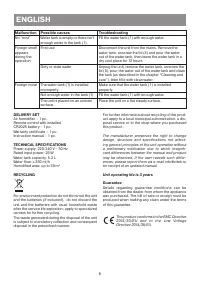
the contact address list given in the warranty
certificate and on the website www.vitek.ru.
•
Transport the unit in the original package only.
•
Keep the unit out of reach of children and dis-
abled persons.
THE UNIT IS INTENDED FOR HOUSEHOLD USE
ONLY, ITS COMMERCIAL USAGE AND USAGE
IN PRODUCTION AREAS AND WORK SPACES IS
PROHIBITED.
BEFORE THE FIRST USE
After unit transportation or storage at low tem-
perature keep it for at least three hours at room
temperature before switching on.
There may be water spots in the air humidifier,
this is normal, as the unit has undergone fac-
tory quality control.
–
Unpack the unit, remove any stickers and pack-
age materials that can prevent unit operation.
Check the unit for damages. In case of damages
do not switch the unit on.
–
Before plugging the unit in make sure that your
home mains voltage corresponds to the unit
operating voltage.
Notes:
Use the air humidifier at the room temperature
from +10°С to +40°С, and relative humidity less
than 80%.
Water temperature should not exceed +40°С.
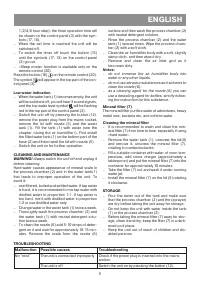
USING THE AIR HUMIDIFIER
Notes:
–
the operation mode selection and setting but-
tons are sensory, you just need to touch the but-
ton to switch the necessary operation mode on,
every touch of the active button is accompanied
by a sound signal.
–
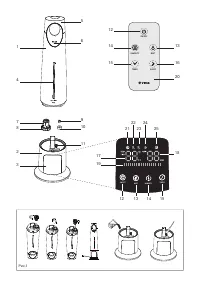
Take the water tank (1) by the handle (5) and
remove it from the bottom part (2).
–
Turn over the tank (1), unscrew the lid (8) rotat-
ing it counterclockwise (pic. 1).
–
Fill the tank (1) with necessary amount of water,
insert the lid (8) into the water inlet and screw it
in clockwise (pic. 1).
–
First place the filled water tank (1) back to its
place and then install the handle (5) with nozzle.
–
Wait till the process chamber (2) is filled with
water.
Note:
–
Before the first use it is recommended to put the
mineral filter (7) into a container filled with water
of room temperature for several minutes.
–
Remove the filter (7) from the lid (8) turning it
counterclockwise, put the filter (7) into water for
several minutes, take the filter out and drain the
remaining water, then install it back on the lid
(8), turning it clockwise until bumping.
–
Connect the power plug to the mains socket,
you will hear a sound a signal and the symbol
will appear in the top left corner of the con-
trol panel.
–
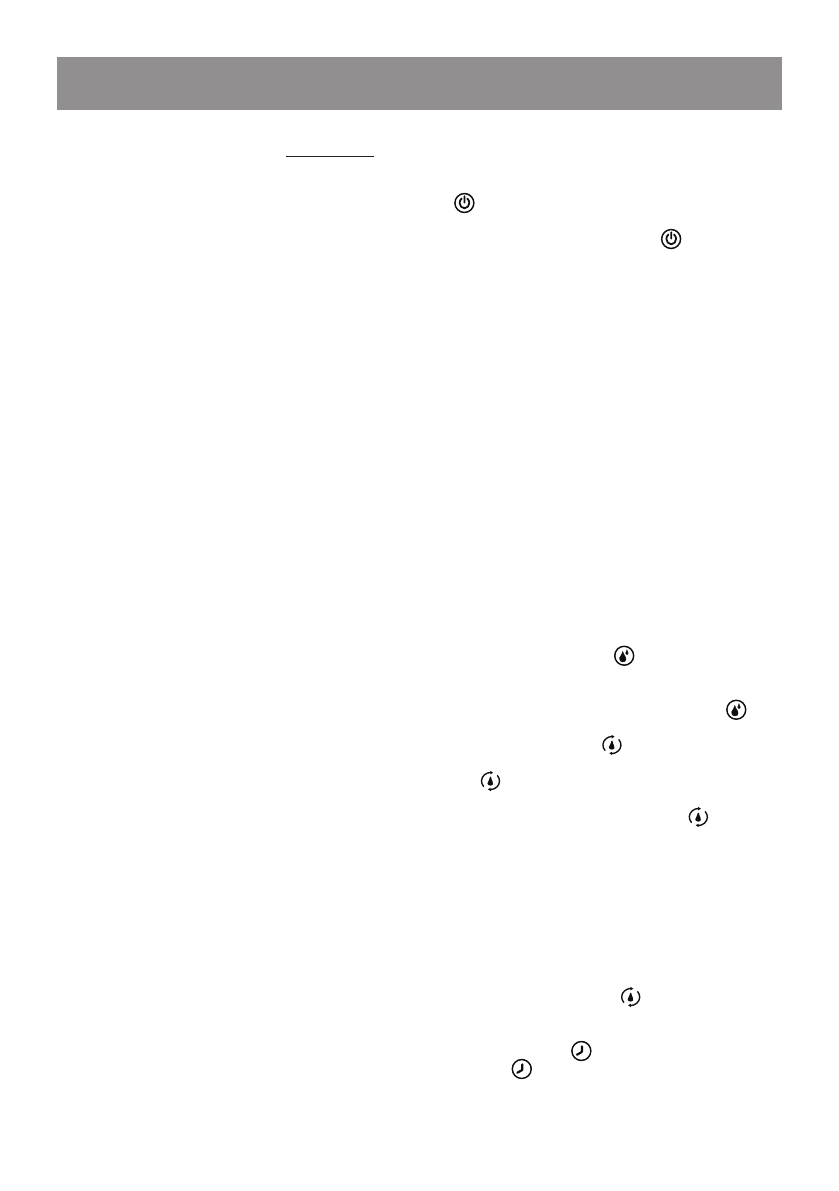
Press the on/off button (12)
, you will hear
a sound signal and the digital indicators (17,
18) and the mist release intensity scale (19) will
appear on the control panel (3).
Note: The unit switches on in the automatic mode
at minimal mist release intensity.
Installing batteries in the remote control (RC)
•
Open the RC battery compartment lid and insert
a CR2025 battery, strictly following the polarity.
•
Install the battery compartment lid back to its
place.
Note: The unit can be supplied with the battery
installed in the RC battery compartment. In this
case if there is an isolation insert in the RC battery
compartment, remove the insert.
Battery replacement
•
Open the battery compartment lid, replace the
old battery with a new one, strictly following the
polarity, then close the battery compartment lid.
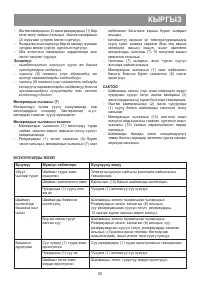
OPERATION MODE CONTROL BUTTONS
–
Press the button (13)
to select the «mist»
release intensity.
You can select 3 levels of «mist» release intensity
by consequently pressing the button (13)
. The
intensity level will be shown on the scale (19).
–
Press the button (14)
to set desired humidity
level. Maintaining relative humidity mode sym-
bol
will appear in the top part of the control
panel (3).
Consequently press the button (14)
to set the
desired level of relative humidity in the room within
the range from 45% to 90% with the step 5%, the
humidity level will be shown on the control panel
with the digital indicator (18). When the set humidity
level is reached, the «mist» release will stop. When
the humidity level decreases, the «mist» release will
resume.
Press the button (14) once to view the set humidity
level. To switch the set humidity mode off, press the
button (14) until the symbol
goes out. The digital
symbols (17) and (18) will show the current values of
the relative humidity and room temperature.
–
To set the timer
, press the button (15); the
symbol
will appear in the top part of the
panel.
–
Consequently touch the button (15) to set up
the timer within the range from 1 to 8 hours (with
Характеристики

Остались вопросы?Не нашли свой ответ в руководстве или возникли другие проблемы? Задайте свой вопрос в форме ниже с подробным описанием вашей ситуации, чтобы другие люди и специалисты смогли дать на него ответ. Если вы знаете как решить проблему другого человека, пожалуйста, подскажите ему :)


