
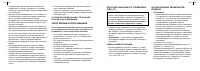
Увлажнители Brayer BR4703 - инструкция пользователя по применению, эксплуатации и установке на русском языке. Мы надеемся, она поможет вам решить возникшие у вас вопросы при эксплуатации техники.
Если остались вопросы, задайте их в комментариях после инструкции.
"Загружаем инструкцию", означает, что нужно подождать пока файл загрузится и можно будет его читать онлайн. Некоторые инструкции очень большие и время их появления зависит от вашей скорости интернета.


8
9
en
en
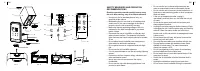
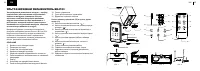
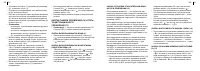
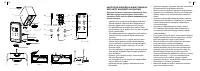
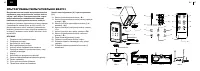
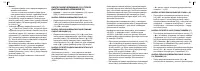
• Take the water tank by the handle (2) and remove it
from the unit body (7).
• Turn over the tank (2), unscrew the lid (4) rotating it
counterclockwise (pic. 2).
• Fill the water tank (2) with necessary amount of water
(pic. 3), place the lid (4) on the water inlet (3) and
thread it rotating clockwise.
• Install the filled water tank (2) on the body (7), install
the nozzle (1).
• Wait till the process chamber (6) is filled with water.
• If you want to use the aromatization function, remove
the aromatic oil container (8). Add some drops of
water-soluble aromatic oil and install the container (8)
back to its place (pic 4).
•
notes:
- use water-soluble aromatic oils only.
- if you are not going to use the aromatization
function, remove the container (8), wash it and
install the container (8) back to its place.
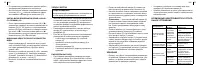
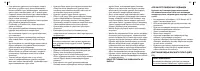
• Insert the plug into the socket; you will hear a sound
signal, the connection icon « » will appear in the
operation mode icons row (19).
• Switch the unit on by touching the button (13)
« ». There will be a sound signal, the display will
show the following symbols: mist release intensity
symbols (20), room temperature symbols (21),
relative humidity symbols (22), and the water tank (2)
lighting will light up. The air humidifier will operate at
the medium mist release intensity.
• You can adjust the mist release direction by turning the
nozzle (1) in various directions.
• To finish the unit operation touch the button (13)
« » again, the symbols on the display will go out,
except the connection icon « » in the operation mode
icons row (19).
• Remove the power plug from the mains socket.
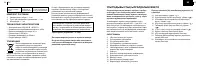
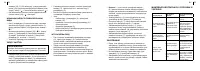
COnTROL PAneL (10) AnD ReMOTe
COnTROL (11) BUTTOnS
•
note:
— the control panel (10) and the remote control
(11) buttons have similar functions.
On/OFF BUTTOn (13).
• Press/touch the button (13) « » (on the remote
control) to switch the air humidifier on and press/touch
the button (13) « » again to switch the unit off.
WATeR HeATInG MODe On/OFF BUTTOn (14).
• Press/touch the button (14) « » to switch the water
heating mode on, the symbol « » will light up in the
operation mode icons row (19). To switch the water
heating mode off press/touch the button (14) «
»
again, the water heating icon « » in the operation
mode icons row (19) will go out.
ROOM ReLATIve HUMIDITY SeTTInG BUTTOn (15)
Relative humidity is the ratio of the mass content of water
vapor in the air to the maximum possible mass at the
given temperature; relative humidity is measured in
percent and is indicated, for example, as «45%».
Atmosphere air always contains water vapour,
percentage of which depends on meteorological
conditions; the higher the temperature, the more water
vapour is contained in the air. When cold air is heated
up to comfort temperature in winter, relative percentage
of water vapour decreases, this is what relative humidity
is.
To maintain comfortable room conditions, water or water
vapor must be artificially added to the ambient air — this
is what the air humidifier is necessary for.
Comfortable relative humidity for humans is «45-65%»;
«40-55%» for preventive and medicinal purposes;
for furniture, musical instruments and libraries it is
recommended to maintain relative air humidity of «40-
60%».
• Consequently press/touch the button (15) « » to
set the desired level of relative humidity in the room
within the range from 40% to 80% which will be
shown with the symbols (22), the symbol « » will
light up on the display in the operation mode icons
row (19).
• When the desired humidity level is reached, the air
humidifier will be switched off, when the relative
humidity level decreases, the air humidifier will switch
on.
• To switch the selected humidity maintenance mode
off press/touch the button (15) « » until the flashing
symbols «- -» (22) appear.
MIST ReLeASe InTenSITY BUTTOn (16)
• Consequently press/touch the button (16) « » to
select the mist release intensity, the mist release
intensity will be shown with the icons (20) in the
following order: — medium intensity — low intensity —
high intensity — medium intensity.
TIMeR SeTTInG BUTTOn (17)
• Consequently press/touch the button (17) « » to set
up the timer within the range from 1 to 12 hours with 1
hour step which will be shown with the digital symbols
(20) and the symbol « » in the operation mode icons
row (19).
• After the preset operation time runs out, the air
humidifier will be switched off.
• To switch the timer off press/touch the button (16) «
»
until the room temperature digital symbols (21) appear.
«nIGHT» MODe On/OFF BUTTOn (18)
• After pressing/touching the button (18) « » the air
humidifier will switch to the night mode: the symbols
(20, 21, 22) will go out, the connection icon «
»
and the night mode symbol « » will be shown in the
operation mode icons row (19).
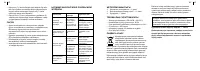
Характеристики

Остались вопросы?Не нашли свой ответ в руководстве или возникли другие проблемы? Задайте свой вопрос в форме ниже с подробным описанием вашей ситуации, чтобы другие люди и специалисты смогли дать на него ответ. Если вы знаете как решить проблему другого человека, пожалуйста, подскажите ему :)


