Утюги VITEK VT-1262 PK - инструкция пользователя по применению, эксплуатации и установке на русском языке. Мы надеемся, она поможет вам решить возникшие у вас вопросы при эксплуатации техники.
Если остались вопросы, задайте их в комментариях после инструкции.
"Загружаем инструкцию", означает, что нужно подождать пока файл загрузится и можно будет его читать онлайн. Некоторые инструкции очень большие и время их появления зависит от вашей скорости интернета.


7
ENGLISH
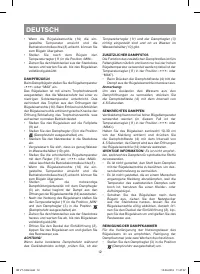
VERTICAL STEAMING
Vertical• steam• function• can• be• used• only• at• high•
ironing• temperatures• (that• is,• when• the• tempera-
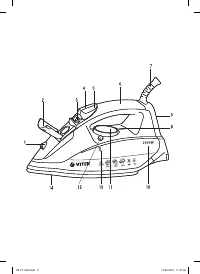
ture•control•knob•(11)•is•set•to•“
•••
”•or•“MAX”).
Hold• the• iron• vertically• at• the• distance• of•
10-30• cm• from• the• clothes• and• press• the• burst•
of• steam• button• (4)• with• 4–5• second• interval,•
steam• will• be• released• from• the• soleplate• (14)•
intensively.
IMPORTANT INFORMATION:
Vertical steaming
is not recommended for synthetic fabrics.
•
To•avoid•fabric•melting,•do•not•touch•it•with•the•
iron•soleplate•while•steaming.
•
Never•steam•clothes•on•a•person•as•tempera-
ture• of• the• released• steam• is• very• high,• use• a•
clothes•hanger•or•a•coat•rack.
•
After• you• finish• ironing,• switch• the• iron• off,•
unplug• it,• wait• until• the• iron• soleplate• cools•
down•completely,•then•open•the•water•inlet•lid•
(2),• turn• over• the• iron• and• drain• the• remain-
ing•water.
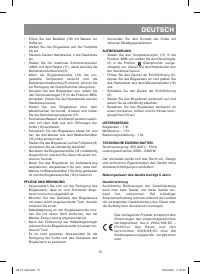
STEAM CHAMBER CLEANING
To• prolong• lifetime• of• the• iron• we• recommend•
cleaning•the•steam•chamber•every•fortnight.
•
Set• the• continuous• steam• supply• knob• (3)• to•
the•position•
•(steam•supply•is•off).
•
Fill•the•water•tank•(10)•until•its•filled•half•way.
•
Place•the•iron•on•its•base•(9).
•
Insert•the•power•plug•into•the•mains•socket.
•
Set•the•control•knob•(11)•to•the•maximum•sole-
plate•temperature•“MAX”,•the•pilot•lamp•(8)•will•
light•up.
•
When• the• soleplate• (14)• reaches• the• desired•
temperature• value,• the• pilot• lamp• (8)• will• go•
out,• and• you• can• start• cleaning• the• steam•
chamber.
•
Switch• the• iron• off• by• setting• the• tempera-
ture• control• knob• (11)• to• the• «MIN»• posi-
tion.• Remove• the• power• plug• from• the• mains•
socket.
•
Hold•the•iron•horizontally•above•the•sink,•press•
and•hold•down•the•self-clean•button•(12).
•
Boiling• water• and• steam• with• scale• will• be•
released•from•the•iron•soleplate•(14)•openings.
•
Slightly•sway•the•iron•back•and•forth•until•all•the•
water•leaves•the•water•tank•(10).
•
Place• the• iron• on• its• base• (9)• and• let• it• cool•
down•completely.
•
When•the•iron•soleplate•(14)•cools•down•com-
pletely,•wipe•it•with•a•dry•cloth.
•
Before• you• take• the• iron• away• for• storage,•
make• sure• that• there• is• no• water• in• the• water•
tank•(10)•and•that•the•iron•soleplate•(14)•is•dry.
CLEANING AND CARE
•
Before• cleaning• the• iron,• make• sure• that• it• is•
unplugged•and•has•cooled•down•completely.
•
Wipe• the• iron• body• with• a• slightly• damp• cloth•
and•then•wipe•it•dry.
•
Scale•on•the•iron•soleplate•can•be•removed•with•
a•cloth•soaked•in•the•vinegar-water•solution.
•
After•removing•scale,•polish•the•iron•soleplate•
surface•with•a•dry•cloth.
•
Do• not• use• abrasives• to• clean• the• iron• sole-
plate•and•body.
•
Avoid• contact• of• the• iron• soleplate• with• sharp•
metal•objects.
STORAGE
•
Set• the• temperature• control• knob• (11)• to• the•
“MIN”• position• and• the• continuous• steam• sup-
ply•knob•(3)•to•the•position•
(the•steam•sup-
ply• is• off).• Remove• the• power• plug• from• the•
mains•socket.
•
Open• the• water• inlet• lid• (2),• turn• over• the• iron•
and• drain• any• remaining• water• from• the• water•
tank•(10).
•
Close•the•water•inlet•lid•(2).
•
Put•the•iron•vertically•and•let•it•cool•down•com-
pletely.
•
Store•the•iron•vertically•in•a•dry•cool•place•out•
of•reach•of•children.
•
DELIVERY SET
Iron•–•1•pc.
Beaker•–•1•pc.
Instruction•manual•–•1•pc.
TECHNICAL SPECIFICATIONS
Power•supply:•220–240•V•~•50•Hz
Power•consumption:•2000–2400•W
The manufacturer reserves the right to modify the
unit design and specifications without prior notice.
Unit operating life is 3 years
Guarantee
Details• regarding• guarantee• conditions• can• be•
obtained• from• the• dealer• from• whom• the• appli-
ance• was• purchased.• The• bill• of• sale• or• receipt•
must•be•produced•when•making•any•claim•under•
the•terms•of•this•guarantee.
This product conforms to the EMC-
Requirements as laid down by the Council
Directive 2004/108/ЕС and to the Low
Voltage Regulation (2006/95/ЕС)
IM VT-1262.indd 7
10.06.2016 11:47:57
Содержание
- 15 ОПИСАНИЕ; Поверхности утюга нагреваются; Регулярно проводите чистку устройства.
- 16 Не разрешайте детям играть с; ПЕРЕД ПЕРВЫМ ИСПОЛЬЗОВАНИЕМ; Примечание; ВЫБОР ВОДЫ; Запрещается заливать в резер-; НАПОЛНЕНИЕ РЕЗЕРВУАРА ДЛЯ ВОДЫ
- 17 не•гладить; УСТАНОВК А ТЕМПЕРАТУРЫ ГЛАЖЕНИЯ; РАЗБРЫЗГИВАТЕЛЬ ВОДЫ; »• или• «MAX»• (в• зависимости• от• типа•
- 18 ПАРОВОЕ ГЛАЖЕНИЕ; »• или•; ДОПОЛНИТЕЛЬНАЯ ПОДАЧА ПАРА; Не рекомендуется; ОЧИСТК А ПАРОВОЙ К АМЕРЫ
- 19 УХОД И ЧИСТК А; Срок службы прибора – 3 года; Информация для связи –
- 32 RUS


