
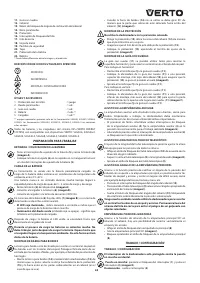
Триммеры VERTO VES 18В Li-Ion 52G549-0 - инструкция пользователя по применению, эксплуатации и установке на русском языке. Мы надеемся, она поможет вам решить возникшие у вас вопросы при эксплуатации техники.
Если остались вопросы, задайте их в комментариях после инструкции.
"Загружаем инструкцию", означает, что нужно подождать пока файл загрузится и можно будет его читать онлайн. Некоторые инструкции очень большие и время их появления зависит от вашей скорости интернета.


11
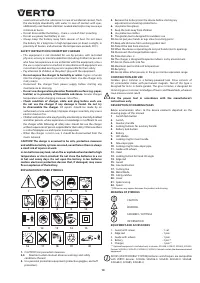
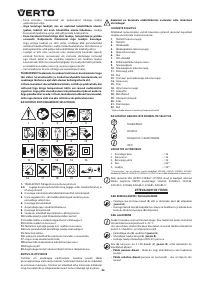
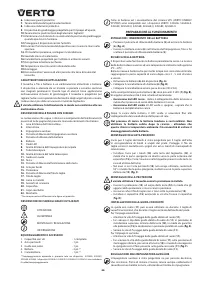
PREPARATION FOR OPERATION
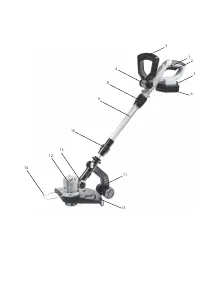
REMOVING AND INSERTING THE BATTERY
•
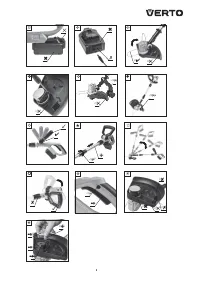
Push battery locking button (
5
) and slide out the battery (
6
) (
fig. A
).
•
Slide charged battery (
6
) into the handle holder, you should hear
when the battery lock button (
5
) snaps.
BATTERY CHARGING
The device is supplied with partially charged battery. The battery should
be charged in ambient temperature between 4°C and 40°C.
New battery, or one that has not been used for a long time, will reach full
efficiency after approximately 3 to 5 charge/discharge cycles.
•
Remove the battery (
6
) from the device (
fig. A
).
•
Connect the charger to the battery (
6
) (
fig. B
).
•
Connect the charger to mains socket (
230V AC
).
Two LEDs (
7
) are located in the battery casing (
6
) (
fig. B
), and meaning of
the lighting is described below.
• Red diode lit
– voltage supplied and informs that charging is in
progress.
• Green diode lit
(red diode turns off ) – the battery is fully charged.
Once the battery has been charged, the green diode stays on until you
will disconnect the charger from mains network.
Batteries heat up very strongly during charging process. Do not
work just after charging has been finished, wait until the battery
cools down to room temperature. It will prevent battery damage.
INSTALLATION OF EDGE ROD
Edge rod is used to trim grass near edges and corners of lawns. It
protects the cutting line from damaging with sharp edges, e.g. concrete
pavement sides.
•
Install the edge rod (
14
) to the grass trimmer head (
12
) so the
protruding part points to front of the guard (
15
), and the rod fits to
the head keys (when used).
•
When the edge rod (
14
) is not used, rotate it by 90° so the protruding
part points upwards of the head (
12
) (
fig. C
).
GUARD INSTALLATION
Do not use grass trimmer without guard installed.
•
Put the guard (
15
) onto head casing (
12
) so the guard catch is in its
guide.
•
Ensure the cutting line is not under the guard (
15
).
•
Fix the guard (
15
) by tightening guard fixing screws (
fig. D
).
INSTALLATION OF GUIDE WITH WHEELS
Guide with wheels (
11
) can be used to trim horizontal surfaces as well as
for vertical trimming of lawn edges.
For horizontal operation:
•
Undo the fixing screw of the guide with wheels (
11
).
•
Slide the ring of the guide with wheels (
11
) to upper installation
position, further from the head (
12
) to guarantee the guard (
15
) is
guided in parallel to the ground (
fig. E
).
•
Tighten the fixing screw of the guide with wheels (
11
).
For vertical operation:
•
Undo the fixing screw of the guide with wheels (
11
).
•
Slide the ring of the guide with wheels (
11
) to lower installation
position, closer to the head (
12
) so the key fits to hole in the guide
with wheels (
11
) (
fig. F
).
•
Tighten the fixing screw of the guide with wheels (
11
).
ADJUSTMENT OF THE AUXILIARY HANDLE
Auxiliary handle is designed for right- and left-handed persons. When
starting operation always hold the grass trimmer firmly with both hands
and by two handles.
•
Simultaneously press two locking buttons for auxiliary handle (
4
) to
set the auxiliary handle (
3
) in the most comfortable position for the
task at hand (
fig. G
).
•
Release the locking buttons for auxiliary handle (
4
) to lock it in
selected position.
LENGTH ADJUSTMENT OF THE TELESCOPIC PIPE
Length adjustment of the telescopic pipe allows to match height of the
tool with persons of various height and posture.
•
Loosen the locking ring for telescopic pipe (
10
).
•
Slide out/in the telescopic pipe (
9
) to desired length (
fig. H
).
•
Lock by tightening the locking ring of the telescopic pipe (
9
).
SETTING TILT ANGLE OF THE MAIN HANDLE
Thanks to convenient feature of adjustable head angular position related
to the main handle it is possible to trim lawn and flower bed edges and
mow in hard to reach areas, e.g. under seats, hammock, table etc.
•
Press in the locking button for head tilt angle (
13
).
•
Press on the telescopic pipe (
9
) to choose desired angle of the head
tilt (
fig. I
).
•
Release the locking button for head tilt angle (
13
) to automatically
secure selected position.
Be very careful when using the grass trimmer for vertical trimming
of lawns and flower bed edges. Stay away from the plane of cutting
line rotation to avoid risk of being hit with an object projected by
the cutting line.
ROTATABLE MAIN HANDLE
Rotation of main handle in relation to the head by 90° allows to trim
flower bed and lawn edges vertically.
•
Loosen the locking ring for main handle (
8
).
•
Rotate the main handle by 90° (
fig. J
).
•
Lock the locking ring for main handle (
8
) by tightening.
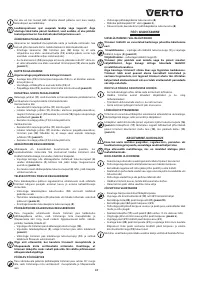
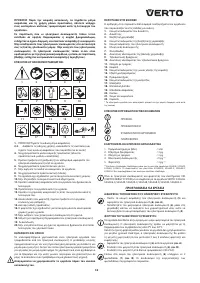
OPERATION / SETTINGS
SWITCHING ON – SWITCHING OFF
The grass trimmer switch features protection against accidental
start up.
Switching on
– press the switch lock button (
1
) and press the switch
button (
2
) (
fig. K
).
Switching off
– release pressure on the switch button (
2
).
Cutting parts rotate for some time after the motor is switched off.
Never attempt to lock the switch in the ON position.
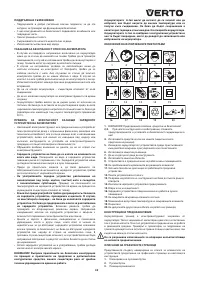
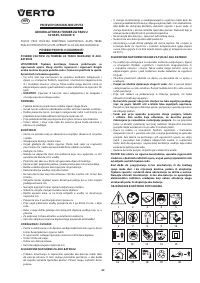
Never use the grass trimmer during rain and in humid environment.
All parts must be assembled properly and must fulfil requirements
that ensure appropriate and safe grass trimmer operation. Any
damaged protective element or part must be repaired or replaced
immediately.
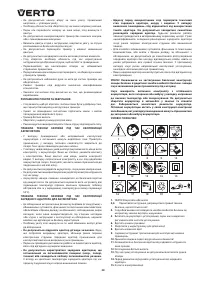
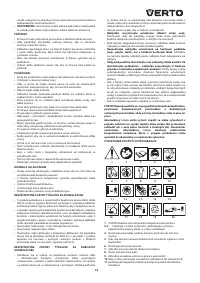
GUIDELINES FOR SAFE AND EFFICIENT USE
•
When trimming long grass perform the work gradually, by layers.
•
Keep the grass trimmer away from hard objects and cultivated plants.
•
Operate the grass trimmer only when the grass is dry.
•
When trimming edges drive the tool along lawn edge.
PULLING OUT THE CUTTING LINE
The grass trimmer features automatic system for cutting line feed. Check
the condition and working length during operation.
You can extend the cutting line by pressing the line lock button (
16
)
(
fig. L
) and by pulling the cutting line (
17
). Excessive length of pulled
cutting line will be cut off by metal blade (
18
) located in the guard (
15
)
(
fig. L
) just after starting the grass trimmer.
OPERATION AND MAINTENANCE
Remove the battery from the device before commencing any
activities related to installation, adjustment, repair or maintenance.
Be careful, the metal blade for cutting off the cutting line is
dangerous.
MAINTENANCE AND STORAGE
•
Cleaning the device after each use is recommended.
•
Clean ventilation holes in engine casing regularly.
•
Regularly remove grass residues from the guard and cutting line spool.
•
Never clean the device with water, aggressive fluids or solvents.
•
Clean the device with brush or delicate cloth.
•
Store the device in a dry place, beyond reach of children.
•
Store the device with the battery removed.
REPLACEMENT OF CUTTING LINE SPOOL
•
Use recommended spools with cutting line.
•
Press in safety catches (
19
) on both sides of the spool casing (
21
).
•
Remove the cover (
20
) from the spool casing (
21
) (
fig. M
).
•
Remove the spool (
22
) from the spool casing (
21
).
•
Clean inside the spool casing and seating thoroughly, remove all
residues of ground and grass.
•
Unwind the cutting line (
17
) from new spool (
22
) to approximately
15 cm length.

