
Триммеры Makita BC300LDZ - инструкция пользователя по применению, эксплуатации и установке на русском языке. Мы надеемся, она поможет вам решить возникшие у вас вопросы при эксплуатации техники.
Если остались вопросы, задайте их в комментариях после инструкции.
"Загружаем инструкцию", означает, что нужно подождать пока файл загрузится и можно будет его читать онлайн. Некоторые инструкции очень большие и время их появления зависит от вашей скорости интернета.


15
deformation on the spring washer, replace the nut. Ask
your local authorized service center to order it.
NOTICE:
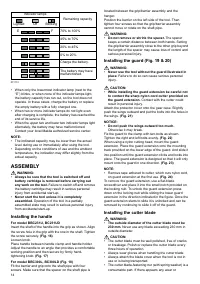
• Be sure to use genuine Makita cutter blade.
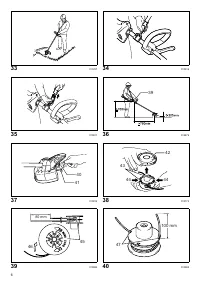
Turn the tool upside down so that you can replace the
cutter blade easily.
(Fig. 25)
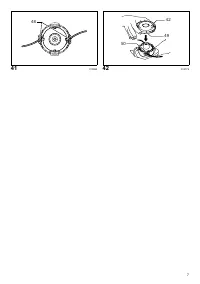
To dismount the cutter blade, insert the hex wrench
through the hole on the protector cover and gear case.
Rotate the receive washer until it is locked with the hex
wrench. Loosen the hex nut (left-hand thread) with the
socket wrench and remove the nut, cup, clamp washer
and hex wrench.
(Fig. 26)
Mount the cutter blade onto the shaft so that the guide of
the receive washer fits in the arbor hole in the cutter
blade. Install the clamp washer, cup, and secure the
cutter blade with the hex nut with 13 to 23 Nm of
tightening torque during holding the receive washer with
hex wrench.
(Fig. 27)
Make sure that the blade is the left way up.
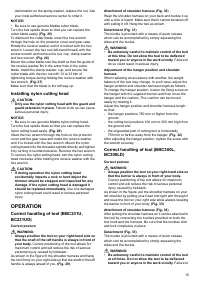
Installing nylon cutting head
CAUTION:
•
Only use the nylon cutting head with the guard and
guard extension in place.
Failure to do so can cause
serious personal injury.
NOTICE:
• Be sure to use genuine Makita nylon cutting head.
Turn the tool upside down so that you can replace the
nylon cutting head easily.
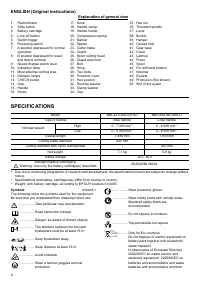
(Fig. 28)
Insert the hex wrench through the hole on the protector
cover and the gear case and rotate the receive washer
until it is locked with the hex wrench. Mount the nylon
cutting head onto the threaded spindle directly and tighten
it by turning it counterclockwise. Remove the hex wrench.
To remove the nylon cutting head, turn the nylon cutting
head clockwise while holding the receive washer with the
hex wrench.
CAUTION:
•
If during operation the nylon cutting head
accidentally impacts a rock or hard object the
trimmer should be stopped and inspected for any
damage. If the nylon cutting head is damaged it
should be replaced immediately.
Use of a damaged
nylon cutting head could result in serious personal
injury.
OPERATION
Correct handling of tool (BBC231U,
BC231UD)
Correct posture
WARNING:
•
Always position the tool on your right-hand side so
that the shaft of the left handle is always in front of
your body.
Correct positioning of the tool allows for
maximum control and will reduce the risk of serious
personal injury caused by kickback.
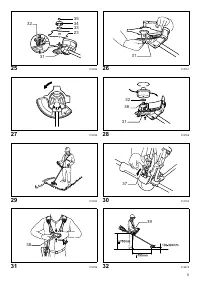
As shown in the figure fit the shoulder harness and hang
the tool firmly on your right side so that the shaft of the left
handle is always ahead of you.
(Fig. 29)
Attachment of shoulder harness
(Fig. 30)
Wear the shoulder harness on your back and buckle it up
until a click is heard. Make sure that it cannot be taken off
with pulling it off. Hang the tool as shown.
Detachment
(Fig. 31)
The buckle is provided with a means of quick release
which can be accomplished by simply squeezing the
sides and the buckle.
WARNING:
•
Be extremely careful to maintain control of the tool
at this time. Do not allow the tool to be deflected
toward you or anyone in the work vicinity.
Failure to
do so could result in serious injury.
Adjustment of the hanger position and shoulder
harness
When replacing an accessory with another, the weight
balance of the tool may change. In such case, adjust the
hanger position and shoulder harness length as follows.
To change the hanger position, loosen the fixing screw on
the hanger with the supplied wrench and then move the
hanger and the cushion. The cushion can be moved
easily by twisting it.
Adjust the hanger position and shoulder harness length
so that:
- the hanger positions 750 mm or higher from the
ground,
- the cutting tool positions 100 mm to 300 mm high from
the ground and
- the unguarded part of cutting tool is horizontally
750 mm or farther away from the hanger.
(Fig. 32)
After adjusting the hanger position, tighten the screw with
the wrench securely.
Correct handling of tool (BBC300L,
BC300LD)
Correct posture
WARNING:
•
Always position the tool on your right-hand side so
that the barrier is always in front of your body.
Correct positioning of the tool allows for maximum
control and will reduce the risk of serious personal
injury caused by kickback.
As shown in the figure, put the shoulder harness on your
left shoulder by putting your head and right arm through it
and keep the tool on your right side while always keeping
the barrier in front of your body.
(Fig. 33)
Attachment of shoulder harness
(Fig. 34)
After putting the shoulder harness on it can be attached to
the tool by connecting the buckles provided on both the
tool hook and the harness. Be sure that the buckles click
and lock completely in place.
Detachment
(Fig. 35)
The buckle is provided with a means of quick release
which can be accomplished by simply squeezing the
sides and the buckle.
WARNING:
•
Be extremely careful to maintain control of the tool
at all times. Do not allow the tool to be deflected
toward you or anyone in the work vicinity.
Failure to


