
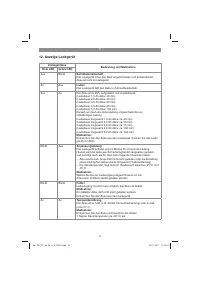
Триммеры Einhell PXC GE-CT 36/30 - инструкция пользователя по применению, эксплуатации и установке на русском языке. Мы надеемся, она поможет вам решить возникшие у вас вопросы при эксплуатации техники.
Если остались вопросы, задайте их в комментариях после инструкции.
"Загружаем инструкцию", означает, что нужно подождать пока файл загрузится и можно будет его читать онлайн. Некоторые инструкции очень большие и время их появления зависит от вашей скорости интернета.


GB
- 26 -
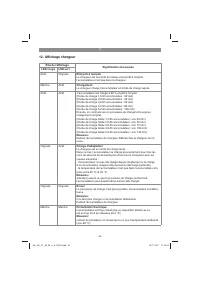
4. In section „Charger indicator“ you will
fi
nd a
table with an explanation of the LED indicator
on the charger.
The battery pack can become a little warm during
the charging. This is normal. If the battery pack
fails to charge, check:
•
whether there is voltage at the socket outlet
•
whether there is good contact at the charging
contacts
If the battery pack still fails to charge, send
•
the charging unit
•
and the battery pack
to our customer service center.
To ensure that the battery pack provides long ser-
vice, you should take care to recharge it promptly.
You must recharge the battery pack when you
notice that the power of the cordless grass trim-
mer drops. Never fully discharge the battery pack.
This will cause it to develop a defect.
5.10 Battery capacity indicator (Fig. 12)
Press the switch for the battery capacity indicator
(Item F). The battery capacity indicator (Item H)
shows the charge status of the battery using 3
LEDs.
All 3 LEDs are lit:
The battery is fully charged.
2 or 1 LED(s) are lit:
The battery has an adequate remaining charge.
1 LED
fl
ashes:
The battery is empty, recharge the battery.
All LEDs
fl
ash:
The battery pack has undergone exhaustive di-
scharge and is defective. Do not use or charge a
defective battery pack.
6. Operation
Please note that the statutory regulations gover-
ning noise abatement may di
ff
er from one loca-
tion to another.
Danger! The guard hood must be
fi
tted when car-
rying out work.
6.1 Switching the equipment on and o
ff
,
adjusting the speed (Fig. 13)
Switching on and setting the speed
Press the safety lock-o
ff
(3) forwards and press
the On/O
ff
switch (2) at the same time. Adjust the
speed during operation by pressing the On/O
ff
switch to a greater or lesser extent. The harder
you push, the higher the speed.
Switching o
ff
Release the On/O
ff
switch.
6.2 Practical tips
Practice all the work steps with the motor swit-
ched o
ff
and without the rechargeable battery
before you start to use the equipment. Only ever
cut grass that is dry. If the grass is long, the grass
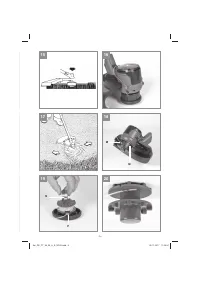
must be cut shorter in stages (Fig. 14).
Extending the cutting line (Fig. 15)
Danger! Do not use any kind of metal wire or me-
tal wire encased in plastic in the line spool. This
may cause serious injuries to the user.
The grass trimmer has a semi-automatic line
extension system (automatic jog line feed). Each
time you activate the semi-automatic line exten-
sion system, the line is automatically extended to
ensure that you can cut your lawn with the perfect
cutting width at all times. To extend the cutting
line, run the motor and tap the line spool on the
ground. This will automatically extend the line.
The blade on the guard hood will cut the line to
the permissible length. Please note that the more
often you activate the semi-automatic line exten-
sion system, the more the line will wear.
Note: If the line is too long when you use the
equipment for the
fi
rst time, the surplus end of it
will be cut by the blade on the guard hood. If the
line is too short when you start the equipment
for the
fi
rst time, press the knob on the line spool
and pull the line hard. When you then start the
machine for the
fi
rst time the line will be cut to the
perfect length automatically.
Using a brush or similar, carefully remove all resi-
dual grass from the underside of the guard hood
at regular intervals.
Di
ff
erent cutting methods
Caution! To use the edge guide along walls or
objects, swing the edge guide forward to the front
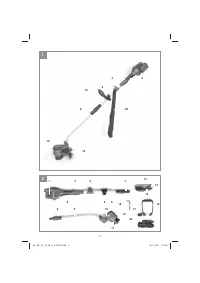
(Fig. 4). Swing it up when not in use (Fig. 16).
Anl_GE_CT_36_30_Li_E_SPK9.indb 26
Anl_GE_CT_36_30_Li_E_SPK9.indb 26
03.11.2017 11:25:47
03.11.2017 11:25:47
Характеристики

Остались вопросы?Не нашли свой ответ в руководстве или возникли другие проблемы? Задайте свой вопрос в форме ниже с подробным описанием вашей ситуации, чтобы другие люди и специалисты смогли дать на него ответ. Если вы знаете как решить проблему другого человека, пожалуйста, подскажите ему :)


