TP-Link VIGI C300P-6 - Инструкция по эксплуатации
Система видеонаблюдения TP-Link VIGI C300P-6 - инструкция пользователя по применению, эксплуатации и установке на русском языке. Мы надеемся, она поможет вам решить возникшие у вас вопросы при эксплуатации техники.
Если остались дополнительные вопросы — свяжитесь с нами через контактную форму.
1
2
1
2
OR
Quick Start Guide
*Images may differ from actual products.
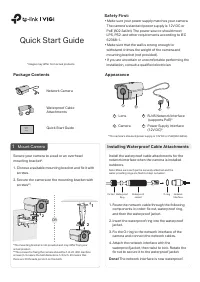
Appearance
*The camera’s standard power supply is 12V DC or PoE (802.3af/at).
Power Supply Interface
(12V DC)*
4
Camera
2
RJ45 Network Interface
(supports PoE)*
3
Lens
1
1
2
3
4
Package Contents
Network Camera
Waterproof Cable
Attachments
Quick Start Guide
Quick
Start
Guide
Secure your camera to a wall or an overhead
mounting bracket*.
1. Choose a suitable mounting bracket and fix it with
screws.
2. Secure the camera on the mounting bracket with
screws**.
• Make sure your power supply matches your camera.
The camera’s standard power supply is 12V DC or
PoE (802.3af/at). The power source should meet
LPS, PS2, and other requirements according to IEC
62368-1.
• Make sure that the wall is strong enough to
withstand 4 times the weight of the camera and
mounting bracket (not provided).
• If you are uncertain or uncomfortable performing the
installation, consult a qualified electrician.
Safety First:
Installing Waterproof Cable Attachments
Wall Mounting
Install the waterproof cable attachments for the
network interface when the camera is installed
outdoors.
Note: Make sure each part is securely attached and the
water-proofing rings are flush to keep out water.
1. Route the network cable through the following
components in order: fix nut, waterproof ring,
and then the waterproof jacket.
2. Insert the waterproof ring into the waterproof
jacket.
3. Fix the O-ring to the network interface of the
camera and connect the network cables.
4. Attach the network interface with the
waterproof jacket, then twist to lock. Rotate the
fix nut to secure it to the waterproof jacket.
Done!
The network interface is now waterproof.
1
Mount Camera
Fix Nut Waterproof
Ring
O-ring
Network
Interface
Waterproof
Jacket
*The mounting bracket is not provided and may differ from your
actual product.
**The screws for fixing the camera should be 1/4-20 UNC machine
screws (1/4 means the bolt diameter is 1/4 inch, 20 means that
there are 20 threads per inch on this bolt).
"Загрузка инструкции" означает, что нужно подождать пока файл загрузится и можно будет его читать онлайн. Некоторые инструкции очень большие и время их появления зависит от вашей скорости интернета.