Тостеры Tefal Delight TT 81xx - инструкция пользователя по применению, эксплуатации и установке на русском языке. Мы надеемся, она поможет вам решить возникшие у вас вопросы при эксплуатации техники.
Если остались вопросы, задайте их в комментариях после инструкции.
"Загружаем инструкцию", означает, что нужно подождать пока файл загрузится и можно будет его читать онлайн. Некоторые инструкции очень большие и время их появления зависит от вашей скорости интернета.
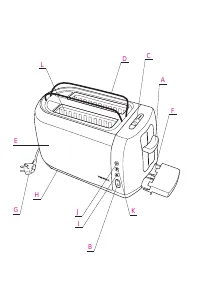
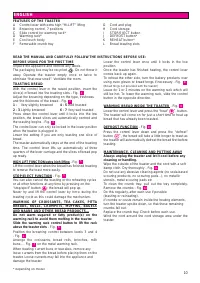


FEATURES OF THE TOASTER
A
Control lever with extra high “HI-LIFT” lifting
B
Browning control, 7 positions
C
Slide control for warming rack*
D Warming
rack*
E
Cool touch body
F
Removable crumb tray
G
Cord and plug
H Cord
storage
I STOP/EJECT
button
J DEFROST
button*
K REHEAT
button*
L
Bread toasting slots
READ THE MANUAL AND CAREFULLY FOLLOW THE INSTRUCTIONS BEFORE USE:
BEFORE USING FOR THE FIRST TIME
Unpack the appliance and remove any labels.
The packaging box may be recycled
. Do not throw it
away. Operate the toaster empty once or twice to
eliminate “that new smell”. Ventilate the room.
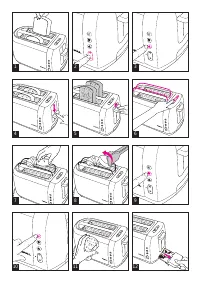
TOASTING BREAD
With the control lever in the raised position, insert the
slice(s) of bread into the toasting slots - Fig.
Adjust the browning depending on the type, freshness
and the thickness of the bread - Fig.
1 - Very slightly browned
4 - 5 Well toasted
2 - 3 Lightly browned
6 - 7 Very well toasted
Press down the control lever until it locks into the low
position, the bread slices are automatically centred and
the toasting begins - Fig.
The control lever can only be locked in the lower position
when the toaster is plugged in.
Lower the setting if you are only toasting one slice of
bread.
The toaster automatically stops at the end of the toasting
time. The control lever lifts up automatically at three
quarters of the lever carriage and the slices of bread pop
up ready.
HIGH LIFT FUNCTION/extra high lifting - Fig.
Lift the control lever when the bread has finished toasting
to remove the toast more easily.
STOP/EJECT FUNCTION - Fig.
You can also cancel the toasting or the reheating cycles
or all other functions at any time by pressing on the
“stop/eject” button
: the bread will pop up.
Never try and lift the control lever by force during the
toasting cycle as this could damage the mechanism.
WARMING OF CROISSANTS, TEA CAKES, PITTA
BREADS, ROLLS, CRUMPETS, MUFFINS, BAGELS
AND NAANS AND OTHER BREAD PRODUCTS…
Do not warm sugared or fatty product(s) on the
warming rack to avoid them melting in the toaster.
Slide the warming rack control button to lift the rack
above the toaster slots - Fig.
Position the browning control between levels 3 and 4
- Fig.
Arrange the croissants, bread rolls, brioches, milk
buns…- Fig.
on the metal warming rack.
When toasting currant buns or teacakes, remove any
loose currants from the bread before placing them on the
toaster. Loose currants may fall into the appliance and
damage the toaster.
7
2
6
3
5
4
2
1
Lower the control lever once until it locks in the low
position.
Once the toaster has finished heating, the control lever
comes back up again.
To reheat the other side, turn the bakery products over
using oven gloves or bread tongs if necessary - Fig.
(Bread tongs not provided with the toaster)
Leave for 1 or 2 minutes on the warming rack which will
still be hot. To lower the warming rack, slide the control
button in the opposite direction.
WARMING BREAD INSIDE THE TOASTER - Fig.
Lower the control lever and press the “heat”
*
, button.
The toaster will come on for just a short time to heat up
bread that has already been toasted.
DEFROST FUNCTION - Fig.
Press the control lever down and press the “defrost”
button
*
, the bread will take a little longer to toast as
the toaster will automatically defrost the bread first before
toasting.
MAINTENANCE, CLEANING AND PUTTING AWAY
Always unplug the toaster and let it cool before any
cleaning or handling.
Wipe the outside of the toaster and the cord with a soft
damp cloth. Dry thoroughly - Fig.
Do not use any abrasive cleaning agents (no soda-based
scouring products, no scouring pads...), no metallic
utensils, metal scouring pads etc.
To clean the crumb tray: pull out the tray completely.
Remove the crumbs - Fig.
Do this regularly, after each use if possible
(toasting or re-heating).
If crumbs or crusts remain inside the heating elements,
turn the toaster upside down, so that these remaining
crumbs fall out.
Replace the crumb tray. Check before each use.
Wind the cord around the cord storage area under the
toaster.
12
11
10
9
8
10
ENGLISH
* depending on model


