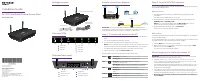
Точки доступа NETGEAR WAC104 AC1200, 4xGE LAN. - инструкция пользователя по применению, эксплуатации и установке на русском языке. Мы надеемся, она поможет вам решить возникшие у вас вопросы при эксплуатации техники.
Если остались вопросы, задайте их в комментариях после инструкции.
"Загружаем инструкцию", означает, что нужно подождать пока файл загрузится и можно будет его читать онлайн. Некоторые инструкции очень большие и время их появления зависит от вашей скорости интернета.

Visit
to get your questions answered and access the latest
downloads.
You can also check out our NETGEAR Community for helpful advice at
Support and Community
Si ce produit est vendu au Canada, vous pouvez accéder à ce document en français
canadien à
https://www.netgear.com/support/download/
.
(If this product is sold in Canada, you can access this document in Canadian French at
https://www.netgear.com/support/download/
For regulatory compliance information including the EU Declaration of Conformity, visit
https://www.netgear.com/about/regulatory/
.
See the regulatory compliance document before connecting the power supply.
For NETGEAR’s Privacy Policy, visit
https://www.netgear.com/about/privacy-policy
By using this device, you are agreeing to NETGEAR’s Terms and Conditions at
https://www.netgear.com/about/terms-and-conditions
. If you do not agree, return the
device to your place of purchase within your return period.
Do not use this device outdoors.
Applicable to 6 GHz devices only: Only use the device indoors. The operation of
6 GHz devices is prohibited on oil platforms, cars, trains, boats, and aircraft, except that
operation of this device is permitted in large aircraft while flying above 10,000 feet.
Operation of transmitters in the 5.925‑7.125 GHz band is prohibited for control of or
communications with unmanned aircraft systems.
Regulatory and Legal
These steps apply only if you updated your
AP firmware to version 1.0.4.15 or a later
version and then reset the AP to factory defaults.
Before you start using your AP, we recommend that you use the AP’s automatic update
function to check for new
firmware.
1. Launch a web browser on a WiFi‑enabled device that has a WiFi connection to the
AP (see
Step 2. Join the AP’s WiFi network
http://www.aplogin.net
or
http://www.aplogin.com
in the address field.
A login window displays.
2. Enter the AP user name and password.
The user name is
admin
. The password is the one that you specified on the initial
set up page the first time that you logged in to the local browser UI (see
Log in to the local browser UI
). The user name and password are case‑sensitive.
The Home page displays.
3. Select
Administration > Firmware Update
.
The Firmware Update page displays.
4. Click the
Check
button.
The AP
detects new firmware if any is available, and displays a message asking if
you want to download and install it.
5.
To download and install the new firmware, click the
Yes
button.
The AP
locates the firmware, downloads it, and begins the update.
A progress bar shows the progress of the firmware upload process. The firmware
upload process takes several minutes. When the upload is complete, your AP
restarts.
WARNING:
To avoid the risk of corrupting the firmware, do not interrupt the
update. For example, do not close the browser, click a link, or load a new page. Do
not turn off the AP. Wait until the AP finishes loading the new firmware and restarts,
and the Power LED stops blinking and remains solid green.
6. Log back into the local browser UI.
The Home page displays. The firmware version is stated in the Firmware Version
field of the AP Information pane.
Step 4. Check for new firmware
These steps apply only if you updated your
AP firmware to version 1.0.4.15 or a later
version and then reset the AP to factory defaults.
1. Launch a web browser on a WiFi‑enabled device that has a WiFi connection to the
AP (see
Step 2. Join the AP’s WiFi network
http://www.aplogin.net
or
http://www.aplogin.com
in the address field.
These URLs are the same as the IP address 192.168.0.100.
A login window displays.
2. Enter the AP user name and password.
The user name is
admin
. The default password is
password
. The user name and
password are case‑sensitive.
The initial set up page displays. This page displays only the first time that you log in
to the local browser user interface (UI).
3. On the initial set up page, do the following:
•
Set a new password for the admin user.
•
Enable password recovery and set security questions. Although this is optional,
we recommend that you enable password recovery.
•
For greater security, you can also set new WiFi network names (SSIDs) for the
WiFi network in the 2.4 GHz and 5 GHz radio bands and new WiFi passphrases.
We recommend that you let the AP get its IP address from the router in your
network (this is the default setting). However, if you want to use a static IP address
for the AP, you can do so.
4. Click the
Apply
button.
Your settings are saved.
5. If you set a new SSID and passphrase, reconnect to the AP using the new SSID and
passphrase.
6. Log back in to the local browser UI using your new password.
You can now monitor and manage the AP.
Step 3. Log in to the local browser UI
Troubleshooting tips
The following table provides some tips for correcting simple problems that you might
encounter. For more troubleshooting information, see the troubleshooting chapter in
the user manual.
Problem
Cause
Possible solution
You cannot
connect over WiFi
to the AP.
The WiFi LED is off,
indicating that the
WiFi radios are off.
Verify that the radios are turned on by pressing
the
WiFi On/Off
button.
You might be using
the wrong WiFi
credentials.
If you did not change the default SSIDs and
default WiFi passphrase, make sure that
you are connecting to
NETGEAR_11N
or
NETGEAR_11AC
and that you are using
sharedsecret
as the WiFi passphrase.
You might be too far
away from the AP.
Move closer to the AP. and try again.
You cannot
connect more
than five WiFi
clients to the AP.
The AP cannot find a
DHCP server in your
network.
Make sure that one of the AP’s LAN ports is
connected to a router in your network so that
the AP can receive a DHCP address.
You cannot access
the Internet.
Multiple possible
causes.
•
Make sure that one of the AP’s LAN ports is
connected to a router in your network.
•
Make sure that the router is connected to
your modem.
•
Make sure that your modem is connected to
the Internet outlet.
•
Make sure your Internet service provider (ISP)
is not experiencing an outage.
You cannot
access the local
browser UI after
you update
the firmware to
version 1.0.4.15.
The new firmware
did not yet fully
install.
1. Reset the AP to factory defaults by pressing
the recessed
Reset
button on the back panel
for at least 10 seconds.
2. Wait until the Power LED turns solid green.
3. Log in to the local browser UI (see
4.
Reconfigure the AP.
You might be using
the wrong admin
credentials.
If you did not yet change the default password,
enter
password
. The user name is
admin
. (You
cannot change the user name.) The user name
and password are case‑sensitive.
Характеристики

Остались вопросы?Не нашли свой ответ в руководстве или возникли другие проблемы? Задайте свой вопрос в форме ниже с подробным описанием вашей ситуации, чтобы другие люди и специалисты смогли дать на него ответ. Если вы знаете как решить проблему другого человека, пожалуйста, подскажите ему :)
