Телевизоры Sharp LC-49CFF5001E - инструкция пользователя по применению, эксплуатации и установке на русском языке. Мы надеемся, она поможет вам решить возникшие у вас вопросы при эксплуатации техники.
Если остались вопросы, задайте их в комментариях после инструкции.
"Загружаем инструкцию", означает, что нужно подождать пока файл загрузится и можно будет его читать онлайн. Некоторые инструкции очень большие и время их появления зависит от вашей скорости интернета.


15
*
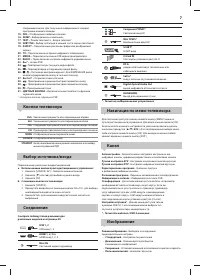
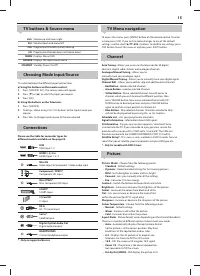
TV buttons & Source menu
Vol+
Volume up and menu right
Vol-
Volume down and menu left
CH+
Programme/Channel up and menu up
CH-
Programme/Channel down and menu down
MENU
Displays Menu/OSD
SOURCE
Displays the input source menu
STANDBY
Standby Power On/Off
Choosing Mode Input/Source
To switch between the diff erent input/connections.
a) Using the buttons on the remote control:
1.
Press [SOURCE/ AV ] - The source menu will appear.
2.
Press [
▼
] or [
▲
] to select the input you require.
3.
Press [OK].
b) Using the buttons on the Television:
1.
Press [SOURCE].
2.
Scroll up / down using CH+/ CH- buttons to the input/source you
require.
3.
Press Vol+ to change input/source to the one selected.
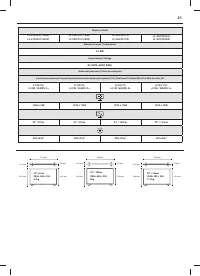
Connections
Please see the table for connector types for
diff erent models available on the page 20.
USB
USB-Input 1, 2
HDMI 1, 2, 3 in
HDMI-Input 1, 2, 3
Mini AV
Video Input & Component / Video audio input
R
G
B
Component
/
YPbPr*
Component HD Input
Mini YPbPr*
Mini Component HD Input
SCART*
SCART-Input
CI Card IN
CI input
RF In
RF / TV Aerial Input
Sat In*
Satellite Input
Digital Optical Audio Out
Digital optical output
HEADPHONES
3.5mm Headphone output
* - Only on supported devices
TV Menu navigation
To access this menu, press [MENU] button on the remote control. To enter
a menu press [OK]. If you wish to make changes to any of the default
settings, use the scroll (
▲/▼/◄/►)
buttons. To confi rm any settings press
[OK] button. To exit this menu at anytime, press [EXIT ] button.
Channel
Auto Tuning
- Allows you to retune the television for all digital
channels, digital radio stations and analogue channels.
Analogue Manual Tuning
- Allows you to
manually tune your analogue signal.
Digital Manual Tuning
- Allows you to manually tune your digital signal.
Channel Edit
- Allows you to delete, skip and add favourite channels.
–
Red Button
- delete selected channel.
–
Green Button
- rename selected channel.
–
Yellow Button
- Move selected channel. Go with cursor to
channel, which you wish to move to diff erent position, then
press YELLOW button. Now move selected channel with UP/
DOWN arrow to desired position and press YELLOW button
again to confi rm its new position in channel list.
–
Blue Button
- Skip selected channel. Channels selected to Skip
will not be displayed while pressing CH+ or CH- buttons.
Schedule List
- Lists your programme reminders.
Signal Information
- Information about DVB signal.
CI Information
- Pay per view services require a “smartcard” to be
inserted into the TV. If you subscribe to a pay per view service the
provider will issue you with a ‘CAM’ and a “smartcard”. The CAM can
then be inserted into the COMMON INTERFACE PORT (CI Card In).
Satellite Setup*
- This menu is only available in DVB-S2 mode. You can
select the type of satellite, your transponder and your LNB type, etc.
* - Only for models with DVB-S tuner
Picture
Picture Mode
- Choose from the following presets.
–
Standard
- Default settings
–
Dynamic
- Recommended settings for fast moving pictures
–
Mild
- Set to be lighter in colour and less bright
–
Personal
- Lets you manually alter all the settings
–
Eco
- Consume 15% less energy.
Contrast
- Switch the balance between black and white.
Brightness
- Increase or decrease the brightness of the picture.
Colour
- Increases the colour from black and white.
Tint
- Lets you increase or decrease the level of tint
within the picture (for NTSC signal only)
Sharpness
- Increase or decrease the sharpness of the picture.
Colour Temperature
- Choose from the following presets.
–
Normal
- Default settings
–
Warm
- Increases red within the picture
–
Cold
- Increases blue within the picture
Aspect Ratio
- Picture format varies depending on the channel/broadcast.
There are a number of diff erent options to best meet your needs.
–
Auto
- Automatically displays the best picture format.
So the picture is in the correct position. May have
black lines at the top/bottom and/or sides.
–
4:3
- Displays the 4:3 picture in its original size.
Side bars are shown to fi ll the 16:9 screen.
–
16:9
- Fills the screen with a regular 16:9 signal.
–
Zoom 1/2
- The picture is the correct proportion
but zoomed in to fi ll the screen.
–
Dot by Dot (HDMI)
- Will display the picture in its


