Телевизоры Sharp LC-43XUF8772ES - инструкция пользователя по применению, эксплуатации и установке на русском языке. Мы надеемся, она поможет вам решить возникшие у вас вопросы при эксплуатации техники.
Если остались вопросы, задайте их в комментариях после инструкции.
"Загружаем инструкцию", означает, что нужно подождать пока файл загрузится и можно будет его читать онлайн. Некоторые инструкции очень большие и время их появления зависит от вашей скорости интернета.


EN
postprocessing functions to achieve minimal input lag.
–
PC
- Optimal mode for reading text.
–
Cinema
- Movies are played at original 24/25 frames
per second, to get feel of real cinema.
–
Personal
- Lets you manually alter all the settings.
–
Eco
- Consume 15% less energy.
–
Dynamic
- Recommended settings for fast moving pictures.
Contrast
- Switch the balance between black and white.
Brightness
- Increase or decrease the brightness of the picture.
Colour
- Increases the colour from black and white.
Tint
- Lets you increase or decrease the level of tint
within the picture (for NTSC signal only).
Sharpness
- Increase or decrease the sharpness of the picture.
Backlight
- Adjust the screen's brightness by increasing/
decreasing the panel's backlighting.
Backlight Mode
- allows you to modify way how panel backlighting works.
–
Standard
- default uniformly backlit screen.
–
Scanning
- rapidly fl ashes the backlight in a sequence from
the top to the bottom of the screen to reduce motion blur.
Colour Temperature
- Choose from the following presets.
–
Normal
- Default settings.
–
Warm
- Increases red within the picture.
–
Cold
- Increases blue within the picture.
–
Personal -
Personal RGB balance from „Expert Settings“
menu. Suggested only for advanced users.
Aspect Ratio
- Picture format varies depending on the channel/broadcast.
There are a number of diff erent options to best meet your needs.
–
Auto
- Automatically displays the best picture format.
So the picture is in the correct position. May have
black lines at the top/bottom and/or sides.
–
4:3
- Displays the 4:3 picture in its original size.
Side bars are shown to fi ll the 16:9 screen.
–
16:9
- Fills the screen with a regular 16:9 signal.
–
Zoom 1/2
- The picture is the correct proportion
but zoomed in to fi ll the screen.
–
Dot by Dot (HDMI)
- Will display the picture in its
original resolution without any change.
–
Full Screen
- Stretch signal to fi ll the screen.
Expert Settings
–
Gamma
- Adjust the tones between the bright
and dark parts of the picture.
–
Red
- Adjust red tone of the picture
–
Green
- Adjust green tone of the picture
–
Blue
- Adjust blue tone of the picture
–
Noise Reduction
- Filters and reduces the
noise (interference) of the picture.
–
MPEG Noise Reduction
- Allows you to reduce visible
interference caused by MPEG compression.
–
Motion Enhancement
- Makes picture movement and
movement of objects in the picture smoother. Use Motion
Enhancement to view fast-action video more clearly.
–
Active Contrast
- Automatically optimises the ‘backlight’ and
‘contrast’ of the picture according to the brightness of the screen.
–
CMS Hue
- This is a standard to adjust the colour
either more reddish or more bluish in tone.
–
CMS Value
- A higher value makes the image brighter.
A lower value makes the image darker.
–
CMS Saturation
- Increases or decreases the
saturation of a selected colour.
SOUND
Sound Mode
- Choose from the following presets
–
Standard
- Default settings
–
Music
- Emphasises music over voices
–
Movie
- Provides live and full sound for movies
–
Personal
- Selects your personal sound settings
–
Sports
- Emphasises sound for sports
Headphones
–
HP+TV
- option to play sound from TV speakers
and headphones simultaneously.
–
Volume
- adjust volume for headphones.
Equalizer
- Adjusts the volume of diff erent sound
frequencies. The equalizer sound levels can only be adjusted
when the sound mode ‘Personal’ is selected.
Balance
- To switch the sound between the left and right speakers.
Auto Volume Level (AVL)
- When ‘on’ is selected, the volume
will stay at a constant level regardless of input/source.
DTS TruSurround
- Allows you to turn surround sound eff ect ON or OFF.
Digital Output
- This is the digital Audio output.
Choose from the following options:
–
Off
- Off
–
Auto
- Selects the best settings automatically
–
PCM
- Select this option if you are connecting to a Stereo
Hi-fi via digital cable (Pulse-code modulation (PCM) is
a digital representation of an analogue signal).
Audio Description
- Additional sound track for visually impaired.
Available only on selected DTV shows.
AD Volume
- to adjust volume of Audio Description sound track
AudioTrack
- allows you to choose diff erent audio/
language for Digital TV or media.
Audio Delay (ms)
- Enables the user to adjust sound
setting to sync picture and audio for TV speakers.
SPDIF Delay (ms)
- Enables the user to adjust sound setting to sync picture
and audio for external speakers connected via digital audio output.
NETWORK
Network Confi guration
- First you will need to select your connection
type. You can choose between either a Wi-Fi or Wire (cable) connection.
NOTE
: For connecting to the Internet with a wired connection, connect a Cat
5/Ethernet cable (not included) from the TV to your broadband modem/router.
IP Confi guration
- LAN network connection settings
–
Auto
- Will automatically connect the TV to your home network
(this is the default setting and is highly recommended)
–
Manual
- Allows you to manually change the IP,
Netmask, Gateway and DNS information.
Wi–Fi Confi guration
- Wireless network connection settings
–
Wi–Fi Auto Search
- Automatically searches for available wireless
networks. Select the desired Wi–Fi network and then enter the
network password (if network is password protected). Once
the password is accepted, you will not be asked for it again.
NOTE
: The connection process may take a few minutes, please be
patient. Every time the TV is then powered on it will automatically
connect to the network, this may also take some time.
Network Info
- Information about the network settings
Network Test
- A network connection test
SETUP
Language
- Allows you to change the language of the menu.
Audio Languages
- Allows you to change audio
language on selected DVB channels.
Subtitle Language
- Allows you to change subtitles
language on selected DVB channels.
Hearing Impaired
- If signal provides support for the hearing
impaired, the subtitles can be played by pressing the “Subtitle”. If
you set Hearing Impaired ON and switch to a channel with supports
for hearing impaired subtitles will be activated automatically.
Blue Screen
- Changes the background when there is no input between
transparent and a blue background (Only available on some sources).
PVR File System
- PVR Recording options*
–
Select disk
- Select USB port and disk partition
–
TimeShift Size
- Set size time of shift buff er.
–
Format
- You can format connected USB
Содержание
- 5 Торговые марки
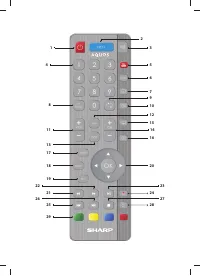
- 6 Дистанционное управление
- 8 Источники; ИЗОБРАЖЕНИЕ
- 9 СЕТЬ; НАСТРОЙКА; КАНАЛ
- 10 Телепрограмма на 7 дней
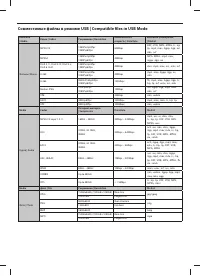
- 11 Запись одной кнопкой; MHL; Справочные технические данные
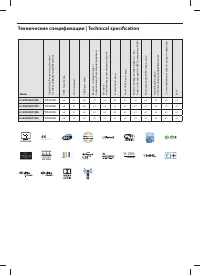
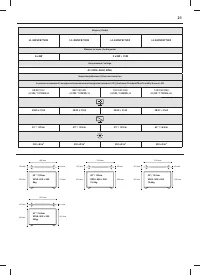
- 20 Технические спецификации | Technical specifi cation
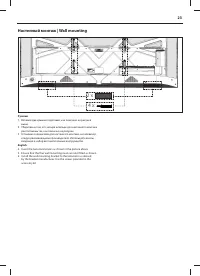
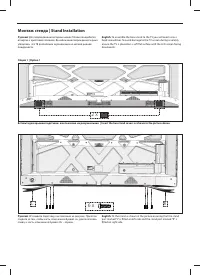
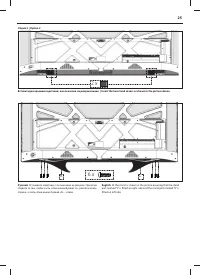
- 23 Настенный монтаж | Wall mounting
- 24 Монтаж стенда | Stand Installation


