Телескопы Bresser National Geographic 76 700 EQ - инструкция пользователя по применению, эксплуатации и установке на русском языке. Мы надеемся, она поможет вам решить возникшие у вас вопросы при эксплуатации техники.
Если остались вопросы, задайте их в комментариях после инструкции.
"Загружаем инструкцию", означает, что нужно подождать пока файл загрузится и можно будет его читать онлайн. Некоторые инструкции очень большие и время их появления зависит от вашей скорости интернета.


13
ES PL RU
DE
EN
FR NL IT
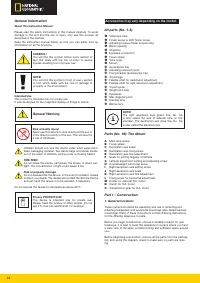
IMPORTANT!
Only secure screws finger tight.
Do not overtighten screws.
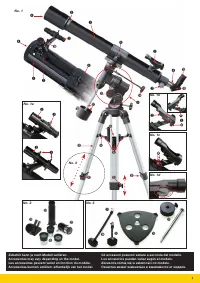
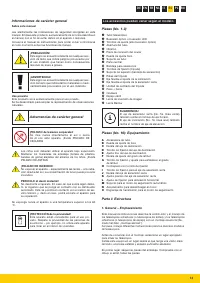
2. Tripod
The tripod legs are preinstalled and connected to the tripod head
(No. 5, X) and tripod spider (No. 1, 16).
Remove the tripod from its packaging and place it upright, with the
feet at the base. Take two of the legs and carefully pull them apart
until they are in the fully open position. The entire weight of the
tripod rests on one leg during this procedure. Then set the tripod
upright again.
Now extend each individual tripod leg to the desired length (No. 4),
and then tighten the clamping screw on each leg (No. 4, 11), until
they are all hand tight. Do not overtighten the screws. The clamping
screws serve to set the
tripod leg interior segments to the desired height.
NOTE!
The right ascension axis (green line, No. 16)
is also called the axis of sidereal time on the
meridian. The declination axis (blue line, No. 16)
is also called the elevation axis.
i
3. Mounting
Fasten the mount (No. 1, 9) to the tripod head (No. 5, X) by inserting
the mount into the tripod head from above and hand tightening the
knurled screw from below.
Prepare the mount (No. 1, 9) by putting the weight on the weight
shaft pole (No. 7, X) and securely screwing it into the mount from
below.
Then, place the tube ring (No. 1 and 3, 8) on the mount and affix it
with the screw (No. 8, X).
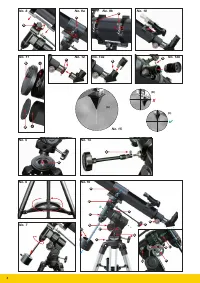
4. Accessories tray:
Insert the accessories tray (No. 1, 3 and 10) flat side down onto the
center of the tripod spider (No. 1, 16) and mount in place by turning
it clockwise 60° (No. 6). Align the three fittings of the accessories
tray with the tripod spider retaining fittings to fix the tray in place.
5. Tube:
To mount the telescope tube (No. 1, 1) onto the tripod, undo the
screw on the tube ring (No. 9, X) and open up the ring.
Then place the tube in the centre of the ring and close the ring up.
Finally, secure the mounting by tightening the screw.
Note: The main tube clamp may have two screws depending
on model (No. 9b). If so, the main tube mounting process
remains the same as described above.
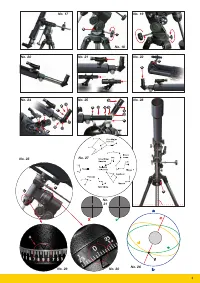
6. Inserting the eyepiece
6.1. On refracting telescopes
The eyepieces allow you to decide which magnification you want
your telescope to have.
Before you insert the eyepiece and the star diagonal prism, you must
remove the dust-protection cap from the eyepiece connection tube
(No. 1, 6).
Loosen the screw (No. 12, X) on the eyepiece connection tube and
insert the star diagonal prism. Retighten the screw (No. 12, X) on the
eyepiece connection tube.
Loosen the clamping screw (No. 13a, X) to fasten the 20 mm eye-
piece into the zenith mirror in the same way, and then retighten the
clamping screw to secure the eyepiece in place.
Make sure that the eyepiece is pointing vertically upward.
If it is not, loosen the screw (No. 12, X) on the eyepiece connection
tube and rotate the star diagonal prism into the vertical position.
6.2. On reflecting telescopes
Loosen the clamping screws on the eyepiece supports (No. 1, 6).
Insert the 20 mm eyepiece (No. 2, 18) directly into the eyepiece
supports. Hand tighten the clamping screws (No. 3b, X).
Remove the dust cap from the main tube end.
Risk of bodily injury!
Never use this device to look directly at the sun or
in the direct proximity of the sun. This will result in
a risk of blindness.
7. Assembling the finder scope/LED finder scope
Note: The LED finder scope's battery is safeguarded against
discharge with plastic foil when shipped. The foil must be
removed before first use (No. 1d).
7.1. Finder scope installation (type I)
Finder scope with threaded mounting
The finder scope and finder scope mount (No. 1a, 2) are included in
the packaging.
Remove the finder scope mount fastening screws on the main tube
(No. 1a, X), and set the mount onto the projecting screws on the tel-
escope's main tube. Carefully reinsert and tighten the screws previ-
ously removed to securely fasten the finder scope mount in place.
Now, undo the finder scope adjusting screws (No. 1a, 3) — three or
six depending on finder scope model — until the finder scope can
easily be slid into its mounting.
Important: Make sure the finder scope lens points toward the main
tube end (No. 1, 4).
Retighten the screws equally to securely fasten the finder scope in
place.
7.2. Finder scope assembly (type II)
LED finder scope with screw threading
To assemble the LED finder scope (No. 1b, 2), remove the LED
finder scope on the telescope's main tube (No. 1c, X). Set the LED
finder scope onto the projecting screws fastening screws on the
telescope's main tube. Then carefully reinsert and tighten the screws
previously removed to securely fasten the LED finder scope in place.
Important: Make sure the LED finder scope lens points towards the
main tube end (No. 1, 4).
7.3. Finder scope assembly (type III)
LED finder scope with Quick Insert
The LED finder scope (No. 1b, 2) and mount constitute a single unit.
Slide the foot of the LED finder scope completely into the appropri-
ate base on the telescope's main tube (No. 10, X). The finder scope
mount will snap in place.
Important: Make sure the LED finder scope lens points towards the
main tube end (No. 1, 4).
7.4. Finder scope assembly (type IV)
Finder scope with Quick Insert
The finder scope and its mount are preassembled and included in
the packaging.
Slide the finder scope mount foot entirely into the appropriate base
on the telescope's main tube (No. 10, X). The finder scope mount will
snap in place.
Important: Make sure the LED finder scope lens points towards the
main tube end (No. 1, 4).
There are two clamping screws (No. 1c, 3) and a spring-loaded
counter screw on the finder scope mount. Evenly tighten the clamp-
ing screws until resistance is felt to securely fasten the finder scope
in place.

