
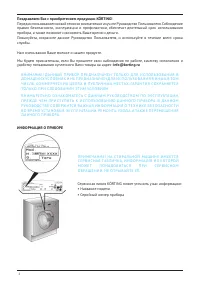
Стиральная машина Korting KWMI 1480 W - инструкция пользователя по применению, эксплуатации и установке на русском языке. Мы надеемся, она поможет вам решить возникшие у вас вопросы при эксплуатации техники.
Если остались вопросы, задайте их в комментариях после инструкции.
"Загружаем инструкцию", означает, что нужно подождать пока файл загрузится и можно будет его читать онлайн. Некоторые инструкции очень большие и время их появления зависит от вашей скорости интернета.


6
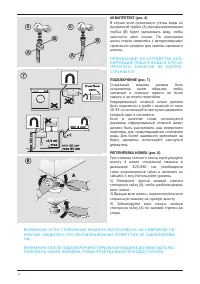
АКВАПРОТЕКТ (рис. 6)
В случае если происходит утечка воды из
внутренней трубки (А), прозрачная внешняя
трубка (В) будет удерживать воду, чтобы
закончить цикл стирки. По окончанию
цикла стирки свяжитесь с авторизованным
сервисным центром для замены заливного
шланга.
П Р И М Е Ч А Н И Е! Н А УСТ Р О Й СТ В А , Б Л О
-
К И РУ Ю Щ И Е П ОД АЧ У В ОД Ы В С Л У Ч А Е
П Р ОТ Е Ч К И, ГА РА Н Т И Я Н Е РАС П Р О
-
СТ РА Н Я Е ТС Я.
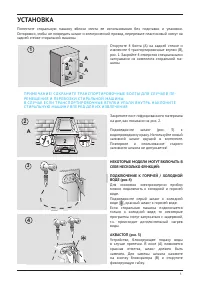
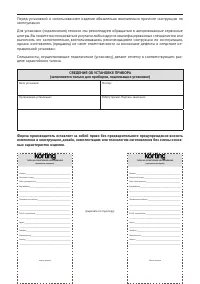
ПОДКЛЮЧЕНИЕ (рис. 7)
Стиральная
машина
должна
быть
установлена
таким
образом,
чтобы
заливные и сливные шланги не были
зажаты и не имели перегибов.
Гофрированный сливной шланг должен
быть подключен к трубе с высотой от пола
50-85 см, используйте изогнутый держатель
который идет в комплекте.
Если в качестве слива используется
раковина, гофрированный сливной шланг
должен быть расположен над отверстием
перелива, для предотвращения скопления
воды. Для более надежного крепления на
борту раковины используйте изогнутый
держатель.
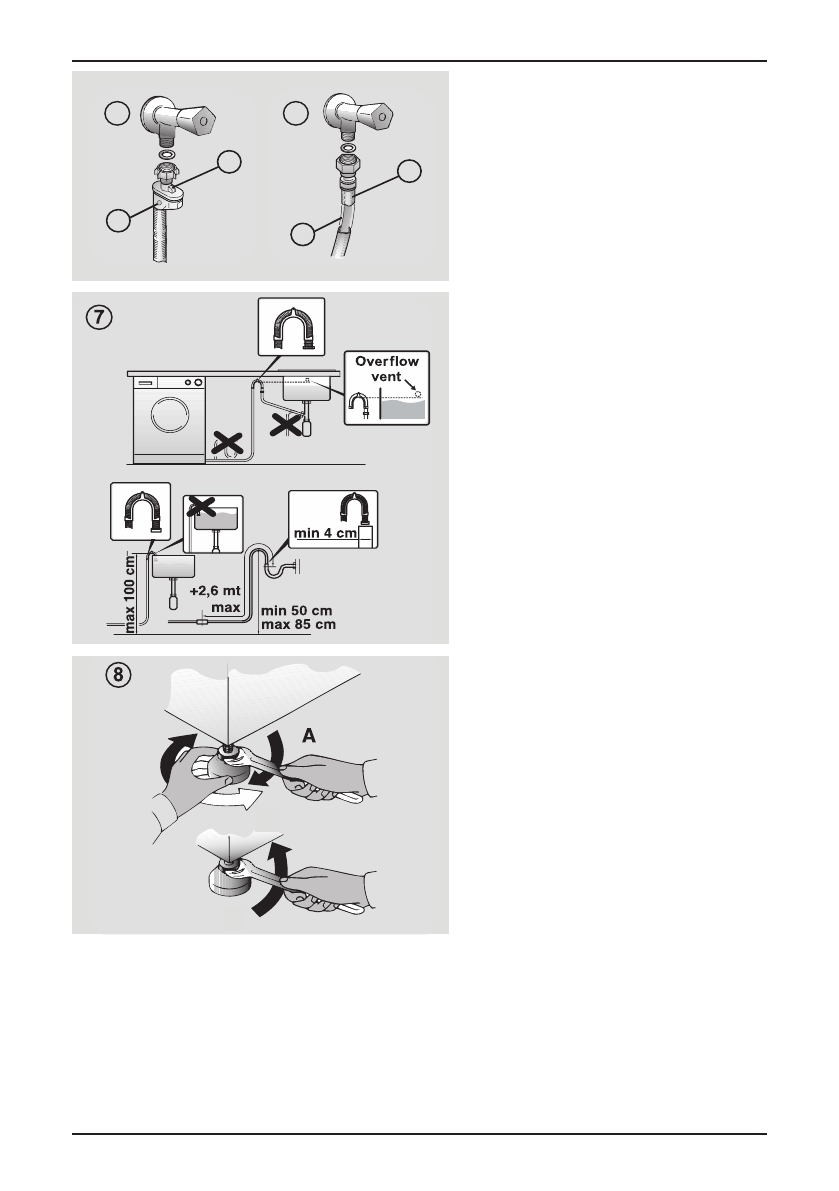
РЕГУЛИРОВКА НОЖЕК (рис. 8)
При помощи гаечного ключа отрегулируйте
высоту 4 ножек стиральной машины в
диапазоне 820-840 мм (необходимо
снять установленные гайки и заменить их
гайками 5 мм). Используйте уровень.
1) Поверните против часовой стрелки
стопорную гайку (А), чтобы разблокировать
винт ножки.
2) Вращая винт ножки , поднимите/опустите
стиральную машину на нужную высоту.
3) Заблокируйте винт ножки, затянув
стопорную гайку (А) по часовой стрелки до
упора.
В Н И М А Н И Е! Е С Л И СТ И РА Л Ь Н А Я М А Ш И Н А РАС П О Л О Ж Е Н А Н А К О В Р О В О М П О
-
К Р Ы Т И И, У Б Е Д И Т Е С Ь Ч ТО В Е Н Т И Л Я Ц И О Н Н Ы Е ОТ В Е Р СТ И Я Н Е З А Б Л О К И Р О В А
-
Н Ы.
В Н И М А Н И Е! П О С Л Е П ОД К Л Ю Ч Е Н И Я СТ И РА Л Ь Н А Я М А Ш И Н А ДО Л Ж Н А Б Ы Т Ь РАС
-
П О Л О Ж Е Н А ТА К И М О Б РА З О М, Ч ТО Б Ы Р О З Е Т К А Б Ы Л А Л Е Г К ОДО СТ У П Н О Й.
10
Level the appliance using the feet as
illustrated in
figure 8
:
a.
turn the nut clockwise to release the
screw;
b
. rotate the foot to raise or lower it until it
touches to the floor;
b.
lock the foot, screwing in the nut, until it
tightens against to the bottom of the
washing machine.
Plug in the appliance.
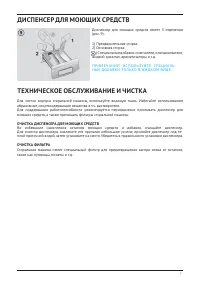
The detergent draw is split into 3
compartments as illustrated in
figure 9
:
compartment "1"
: for prewash detergent;
compartment “ ”
: for special additives,
softeners, starch fragrances, etc.;
compartment "2":
for washing detergent.
10
WARNING:
contact the Customer Service Centre
should the power cord need
replacement.
WARNING:
some detergents are hard to remove.
In this case we recommend using the
specific container to be placed in the
drum (example in figure 10).
WARNING:
only use liquid products; the washing
machine is set to automatically dose
additives at each cycle during the last
rinse.
Detergent drawer
10
Level the appliance using the feet as
illustrated in
figure 8
:
a.
turn the nut clockwise to release the
screw;
b
. rotate the foot to raise or lower it until it
touches to the floor;
b.
lock the foot, screwing in the nut, until it
tightens against to the bottom of the
washing machine.
Plug in the appliance.
The detergent draw is split into 3
compartments as illustrated in
figure 9
:
compartment "1"
: for prewash detergent;
compartment “ ”
: for special additives,
softeners, starch fragrances, etc.;
compartment "2":
for washing detergent.
10
WARNING:
contact the Customer Service Centre
should the power cord need
replacement.
WARNING:
some detergents are hard to remove.
In this case we recommend using the
specific container to be placed in the
drum (example in figure 10).
WARNING:
only use liquid products; the washing
machine is set to automatically dose
additives at each cycle during the last
rinse.
Detergent drawer
9
EN
Connect the water hose to the water
supply tap
(fig. 3)
only using the hose
supplied with the appliance (do not
reuse old hose-sets).
SOME MODELS
may include one or
more of the following features:
HOT&COLD (fig. 4):
water mains connection settings with hot
and cold water for higher energy savings.
Connect the grey tube to the cold water
tap and the red one to the hot water
tap. The machine can be connected to
the cold water tap only: in this case, some
programs may start a few minutes later.
AQUASTOP (fig. 5):
a device located on the supply tube that
stops water flow if the tube deteriorates;
in this case, a red mark will appear in the
window “
A
” and the tube must be
replaced. To unscrew the nut, press the
one-way lock device "
B
".
AQUAPROTECT – SUPPLY TUBE WITH
GUARD (fig. 6):
Should water leak from the primary
internal tube "
A
", the transparent
containment sheath "
B
" will contain water
to permit the washing cycle to complete.
At the end of the cycle, contact the
Customer Service Centre to replace the
supply tube.
The washing machine should be installed
in its final position such that the water fill
hose is not kinked or trapped. The
corrugated drain hose should be inserted
into suitable drain pipe of between 50 cm
and 85 cm height above the floor using
the curved drain hose support. If an under
sink connection is used the drain hose
must be routed above the sink overfill
opening to prevent back siphoning. Care
must be taken to avoid kinking or trapping
the drain hose
(fig. 7)
.
3
1
4
B
A
5
B
A
6
Setting
Hydraulic connections
Содержание
- 3 ОБЩИЕ РЕКОМЕНДАЦИИ
- 5 УСТАНОВКА; Detergent drawer; Setting; window “; AQUAPROTECT – SUPPLY TUBE WITH; Setting
- 7 ДИСПЕНСЕР ДЛЯ МОЮЩИХ СРЕДСТВ; ТЕХНИЧЕСКОЕ ОБСЛУЖИВАНИЕ И ЧИСТКА
- 8 CLEANING; Drawer cleaning
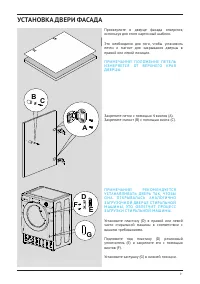
- 9 Instructions for mounting the
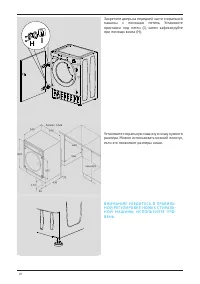
- 10 H I; in
- 11 ПОЛЕЗНЫЕ СОВЕТЫ
- 12 РЕЖИМЫ РАБОТЫ; УПРАВЛЕНИЕ И ПРОГРАММЫ; QUICK USER GUIDE; Should power go out when the washing; For any type of wash, see the program; PROGRAMS; C E; Wait until the DOOR LOCKED light has
- 13 ОТКРЫТИЕ ДВЕРИ; ПЕРЕКЛЮЧАТЕЛЬ ПРОГРАММ; ОТМЕНА / СБРОС ПРОГРАММЫ
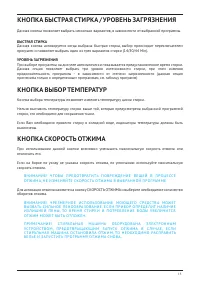
- 15 КНОПКА БЫСТРАЯ СТИРКА / УРОВЕНЬ ЗАГРЯЗНЕНИЯ; КНОПКА ВЫБОР ТЕМПЕРАТУР; КНОПКА СКОРОСТЬ ОТЖИМА
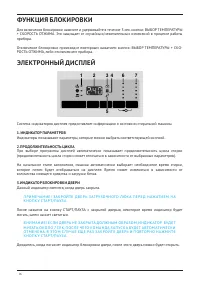
- 16 The display’s indicator system allows you to; SPIN SPEED button
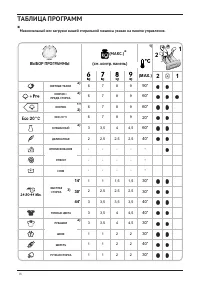
- 18 Table of programmes; ТАБЛИЦА ПРОГРАММ
- 19 ВЫБОР ПРОГРАММ; Please read these notes:
- 21 УСТРАНЕНИЕ НЕИСПРАВНОСТЕЙ
- 25 ИНФОРМАЦИЯ ОТ ПРОИЗВОДИТЕЛЯ
- 26 Сервисная поддержка
Характеристики

Остались вопросы?Не нашли свой ответ в руководстве или возникли другие проблемы? Задайте свой вопрос в форме ниже с подробным описанием вашей ситуации, чтобы другие люди и специалисты смогли дать на него ответ. Если вы знаете как решить проблему другого человека, пожалуйста, подскажите ему :)


