Соковыжималки Scarlett SC-JE50S55 200Вт - инструкция пользователя по применению, эксплуатации и установке на русском языке. Мы надеемся, она поможет вам решить возникшие у вас вопросы при эксплуатации техники.
Если остались вопросы, задайте их в комментариях после инструкции.
"Загружаем инструкцию", означает, что нужно подождать пока файл загрузится и можно будет его читать онлайн. Некоторые инструкции очень большие и время их появления зависит от вашей скорости интернета.


IM020
SC-JE50S55
6
Use the juicer for making juice from:
- Fruits: apples, oranges, pineapples, date plums, avocado, peach, mango, etc.
- Vegetables: both for hard ones (carrot, beet, cabbage, potato, batata, Canada potato), both for soft
ones (cucumber, pepper, onion, garlic), etc.
- Berries: strawberry, raspberry, pomegranate, grapes, currant, gooseberry, bilberry, etc.
- Greenery: celeriac, puppet, fennel, aloe, ginger, etc.
- Leguminosae: soybeans.
From hard and juicy fruits (carrots, greens, oranges, berries) the juice is proved to be liquid; from soft fruits
(tomatoes, pears, peaches, etc.) - the juice is proved to be puree; the consistency of apple juice depends
on its hardness.
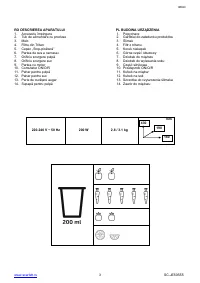
To obtain juice of maximum purity it is recommended to use the amount of the product no more than one
glass. Do not use the product more than to get juice in one glass, as this can lead to malfunction of the
device.
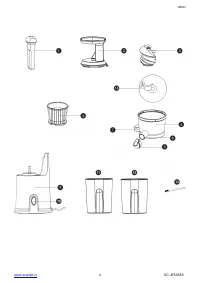
ASSEMBLY/DISASSEMBLY
DISASSEMBLY:
Disconnect the appliance from mains.
Remove the neck rotating it counter-clockwise towards the
position on the unit.
Remove the screw rotating it counter-clockwise.
Remove the filter.
After that remove the plastic housing part.
ASSEMBLY:
Before assembly, make sure that the appliance is disconnected from mains and the motor is not running.
Set the transparent plastic part to the juicer body.
Place the filter on top of the housing so that the green mark on the filter matches the green mark on the
housing.
Check that the cake plug is closed.
Then install the screw by turning it fully clockwise.
Set the neck so that the “
” mark coincides with the green mark on the top of the case, scroll to the
position at the level of the green mark
.
OPERATION
Before operation, make sure that the neck is fixed firmly.
Connect the juice extractor to mains.
Place the juice container under the juice spout. Place the cake container under the cake spout.
To switch the juice extractor on, set the ON/O/R switch into the "ON" position.
Load prepared fruits or vegetables into the juice extractor and gently press them with the pusher. NEVER
PUSH FRUITS/VEGETABLES BEING LOADED INTO EXTRACTOR WITH FINGERS OR OTHER
FOREIGN OBJECTS!
Load fruits/vegetables only when the motor is running.
ANTI-DRIP
There is an anti-drip valve on the nose of the juicer which prevents leakage of juice after the end of work.
During preparation of juice keep the anti-drip valve closed so the juice will turn out to be more saturated
and in keep more useful elements. Keep under control the juice level in the bowl to prevent leakage and
breakage of the appliance.
REVERSE
The juicer is equipped with reverse function. If the juice extractor is plugged up, set the switch to the "R"
position. The screw will start rotating in the opposite direction.
After operation, switch the appliance off and disconnect it from mains.
OFF
To switch the juice extractor off, set it into the "O" position.
When finished, disconnect the juicer from the mains.
USEFUL TIPS:
Soak carrots for 2 hours before preparing carrot juice. During long-term storage, the vegetable loses
moisture, so there will be much more juice from pre-soaked carrots.
When making apple juice add a little lemon so that it foams less.
CLEANING
Remove and wash all removable parts in warm soapy water. The filter and the bowl of Tritan (PBA free) can
be washed in a dishwasher at a temperature not exceeding 50 ° C.
Do not use steel woods, abrasive cleaners or scouring pad on appliance.
To clean the outside of the motor unit, use a damp sponge.
Never immerse the body in water.
Some vegetables, such as carrots, may cause discoloration of the plastic. Reduce this by washing parts
immediately after use with small amount of non-abrasive cleaner on a cloth, rub gently, then rinse well and
dry.
Характеристики

Остались вопросы?Не нашли свой ответ в руководстве или возникли другие проблемы? Задайте свой вопрос в форме ниже с подробным описанием вашей ситуации, чтобы другие люди и специалисты смогли дать на него ответ. Если вы знаете как решить проблему другого человека, пожалуйста, подскажите ему :)


