Соковыжималки Philips HR1931 - инструкция пользователя по применению, эксплуатации и установке на русском языке. Мы надеемся, она поможет вам решить возникшие у вас вопросы при эксплуатации техники.
Если остались вопросы, задайте их в комментариях после инструкции.
"Загружаем инструкцию", означает, что нужно подождать пока файл загрузится и можно будет его читать онлайн. Некоторые инструкции очень большие и время их появления зависит от вашей скорости интернета.


9
ENGLISH
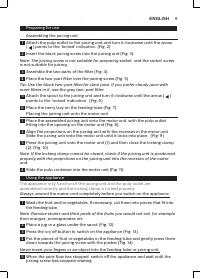
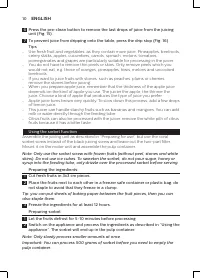
Preparing for use
Assembling the juicing unit
1
Attach the pulp outlet to the juicing unit and turn it clockwise until the arrow
( ) points to the ‘locked’ indication. (Fig. 2)
2
Insert the black juicing screw into the juicing unit (Fig. 3).
Note: The juicing screw is not suitable for preparing sorbet, and the sorbet screw
is not suitable for juicing.
3
Assemble the two parts of the filter (Fig. 4).
4
Place the two-part filter over the juicing screw (Fig. 5).
Tip: Use the black two-part filter for clear juice. If you prefer cloudy juice with
more fibres in it, use the grey two-part filter.
5
Attach the spout to the juicing unit and turn it clockwise until the arrow ( )
points to the ‘locked’ indication. (Fig. 6)
6
Place the berry tray on the feeding tube (Fig. 7).
Placing the juicing unit onto the motor unit
1
Place the assembled juicing unit onto the motor unit, with the pulp outlet
fitting into the opening on the motor unit (Fig. 8).
2
Align the projections on the juicing unit with the recesses in the motor unit.
Slide the juicing unit onto the motor unit until it locks into place. (Fig. 9)
3
Press the juicing unit onto the motor unit (1) and then close the locking clamp
(2). (Fig. 10)
Note: If the locking clamp cannot be closed, check if the juicing unit is positioned
properly with the projections on the juicing unit into the recesses of the motor
unit.
4
Slide the pulp container into the motor unit (Fig. 11).
Using the appliance
The appliance only functions if the juicing unit and the pulp outlet are
assembled correctly and the locking clamp is locked properly.
Always unwind the mains cord completely before you switch on the appliance.
1
Wash the fruit and/or vegetables. If necessary, cut them into pieces that fit into
the feeding tube.
Note: Remove stones and thick peels of the fruits you would not eat, for example
from oranges, pomegranates etc.
2
Place a jug or a glass under the spout (Fig. 12).
3
Press the on/off button to switch on the appliance (Fig. 13).
4
Put the pieces of fruit or vegetables in the feeding tube and gently press them
down towards the juicing screw with the pusher (Fig. 14).
Never insert your fingers or an object into the feeding tube or juicing unit.
5
When the juice flow has stopped, switch off the appliance and wait until the
juicing screw has stopped rotating.
Содержание
- 46 РУССКИЙ; Введение; A Блок соковыжималки; Важная информация; Не помещайте блок электродвигателя в воду или любую другую; Предупреждение; Перед подключением прибора убедитесь, что указанное на нём
- 48 Встроенный блокиратор безопасности; электромагнитных полей.; Перед первым использованием; не предназначен для приготовления сока.
- 49 Установка блока соковыжималки на блок электродвигателя; необходимости разрежьте на части.; Советы; удалите из них косточки.
- 50 несколько капель лимонного сока.; Использование функции приготовления сорбета; присоедините контейнер для мякоти.; Подготовка ингредиентов; Нарежьте свежие фрукты на кусочки размером 3 x 3 см.; Приготовление сорбета; контейнер для мякоти.; Разборка и очистка блока соковыжималки
- 51 Хранение; Проблема


