
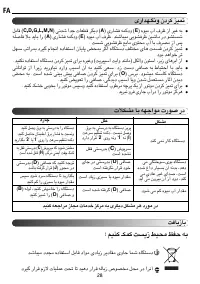
Соковыжималки Moulinex 1200W JU655H30 - инструкция пользователя по применению, эксплуатации и установке на русском языке. Мы надеемся, она поможет вам решить возникшие у вас вопросы при эксплуатации техники.
Если остались вопросы, задайте их в комментариях после инструкции.
"Загружаем инструкцию", означает, что нужно подождать пока файл загрузится и можно будет его читать онлайн. Некоторые инструкции очень большие и время их появления зависит от вашей скорости интернета.


4
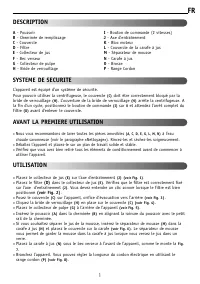
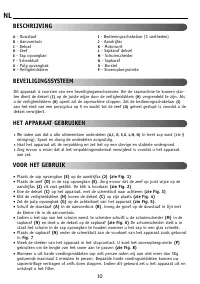
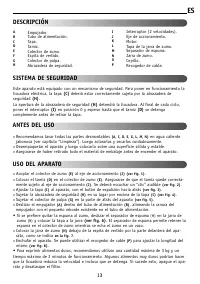
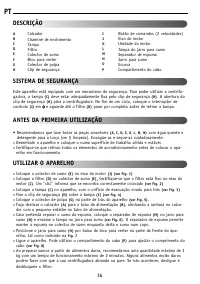
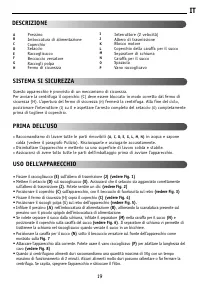
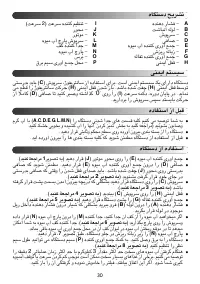
DESCRIPTION
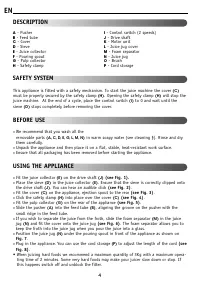
SAFETY SYSTEM
BEFORE USE
USING THE APPLIANCE
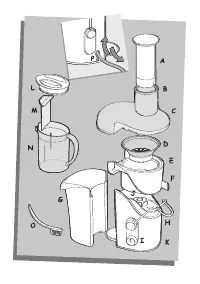
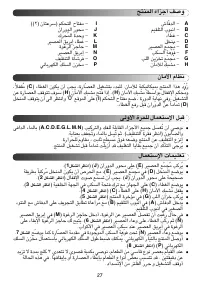
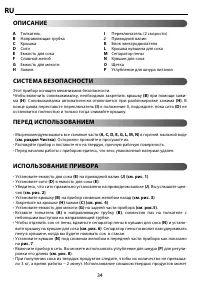
A
- Pusher
B
- Feed tube
C
- Cover
D
- Sieve
E
- Juice collector
F
- Pouring spout
G
- Pulp collector
H
- Safety clamp
I
- Control switch (2 speeds)
J
- Drive shaft
K
- Motor unit
L
- Juice jug cover
M
- Foam separator
N
- Juice jug
O
- Brush
P
- Cord storage
EN
This appliance is fitted with a safety mechanism. To start the juice machine the cover
(C)
must be properly secured by the safety clamp
(H)
. Opening the safety clamp
(H)
will stop the
juice machine. At the end of a cycle, place the control switch
(I)
to 0 and wait until the
sieve
(D)
stops completely before removing the cover.
•
We recommend that you wash all the
removable parts
(A, C, D, E, G, L, M, N)
in warm soapy water (see cleaning §). Rinse and dry
them carefully.
•
Unpack the appliance and then place it on a flat, stable, heat-resistant work surface.
•
Ensure that all packaging has been removed before starting the appliance.
•
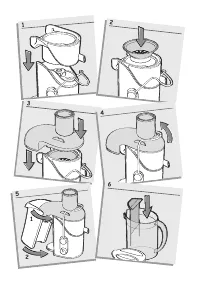
Fit the juice collector
(E)
on the drive shaft
(J)
(see Fig. 1).
•
Place the sieve
(D)
in the juice collector
(E)
. Ensure that the sieve is correctly clipped onto
the drive shaft
(J)
. You can hear an audible click
(see Fig. 2)
.
•
Fit the cover
(C)
on the appliance, ejection spout to the rear
(see Fig. 3)
.
•
Click the safety clamp
(H)
into place over the cover
(C)
(see Fig. 4)
.
•
Fit the pulp collector
(G)
on the rear of the appliance
(see Fig. 5)
.
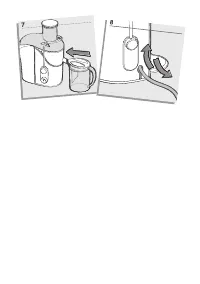
•
Slide the pusher
(A)
into the feed tube
(B)
, aligning the groove on the pusher with the
small ridge in the feed tube.
•
If you wish to separate the juice from the froth, slide the foam separator
(M)
in the juice
jug
(N)
and fit the cover onto the juice jug
(see Fig. 6)
. The foam separator allows you to
keep the froth into the juice jug when you pour the juice into a glass.
•
Position the juice jug
(N)
under the pouring spout in front of the appliance as shown on
Fig. 7
.
•
Plug in the appliance. You can use the cord storage
(P)
to adjust the length of the cord
(see
Fig. 8)
.
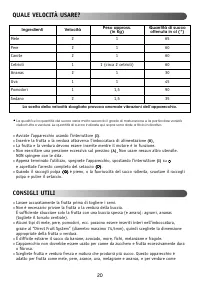
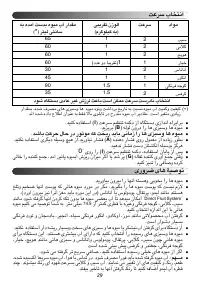
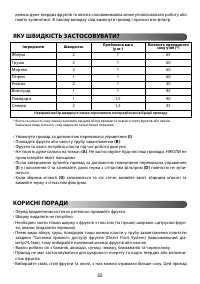
• When juicing hard foods we recommend a maximum quantity of 3Kg with a maximum opera-
ting time of 2 minutes. Some very hard foods may make your juicer slow down or stop. If
this happens switch off and unblock the filter.


