
Смесители Smeg MTS15-CR - инструкция пользователя по применению, эксплуатации и установке на русском языке. Мы надеемся, она поможет вам решить возникшие у вас вопросы при эксплуатации техники.
Если остались вопросы, задайте их в комментариях после инструкции.
"Загружаем инструкцию", означает, что нужно подождать пока файл загрузится и можно будет его читать онлайн. Некоторые инструкции очень большие и время их появления зависит от вашей скорости интернета.


7
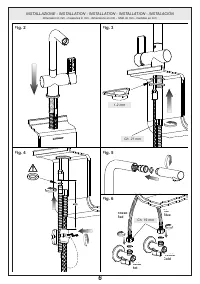
INSTALLAZIONE
Prima di inserire il monocomando nel foro del lavello assicurarsi che la guarnizione di base sia ben
posizionata nella propria sede e che i flessibili di alimentazione siano ben avvitati al corpo del rubinetto.
Sistemare il monocomando sul foro del lavello orientando la bocca di erogazione verso la vasca del
lavello. Inserire quindi il kit di fissaggio nella sequenza indicata e rispettivamente:
· la guarnizione sagomata e la flangia nel caso si installi il monocomando su un lavello di spessore 3-4
cm;
· la guarnizione sagomata, la flangia triangolare in plastica e la flangia nel caso si installi il monocomando
su un lavello in acciaio inox di spessore 1-2 mm.
Serrare a fondo l’apposito tirante o dado filettato.
Collegare il flessibile al tubetto di uscita interponendo la guarnizione di tenuta.
Fissare il contrappeso di piombo sul tubo del flessibile ad una distanza di 400 mm dall’attacco del
tubetto di uscita.
Avvitare la doccetta al tubo flessibile interponendo la guarnizione di tenuta e verificare che il flessibile
scorra in maniera lineare.
Procedere al collegamento dei flessibili alla rete di alimentazione.
INSTALLATION
Before inserting the single lever group in the hole of the sink, make sure that the base gasket is properly
positioned in its seat and that the flexible hoses are well tightened to the body of the tap.
Place the single lever group in the hole of the sink, orienting the spout toward the sink tank. Insert the
fixing kit with the indicated sequence, and respectively:
· the shaped gasket and flange in case the single lever group is installed on a sink having thickness of
3-4 cm;
· the shaped gasket, the triangular plastic flange and the flange in case of a stainless steel sink having
thickness of 1-2 mm.
Tighten well the tie rod or the threaded nut.
Connect the flexible hose to the outlet pipe interposing the gasket.
Fix the lead counterweight to the flexible hose at a distance of approx. 400 mm from the connection to
the outlet pipe.
Tighten the shower to the hose interposing the gasket and confirm the hose can slide smoothly through
the passage hole.
Proceed connecting the flexible hoses to the plumbing.
INSTALLATION
Avant d’insérer le monocommande dans le trou de l’évier, il faut s’assurer que le joint de base est bien
placé dans son emplacement et que les flexibles d’alimentation sont bien vissés au corps du robinet.
Il faut placer le monocommande sur le trou de l’évier en orientant la bouche de distribution vers le bac
de l’évier. Insérer donc le kit de fixage dans la séquence indiquée et respectivement:
· le joint façonné et la bride si on installe le monocommande sur un évier d’une épaisseur de 3-4 cm;
· le joint façonné, la bride triangulaire en plastique et la bride dans le cas d’un évier en acier inox d’une
épaisseur de 1-2 mm.
Serrer à fond le tirant ou l’écrou fileté.
Il faut relier le flexible au tuyau de sortie en interposant le joint d’étanchéité.
Il faut fixer le contrepoids de plomb sur le tuyau du flexible à une distance de 400 mm du raccord du
tuyau de sortie.
Il faut visser la douchette au tuyau flexible en interposant le joint d’étanchéité et il faut vérifier que le
flexible glisse de façon linéaire.
Procéder à la liaison des flexibles au réseau d’alimentation.
INSTALLATION
Bevor Sie die Einhebel-Mischbatterie in die Bohrung des Spülbeckens einführen, vergewissern Sie
sich, dass die Basisdichtung perfekt in ihrem Sitz positioniert ist und das die Versorgungsschläuche
gut am Armaturenkörper festgeschraubt sind.
INSTALLAZIONE - INSTALLATION - INSTALLATION - INSTALLATION - INSTALACIÓN
Характеристики

Остались вопросы?Не нашли свой ответ в руководстве или возникли другие проблемы? Задайте свой вопрос в форме ниже с подробным описанием вашей ситуации, чтобы другие люди и специалисты смогли дать на него ответ. Если вы знаете как решить проблему другого человека, пожалуйста, подскажите ему :)


