
Смесители Smeg MF4 - инструкция пользователя по применению, эксплуатации и установке на русском языке. Мы надеемся, она поможет вам решить возникшие у вас вопросы при эксплуатации техники.
Если остались вопросы, задайте их в комментариях после инструкции.
"Загружаем инструкцию", означает, что нужно подождать пока файл загрузится и можно будет его читать онлайн. Некоторые инструкции очень большие и время их появления зависит от вашей скорости интернета.
ISTRUZIONI DI MONTAGGIO, D’USO E MANUTENZIONE
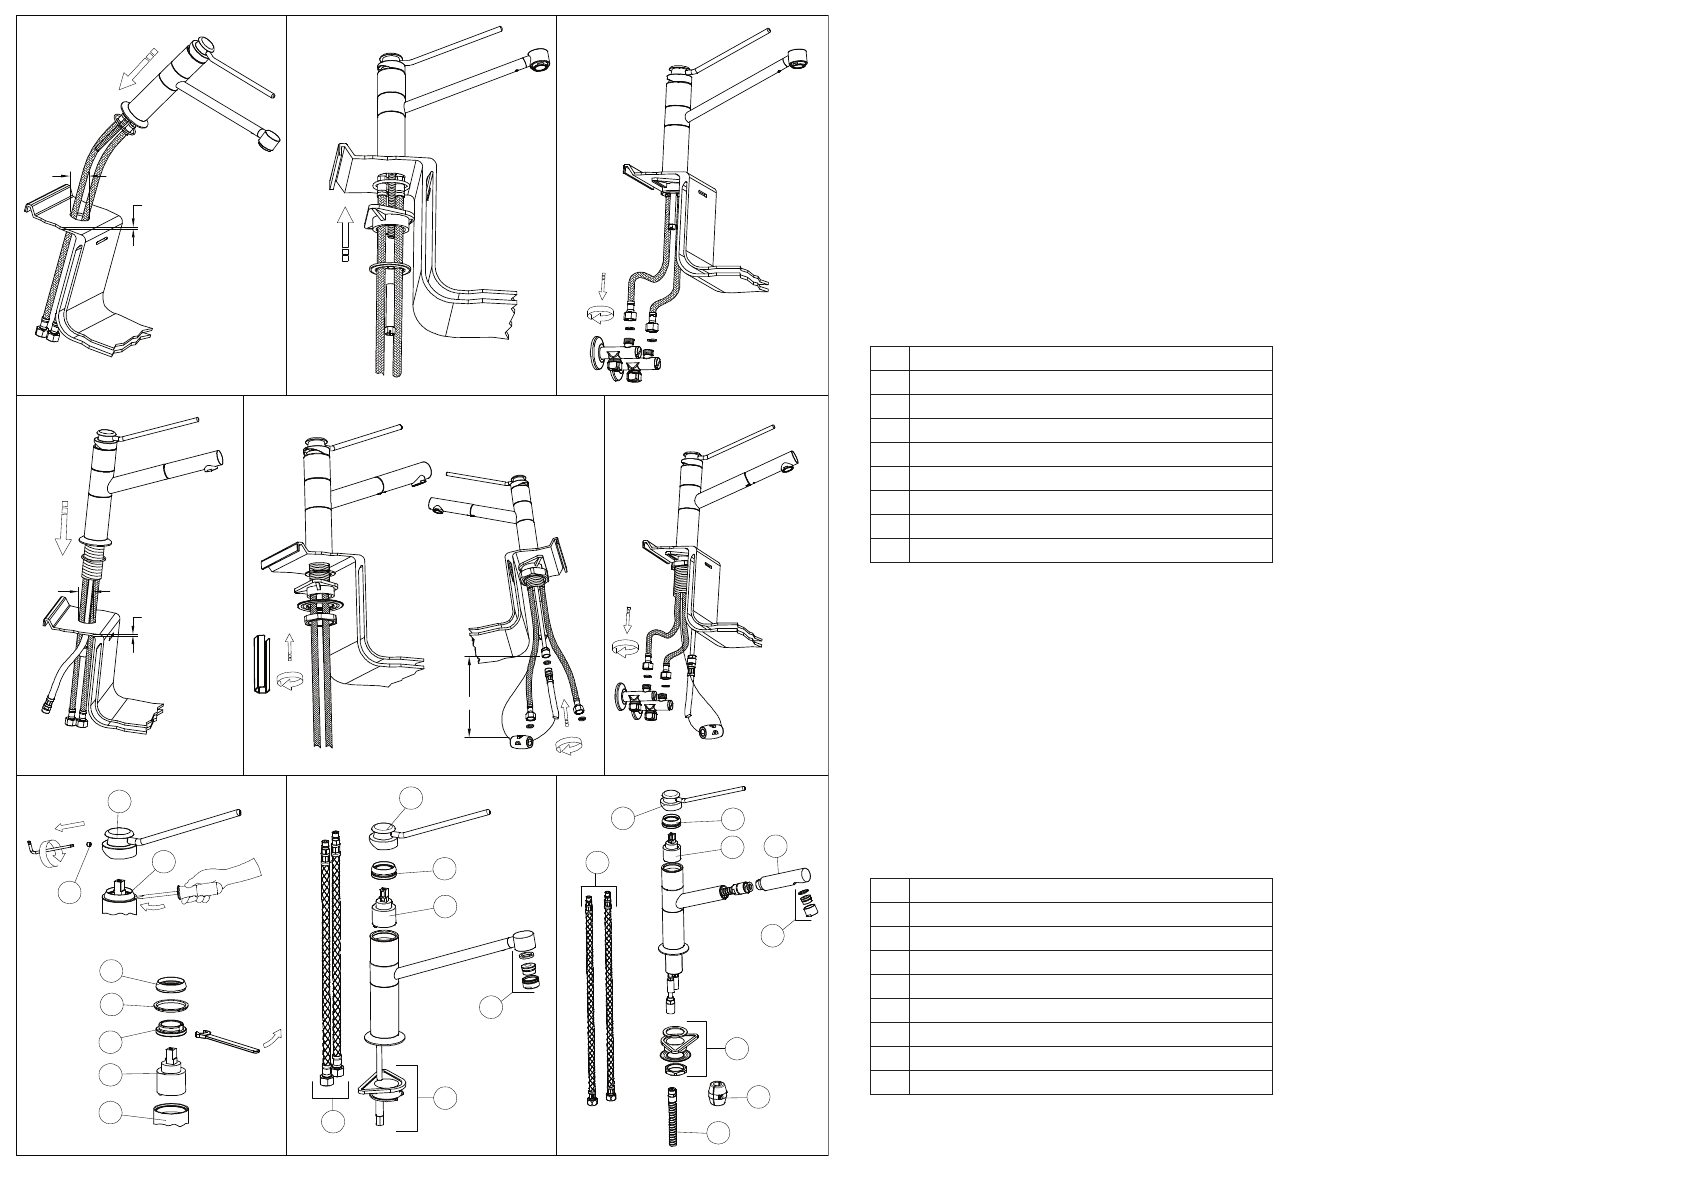
Fig. 1 -
Prima di inserire il monocomando nel foro del lavello assicurarsi che la O-ring sia ben posizionata nella propria sede e che i
flessibili di alimentazione siano ben avvitati al corpo del rubinetto. Sistemare il monocomando sul foro del lavello orientando la bocca
di erogazione verso la vasca del lavello.
Fig. 2 -
Inserire quindi il kit di fissaggio nella sequenza indicata e rispettivamente:
· la guarnizione sagomata e la flangia nel caso si installi il monocomando su un lavello di spessore 3-4 cm;
· la guarnizione sagomata, la flangia triangolare in plastica e la flangia nel caso si installi il monocomando su un lavello in acciaio
inox di spessore 1-2 mm.
Serrare a fondo l’apposito tirante o dado filetta
to.
Nel caso il rubinetto sia un monocomando con doccetta estraibile collegare il
flessibile al tubetto di uscita interponendo la guarnizione di tenuta. Fissare il contrappeso di piombo sul tubo del flessibile ad una
distanza di 40 cm dall’attacco del tubetto di uscita e avvitare la doccetta al tubo flessibile interponendo la guarnizione di tenuta e
verificare che il flessibile scorra in maniera lineare.
Fig. 3 -
Per i rubinetti girevoli allentare la vite della boccola sul corpo ed inserire la canna fino a battuta. Fissare di nuovo la vite in
modo da assicurare la canna nella sua sede. Procedere al collegamento dei flessibili alla rete di alimentazione.
Fig. 4 - SOSTITUZIONE DELLA CARTUCCIA
Prima di sostituire la cartuccia, accertarsi che il raccordo dell’acqua sia chiuso. Svitare la vite di fissaggio (A) utilizzando una chiave
a brugola, estrarre quindi la maniglia (B) sfilandola dalla cartuccia (F). Sollevare la ghiera copricartuccia (C) facendo leva ( come in
figura) tramite l’apposita scanalatura di riferimento. Allontanare l’anello indicatore (D), svitare la ghiera di fissaggio (E) e togliere la
cartuccia (F) dal corpo del miscelatore (G). Infine introdurre la nuova cartuccia, accertandosi che le due spine di centraggio siano
nella loro sede e che le guarnizioni siano correttamente posizionate.
Fig. 5-6 -
PARTI DI RICAMBIO
1
Maniglia completa
2
Ghiera di fissaggio
3
Cartuccia
4
Aeratore
5
Set di fissaggio
6
Flessibili di alimentazione
7
Doccetta
8
Peso in piombo
9
Flessibile dalla doccetta
DIRECTIONS FOR ASSEMBLY, USE AND MAINTENANCE
Fig. 1 -
Before inserting the single lever group in the hole of the sink, make sure that the base O-ring is properly positioned in its seat
and that the flexible hoses are well tightened to the body of the tap. Place the single lever group in the hole of the sink, orienting the
spout toward the sink tank.
Fig. 2 -
Insert the fixing kit with the indicated sequence, and respectively: the shaped gasket and flange in case the single lever
group is installed on a sink having thickness of 3-4 cm; the shaped gasket, the triangular plastic flange and the flange in case of a
stainless steel sink having thickness of 1-2 mm. Tighten well the tie rod or the threaded nut. In case the tap is a single lever group
with extractable shower, connect the flexible hose to the outlet pipe interposing the gasket. Fix the lead counterweight to the flexible
hose at a distance of approx. 40 cm from the connection to the outlet pipe. Tighten the shower to the hose interposing the gasket and
confirm the hose can slide smoothly through the passage hole
Fig. 3 -
Loose the screw of the bush on the body and introduce the tube till the beating. Fix the screw again in order to assure that
the tube is in its seat.
Proceed connecting the flexible hoses to the plumbing.
Fig. 4 -
Before carrying out this operation make sure that the water supply is turned off. Remove the screw (A) by using a 2.5 mm
allen key. Then lift the handle (B) from the mixer body. Lift the ring (C), the painted ring (D) and unscrew the nut (E). Extract the
cartridge (F) from the tap body (G). Before inserting the new cartridge clean the inside making sure that there are no impurities or
limescale. Finally, insert the new cartridge, taking care that the two centering pins are in their seals and that the gaskets are correctly
positioned.
Fig. 5-6 -
SPARE PARTS
1
Complete lever
2
Metal ring
3
Cratridge
4
Aerator
5
Fastening set
6
Supply hoses
7
Hand shower
8
Lead counterweight
9
Handshower flexible hose
Fig. 1
Fig. 2
Fig. 3
Fig. 1
Fig. 4
Fig. 5
40max
Ø33.5
F
Ch. 28mm
Ch. 11mm
Ch. 19mm
Ø33.5
40max
Fig. 6
Fig. 2
Fig. 3
A
B
D
C
C
E
G
Ch. 19mm
2
1
3
6
5
4
5
1
6
3
2
7
9
8
4
Ch. 45mm
40 cm
dimensioni in mm - measures in mm - dimensions en mm - Maß im mm - medidas en milímetros
Характеристики

Остались вопросы?Не нашли свой ответ в руководстве или возникли другие проблемы? Задайте свой вопрос в форме ниже с подробным описанием вашей ситуации, чтобы другие люди и специалисты смогли дать на него ответ. Если вы знаете как решить проблему другого человека, пожалуйста, подскажите ему :)


