Singer Brilliance 6199 - Инструкция по эксплуатации
Швейная машина Singer Brilliance 6199 - инструкция пользователя по применению, эксплуатации и установке на русском языке. Мы надеемся, она поможет вам решить возникшие у вас вопросы при эксплуатации техники.
Если остались дополнительные вопросы — свяжитесь с нами через контактную форму.


Содержание:
- Страница 3 – СОДЕРЖАНИЕ
- Страница 4 – ЧАСТИ
- Страница 5 – ПРИНАДЛЕЖНОСТИ
- Страница 7 – PRESSER FOOT LIFTER; DARNING PLATE
- Страница 8 – CONVERTING TO FREE-ARM SEWING; УСТАНОВКА
- Страница 10 – Tige de localisation; Locating groove
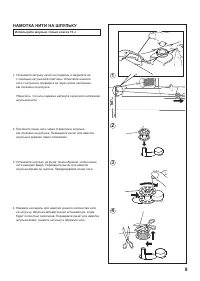
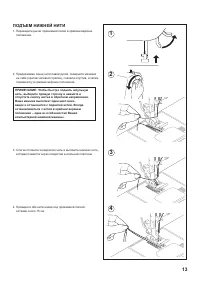
- Страница 13 – PICKING UP BOBBIN THREAD; ПОДЪЕМ
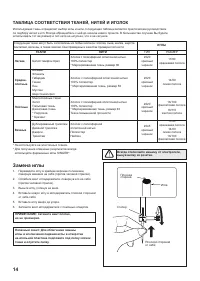
- Страница 14 – Changing the needle; NEEDLE, THREAD AND FABRIC CHART; Замена
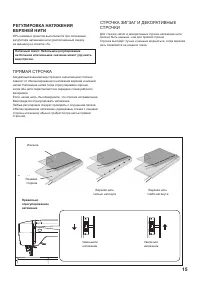
- Страница 15 – Under side; Côté de dessous; Reverso; Côté de dessus; Cara; Well balanced; Bien équilibrer; Bien equilibrada; Top stitch too tight; Fil supérieur trop tendu; P u n t a d a s u p e r i o r; Fil supérieur trop lâche; Increase tension; Augmenter la tension; Aumentar tensión; Diminuer la tension; Disminuir tensión
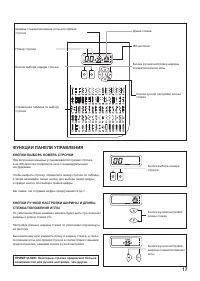
- Страница 17 – FUNCTIONS OF CONTROL PANEL; PATTERN NUMBER SELECTION BUTTONS; ФУНКЦИИ
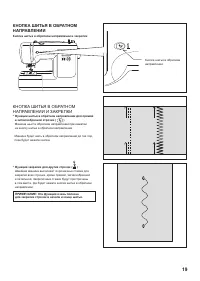
- Страница 19 – REVERSE OPERATION BUTTON; Dual purpose reverse/tacking stitch button; КНОПКА
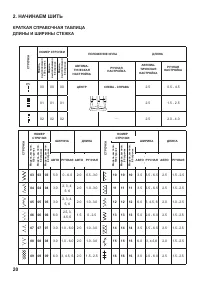
- Страница 20 – COMMENCEZ À COUDRE; CUADRO DE REFERENCIA RÁPIDA DE LARGO Y; TABLEAU DE RÉFÉRENCE RAPIDE DES LONGUEURS ET; НАЧИНАЕМ
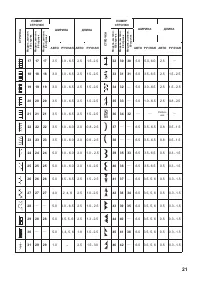
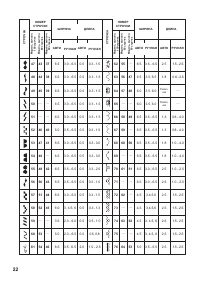
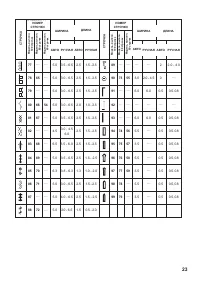
- Страница 21 – PUNT; PUNT; Varied
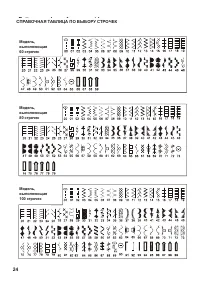
- Страница 24 – Pattern number reference guide; Guide de référence du numéro des motifs; Guía de referencia del número de puntada; 0 stitch model; Modèle 80 points; Modelo 80 puntadas; Modèle 60 points; Modelo 60 puntadas; СПРАВОЧНАЯ
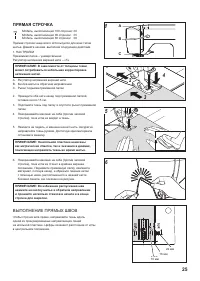
- Страница 25 – ВЫПОЛНЕНИЕ
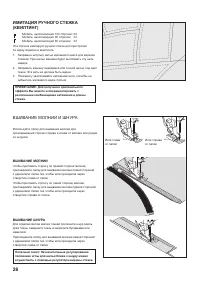
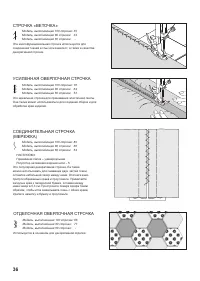
- Страница 26 – INSERTING ZIPPERS AND PIPING; ВШИВАНИЕ; ИМИТАЦИЯ
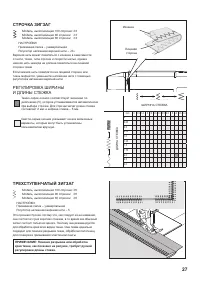
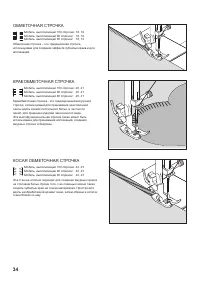
- Страница 27 – СТРОЧКА; РЕГУЛИРОВКА; ТРЕХСТУПЕНЧАТЫЙ
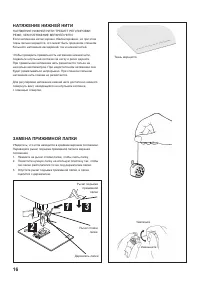
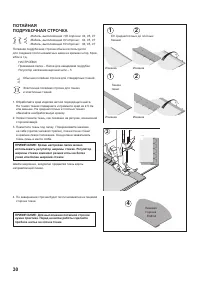
- Страница 30 – BLINDHEM STITCH; Settings : Presser foot - Blind stitch foot; ПОТАЙНАЯ
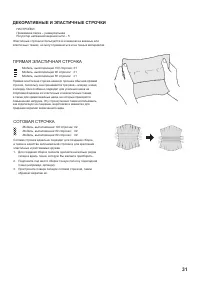
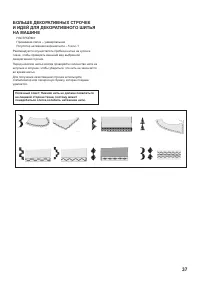
- Страница 31 – ДЕКОРАТИВНЫЕ
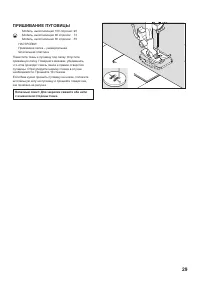
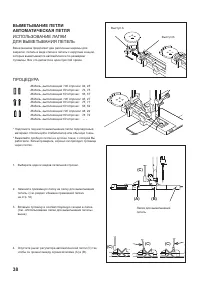
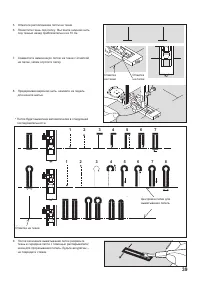
- Страница 38 – Tab A; Languette A; Lengüeta A; Languette B; Lengüeta B; ВЫМЕТЫВАНИЕ; Buttonhole foot; Pied boutonnière; Prensatelas de ojales
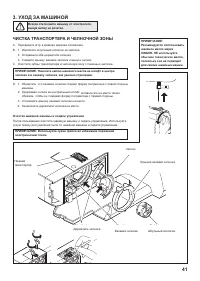
- Страница 41 – ЧИСТКА; Griffes
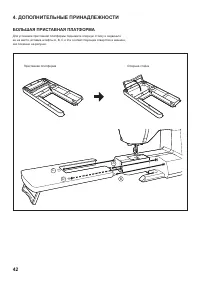
- Страница 42 – БОЛЬШАЯ; Extension table; Grand Plateau de Rallonge; Base de extensión; Supporting leg; Pied de support; Pata de soporte
ИНСТРУКЦИЯ
ПО
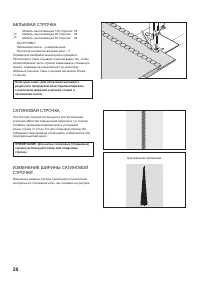
ЭКСПЛУАТАЦИИ
6199/6180/6160
"Загрузка инструкции" означает, что нужно подождать пока файл загрузится и можно будет его читать онлайн. Некоторые инструкции очень большие и время их появления зависит от вашей скорости интернета.
Была ли эта инструкция полезной?
Об этой инструкции
- Бренд
- Singer
- Модель
- Brilliance 6199
- Тип документа
- Инструкция по эксплуатации
- Категория
- Швейная машина
- Язык(и)
- Русский
- Страницы
- 44
- Размер файла
- 3,4 MB
- Формат
Краткое содержание
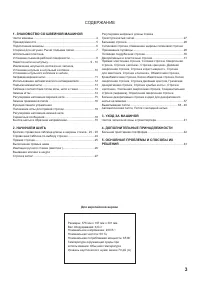
3 СОДЕРЖАНИЕ 1. ЗНАКОМСТВО СО ШВЕЙНОЙ МАШИНОЙ Части машины .............................................................................4 Принадлежности .........................................................................5 Подключение машины ........................................................
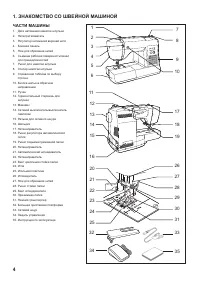
4 2 1 3 4 5 6 7 8 12 14 13 11 21 22 20 23 24 25 27 10 29 31 30 15 16 26 17 18 19 33 34 35 9 28 32 1. ЗНАКОМСТВО СО ШВЕЙНОЙ МАШИНОЙ ЧАСТИ МАШИНЫ 1. Диск натяжения намотки шпульки 2. Нитепритягиватель 3. Регулятор натяжения верхней нити 4. Боковая панель 5. Нож для обрезания нитей 6. Съемная рабочая п...
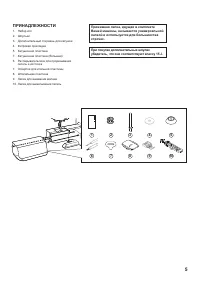
5 Прижимная лапка , идущая в комплекте Вашей машины , называется универсальной лапкой и используется для большинства строчек . При покупке дополнительных шпулек убедитесь , что они соответствуют классу 15 J. ПРИНАДЛЕЖНОСТИ 1. Набор игл 2. Шпульки 3. Дополнительный стержень для катушки 4. Фетровая пр...
Задать вопрос
Похожие инструкции
Популярные швейные машины Singer
Ещё модели: швейные машины Singer
 Singer 3210 Инструкция по эксплуатации
 Singer 4423 Инструкция по эксплуатации
 Singer 7463 Инструкция по эксплуатации
 Singer 7465 Инструкция по эксплуатации
- Singer Brilliance 6160 Инструкция по эксплуатации
 Singer Brilliance 6180 Инструкция по эксплуатации
 Singer Confidence 7463 Инструкция по эксплуатации
 Singer Confidence 7465 Инструкция по эксплуатации
 Singer Confidence 7467 Инструкция по эксплуатации
- Singer Confidence 7469 Инструкция по эксплуатации
 Singer Confidence 7470 Инструкция по эксплуатации
 Singer Confidence 7640 Инструкция по эксплуатации
 Singer CONFIDENCE 7640Q Инструкция по эксплуатации
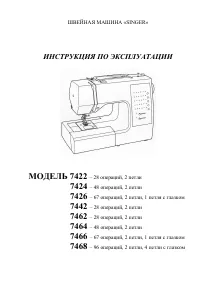 Singer Cosmo 7422 Инструкция по эксплуатации
- Singer Cosmo 7466 Инструкция по эксплуатации
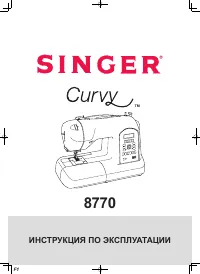 Singer Curvy 8770 Инструкция по эксплуатации
 Singer FASHION MATE 3333 Инструкция по эксплуатации
 Singer Fashion Mate 3342 Инструкция по эксплуатации