
Шуруповерты STATUS SD-550 2220701 - инструкция пользователя по применению, эксплуатации и установке на русском языке. Мы надеемся, она поможет вам решить возникшие у вас вопросы при эксплуатации техники.
Если остались вопросы, задайте их в комментариях после инструкции.
"Загружаем инструкцию", означает, что нужно подождать пока файл загрузится и можно будет его читать онлайн. Некоторые инструкции очень большие и время их появления зависит от вашей скорости интернета.


5
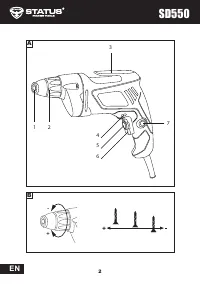
TOOL PARTS OVERVIEW
OPERATION
EN
TOOL PARTS OVERVIEW
OPERATION
Fit the screw on the point of the bit and place the point of the screw on the surface of the
work piece to be fastened. Apply pressure to the machine and start it. Withdraw the tool as
soon as the clutch cuts in. Then release the switch trigger.
Apply constant pressure on the power tool until the screw has been driven in completely.
This is especially important when driving in self-tapping screws with large thread step in
plasterboard because such screws are driven in very fast.
Change the bit when it becomes blunt to achieve efficiency and quality. Unwind and clean
the thread of the adjustment collar in case it starts to move with effort.
SWITCHING ON/OFF
Before plugging in the power tool, always check to see that the switch trigger [6] actuates
properly and returns to the “OFF” position when released.
•
To start the tool, simply press the switch trigger. This tool is equipped with a claw
coupling. The spindle does not start to rotate until the screw is pushed into workpiece.
•
The tool can be operated at different speeds. They are adjusted by speed controller on
the switch [5]. Hold the screwdriver in normal operation position, and turn the variable
speed controller clockwise to increase the speed and torque of the tool. Turn anti-
clockwise to decrease the speed and torque.
•
For continuous operation, press the switch trigger [6] and then push in the lock-on
button [7].
•
Release the switch trigger to stop.
REVERSING
•
Move the reversing button [4] to the <= position for clockwise rotation or the =>
position for anti-clockwise rotation.
INSERTING AND REMOVING BITS
Inserting
: Place the bit into the socket [1]and press until the bit is fixed.
Removing
: Rotate the screwing adjusting collar [2] until it reach maximum screwing depth
and pull out the bit. Use pincers if necessary.
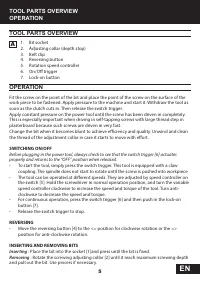
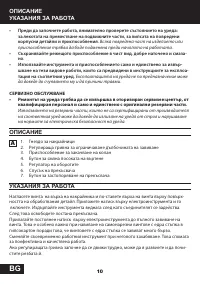
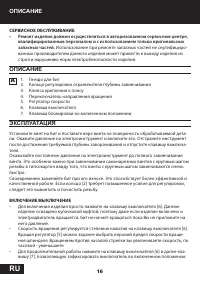
1. Bit socket
2. Adjusting collar (depth stop)
3. Belt clip
4. Reversing button
5. Rotation speed controller
6. On/Off trigger
7. Lock-on button
A


