
Шуруповерты STATUS C16PRLi 07125101 - инструкция пользователя по применению, эксплуатации и установке на русском языке. Мы надеемся, она поможет вам решить возникшие у вас вопросы при эксплуатации техники.
Если остались вопросы, задайте их в комментариях после инструкции.
"Загружаем инструкцию", означает, что нужно подождать пока файл загрузится и можно будет его читать онлайн. Некоторые инструкции очень большие и время их появления зависит от вашей скорости интернета.


6
7
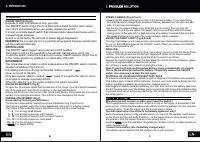
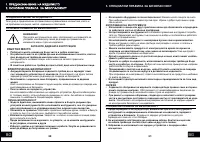
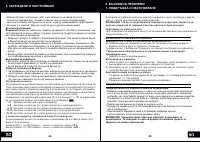
FUNCTIONAL DESCRIPTION
A
B
1. Keyless chuck
2. Torque adjustment ring
3. Two-speed gear control
4. Work light
5. Power trigger
1. Red light
2. Green light
6. Forward/reverse switch
7. Battery pack
CHARGING PROCEDURE
4. Do not operate charger if it has received a sharp blow, been dropped, or otherwise
damaged in any way; take it to a qualified serviceman.
5. Do not disassemble charger or battery cartridge;
take it to a qualified serviceman
when service or repair is required. Incorrect reassembly may result in a risk of electric
shock or fire.
6. To reduce risk of electric shock, unplug charger from outlet before attempting any
maintenance or cleaning.
Turning off controls will not reduce this risk.
8. If operating time has become excessively shorter, stop operating immediately.
It may result in a risk of overheating, possible burns and even an explosion.
9. If electrolyte gets into your eyes, rinse them out with clear water and seek medical
attention right away.
It may result in loss of your eyesight.
Additional precautions
1. Do not charge battery cartridge when temperature is below 10°c or above 40°c.
2. Do not attempt to use a step-up transformer, an engine generator or dc power
receptacle.
3. Do not allow anything to cover or clog the charger vents.
4. Always protect the battery terminals when the battery cartridge is not used.
5. Do not short the battery cartridge.
6. Do not touch the terminals with any conductive material.
7. Avoid storing battery cartridge in a container with other metal objects such as nails,
coins, etc.
8. Do not expose battery cartridge to water or rain.
9. Do not store the tool and battery cartridge in locations where the temperature may
reach or exceed 50°c.
10. Do not incinerate the battery cartridge even if it is severely damaged or is completely
worn out. The battery cartridge can explode in a fire.
11. Be careful not to drop, shake or strike battery.
12. Do not charge inside a box or container of any kind. The battery must be placed in a
well ventilated area during charging.
1. CHARGING THE BATTERY
•
To the Li-Ion battery installed in the machine. Do not use another battery charger.
•
The Li-Ion battery is protected against deep discharging. When the battery is empty,
the machine is switched off by means of a protective circuit: the chuck no longer
rotates.
•
In a warm environment or after heavy use, the battery pack may become too hot.
Allow time for the battery to cool down before recharging.
•
When the battery is charged for the first time and after prolonged storage, the battery
will only accept approximately 60% charge. However, after several charge and
discharge cycles the battery will accept a 100% charge.
Important notes for charging the battery
The battery in your new tool is not charged when it leaves the plant.
Therefore it must be charged for 1 - 1,5 hours before using the first time!
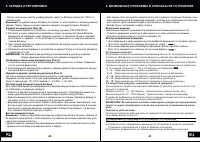
2. IMPORTANT NOTES CHARGING THE BATTERY (Fig.B)
-
Press buttons on battery pack and slide it out of drill’s handle.
-
Insert charger’s plug into a suitable power socket.
-
F
Then insert charging output interface into battery charging port ( ig.B).
P
F B
The charger LED will turn red ( os.1 on ig. ).
-
- 1,5
The battery will require 1
hours charging time after normal use.
-
(1)
(2)
When the red
light turns into a green
light, said the battery pack is fully charged.
-
Disconnect charger from power socket and from battery pack.
WARNING!
When battery charge runs out after continuously use or exposure to
direct sunlight or heat, allow time for the battery to cool down before recharging to
achieve the fully charge. Lithium batteries stored for 3 months requires to charge
and discharge one time, it should be fully charged to save.
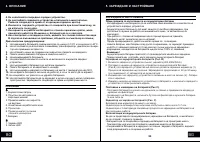
3.TO REMOVE OR INSTALL THE BATTERY PACK
(Fig.C)
Press the button on the end of the battery and remove the battery from the drill handle.
Remove and insert the battery with a little effort.
Check the reliability of fixing the battery in the handle of the drill.
4.BATTERY LEVEL CONTROL (Fig.C)
Press the button on the end of the battery.
Three LEDs are burning - the level of charge is 100%.
Two LEDs are burning - the level of charge is 60-70%.
LED is on - charge level is 25-30%.
One


